How-to: Using and setting up new Outlook add-ins for Exact Globe+
Introduction
Exact Globe+ supports Microsoft Outlook web add-ins for Office 365 users connected to Exchange Online. The new Outlook provides a unified experience across Windows, web, and mobile. COM add-ins and VBA are no longer supported.
Prerequisites
To use the new Microsoft Outlook web add-ins, the following conditions must be met:
-
Enable the new Outlook setting (top-right corner) to activate Outlook add-ins,
-
The email address used must be configured in Exchange Online at Corporate level. You can do this at System > General > Settings > E-mail settings.
-
Use Chromium browser v79+ with cookies enabled.
-
Supports Windows Authentication and Federated Identity, including multi-factor authentication (MFA). For more information, see Getting started with Microsoft Entra ID in Exact Globe+.
-
Set up Microsoft Outlook add-ins for Exact Globe+. The steps are explained below in this document.
Using Microsoft Outlook web add-ins
Accessing Exact Globe+ in new Outlook
-
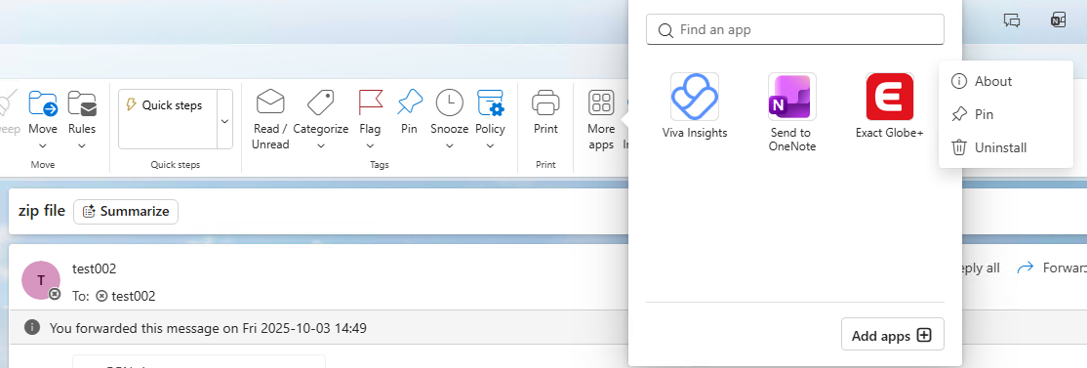
In new Outlook, click the More Apps ribbon.
-
Locate Exact Globe+ in the list.
-
Right-click on Exact Globe+ to view the three available options.
When you click the Exact Globe Add-in icon for the first time, a popup dialog will be shown to complete the initial setup.
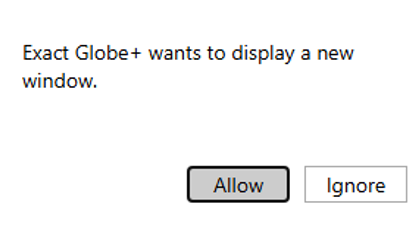
When you click Allow, a login dialog appears (for Federated Identity only).
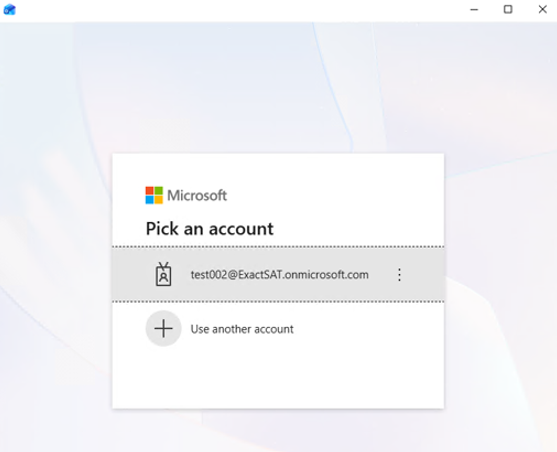
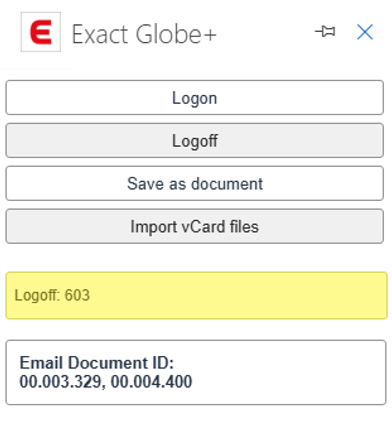
When the Exact Globe+ add-in task pane opens for the first time, you will see four available options:
-
Logon – Sign in to your Exact Globe+ account.
-
Logoff – Sign out from the add-in.
-
Save as Document – Save the current email as a document in Exact Globe+.
-
Import vCard Files – Import vCard files into Exact Globe+.
Logon and Logoff
When you click Logon, the Exact Globe+ screen will be launched.
Simple Mode
- Displays a list of companies.
- Shows the login user name (field is disabled).
Advanced Mode
The Advanced mode displays additional fields:
The following message will be shown when you click Logoff:
Save as document
You can save emails as documents in Exact Globe+.
Note: Meeting appointments are not supported.
Changes:
-
In new Outlook, the Email Document ID is now displayed in the task pane.
-
In classic Outlook, the Document ID was shown in the email title and email body.
Import vCard files
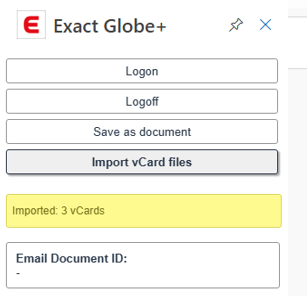
When you import an email with multiple vCards, the following message will be shown:
Setting up Microsoft Outlook web add-ins
To set up the functionality successfully, you must complete the following steps:
-
Set up Microsoft Entra ID. If your Exact Globe+ application uses federated identity, see Getting started with Microsoft Entra ID in Exact Globe+.
-
Configure permissions for email synchronisation for Exchange Online. For more information, see How to: Using Exchange Online with OAuth to synchronise emails.
-
Use the OfficeAddinConfigurator.exe tool to generate files for the installation and Federated identity for Office add-ins.
-
Set up Microsoft Office add-ins.
-
Deploy Microsoft Office add-ins.
Setting up Microsoft Entra ID
The following steps are applicable if your Exact Globe+ application uses federated identity (with or without MFA). For more information, see Getting started with Microsoft Entra ID in Exact Globe+.
Prerequisites
-
Log in to the correct Azure tenant for Exact Globe+. Ensure this is the same Azure tenant used for Exchange Online.
-
Use a Microsoft 365 account with permissions to register applications in the Azure portal.
Web application
-
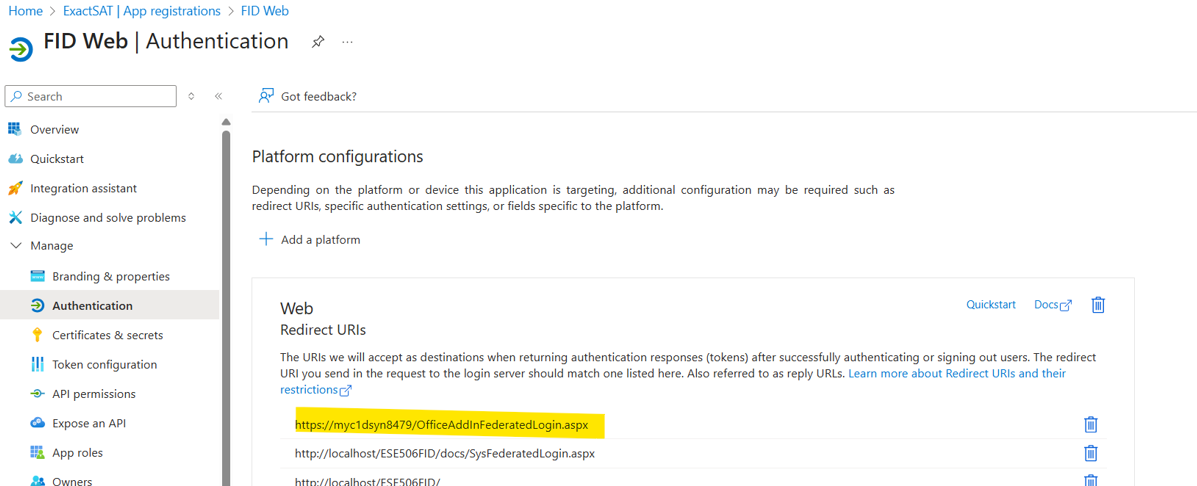
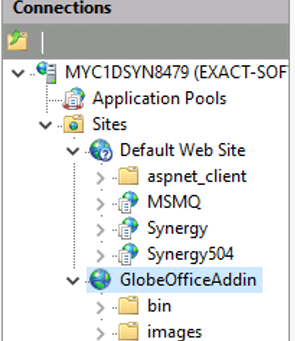
Enter Redirect URIs for the Office Add-ins website. The following is a sample when a web site is created in IIS.
-
If the Office Add-ins are hosted under an application, ensure the URL includes the application name. For example: https://MYC1DSYN8479/GlobeOfficeAddIn/OfficeAddInFederatedLogin.aspx
-
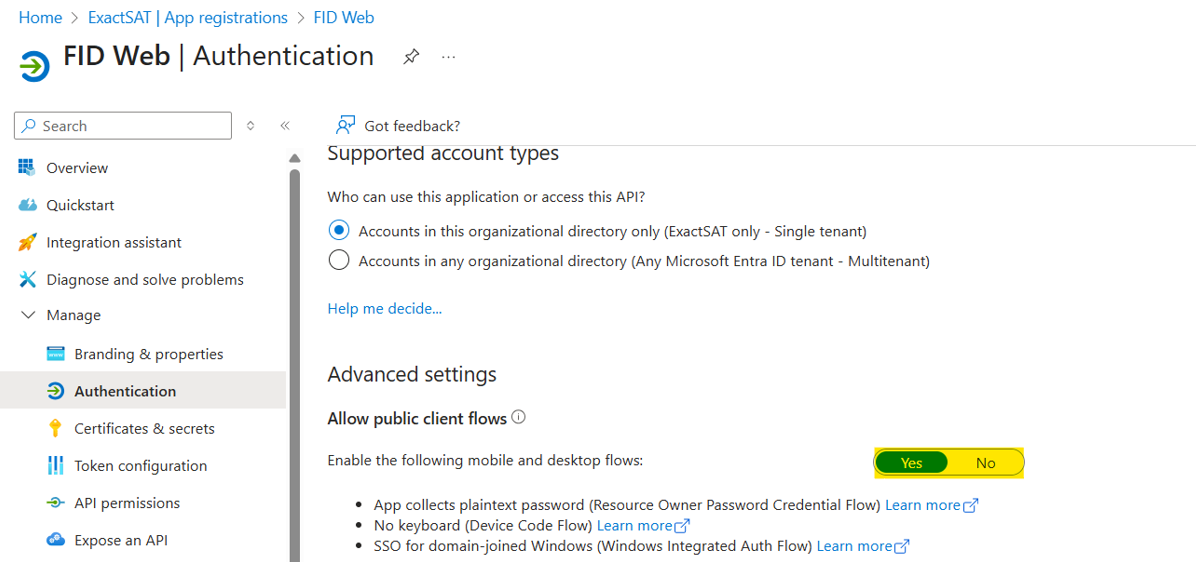
Enable mobile and desktop flows.
-
Add a client secret.
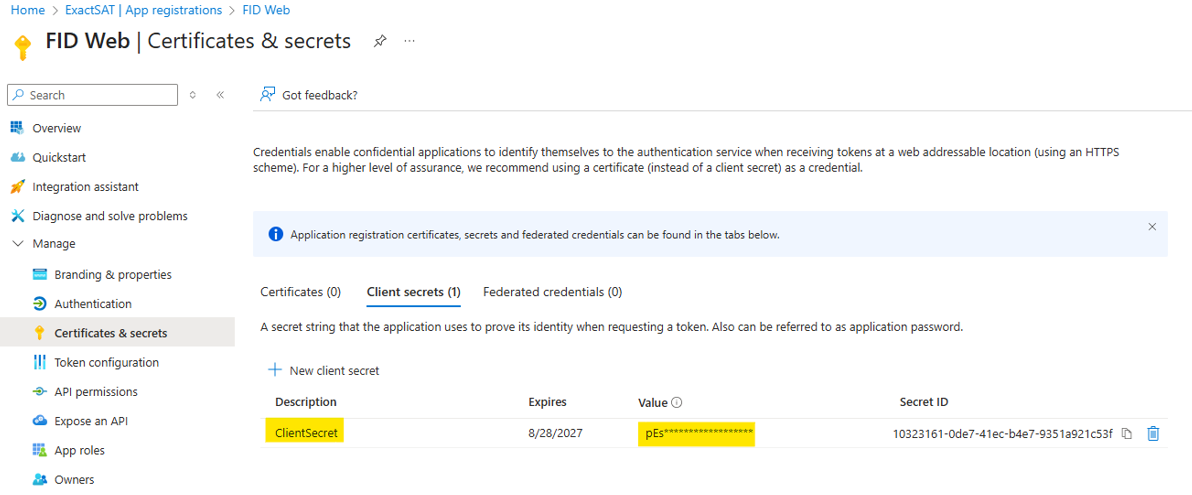 Note: This is the Client ID for the Web Application.
-
Configure required API permissions.
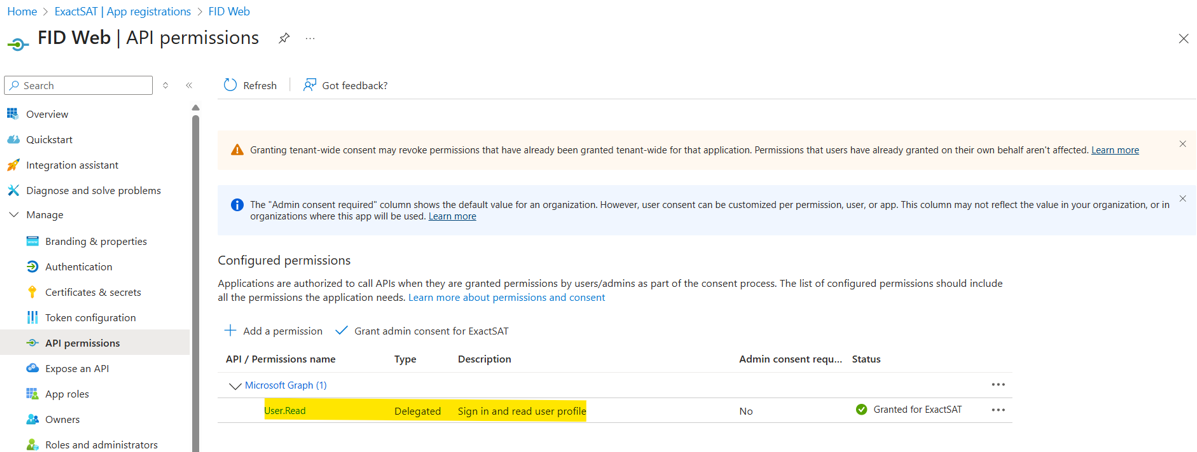
-
Set up API exposure as needed.
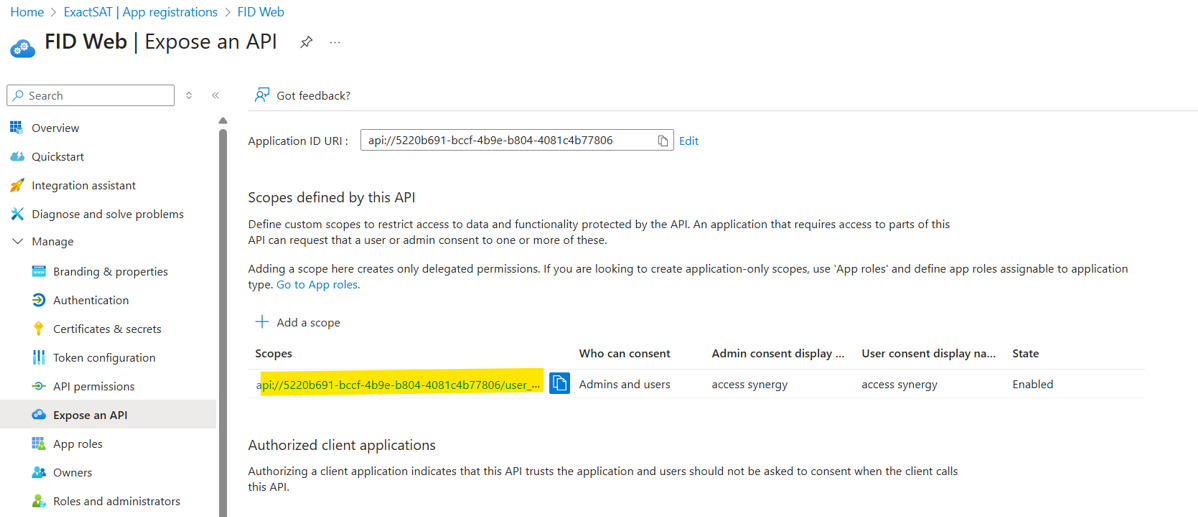
Native application
-
In the Authentication section, add the "urn:ietf:wg:oauth:2.0:oob" URL as highlighted in the image.
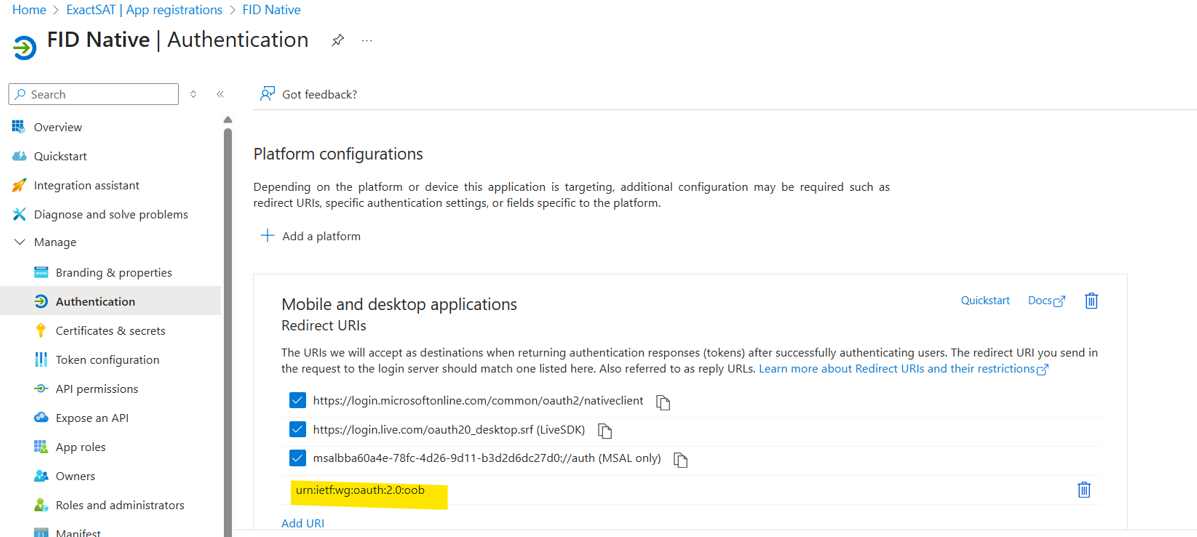
-
In the Advanced settings section, enable the public client flows.
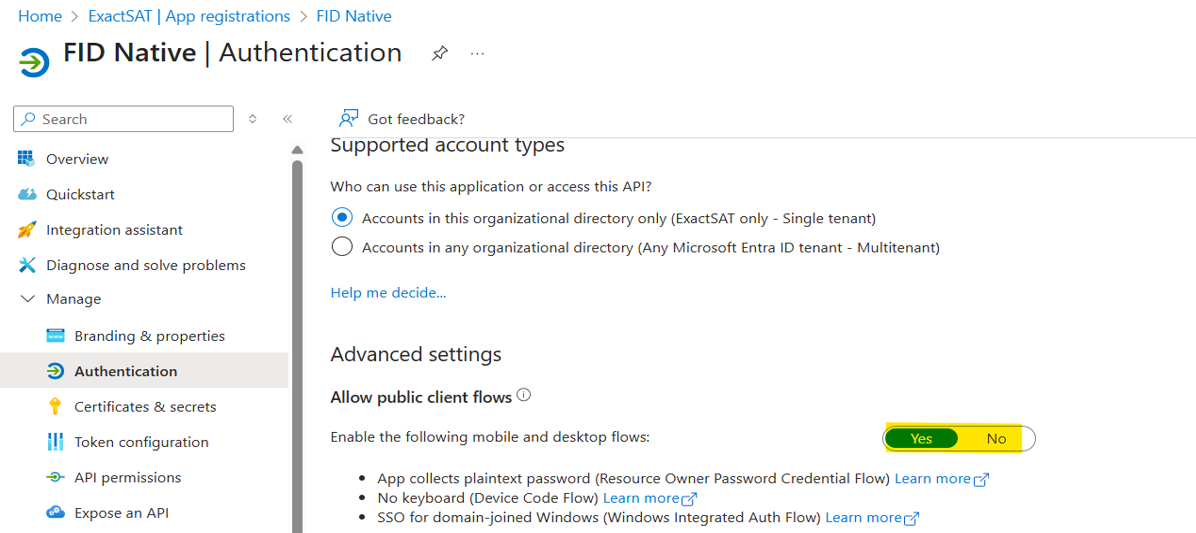
-
In the API permissions section, add the new user “user_impersonation”.
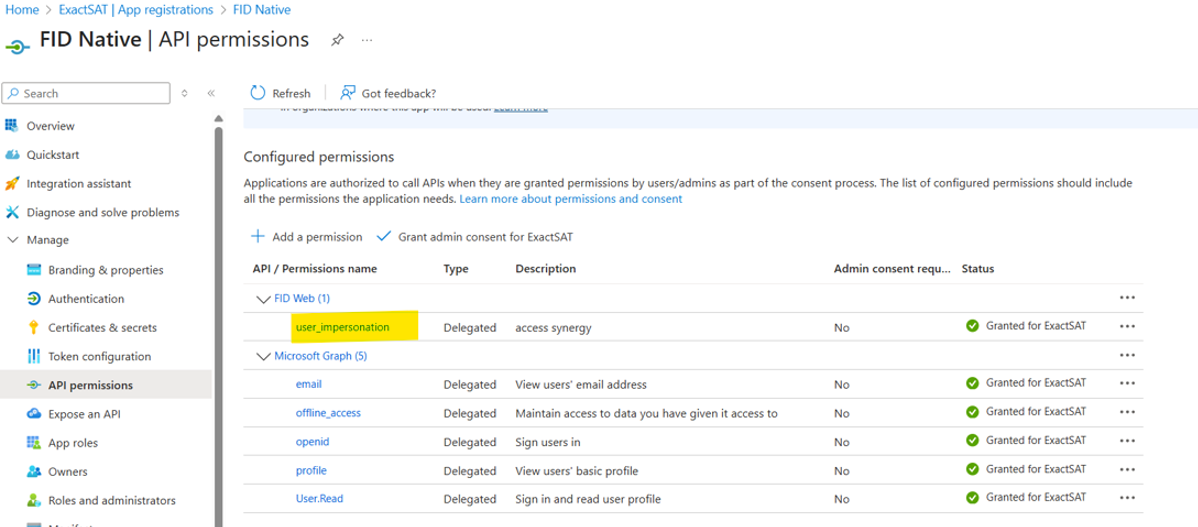
-
Set up API exposure as needed.
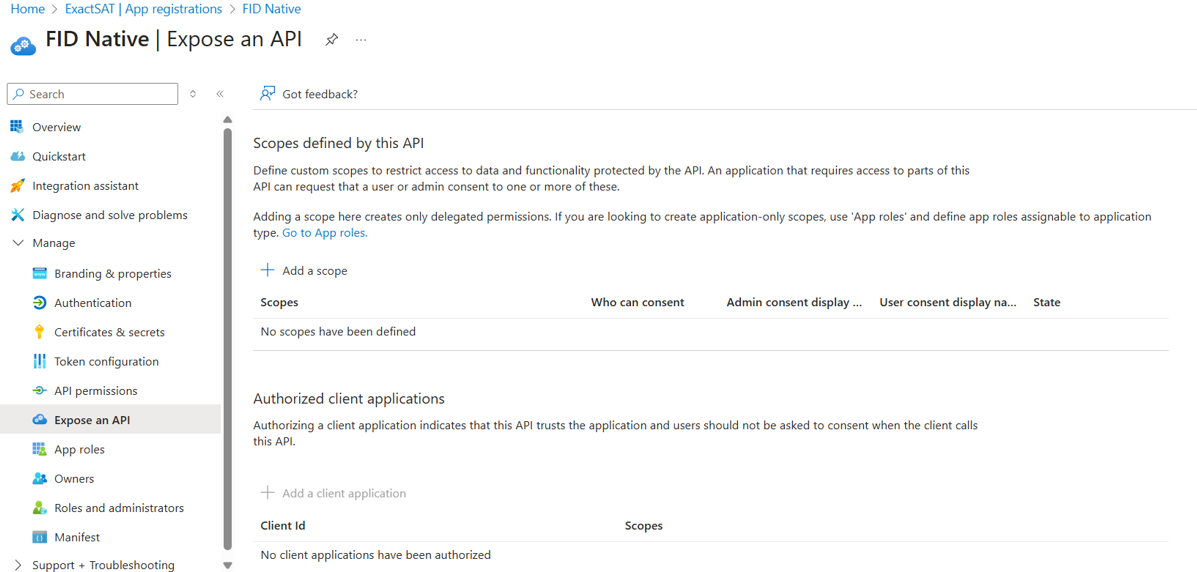
Configure permissions for email synchronisation for Microsoft Exchange Online
To allow the email synchronisation between Exact Globe+ and Microsoft Outlook, add the following permissions in Exchange Online.
Make sure that you use an account that has permissions to register application in the Azure portal using Microsoft 365 account.
Use the OfficeAddinConfigurator.exe tool to generate files for the installation and Federated identity for Office add-ins
OfficeAddinConfigurator.exe is a standalone tool in the Exact Globe+ BIN folder. It generates two essential files:
-
OfficeWebAddInIdentity.config
- Location: Globe+ BIN folder
- Purpose: Supports Federated Identity for the Office Add-ins website.
-
ExactOutlookWebAddIn.xml
- Location: Globe+ installation folder
- Purpose: Serves as the installation file for Office Add-ins.
The tool requires read and write access to the installed folders of Exact Globe+. It is recommended to run the tool with Administrator role to ensure proper functionality.
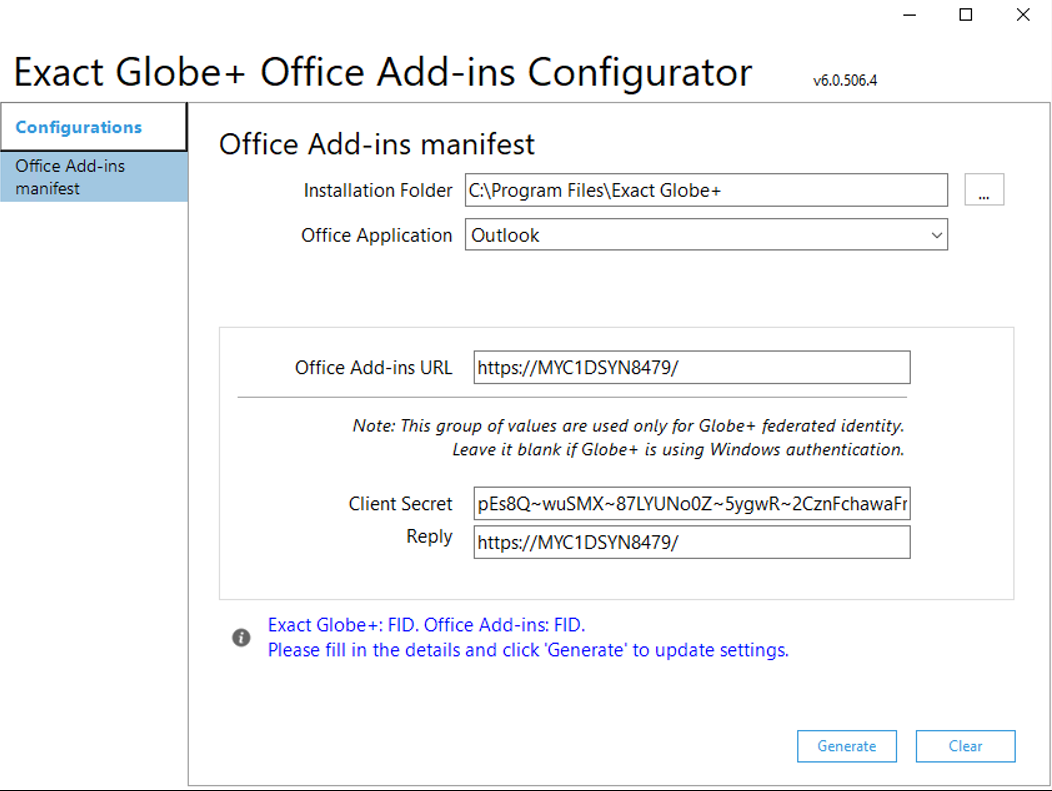
For Windows authentication, all fields are mandatory except for Client Secret and Reply.
For federated identity, all fields are mandatory.
Fields
-
Installation Folder: Specify the directory where Exact Globe+ is installed.
-
Office Application: Select the desired Office application from the dropdown list. Currently, Outlook is the only option.
-
Office Add-ins URL: Enter the URL of the Office Add-ins as configured in IIS.
-
Client Secret: Enter the client secret key from the web application.
-
Reply: Enter the same URL of the Office Add-ins as configured in IIS.
Set up Microsoft Office add-ins
There are several steps that you need to complete to set up Microsoft Office add-ins for your Exact Globe+.
Enable IIS from Programs and Features
-
Open the Control Panel.
-
Navigate to Programs > Programs and Features.
-
In the left pane, click turn Windows features on or off.
-
In the Windows features dialog, clear the checkbox for .NET Framework 3.5. For more information, see How-To: IIS Installation for Windows Server 2025.
-
Click OK, and wait for Windows to apply the changes.
Create a new application pool
This procedure serves as a general guideline. Customer requirements may vary, so adjust settings as needed. It is recommended to create a new application pool with custom settings for the Office Add-ins website. This helps prevent conflicts with existing web applications.
To create a new application pool in IIS:
-
Open Internet Information Services (IIS) Manager:
- Search for Internet Information Services (IIS) Manager in the Start menu and run it.
- Add a new application pool:
-
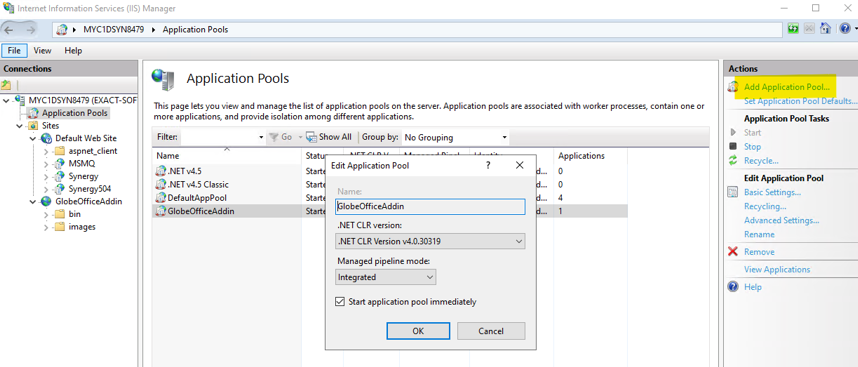
In the left pane, select Application Pools.
-
In the right pane, click Add Application Pool.
-
Configure the application pool:
-
Enter a name (e.g., GlobeOfficeAddin).
-
Select the appropriate .NET Framework version.
-
Set the Managed Pipeline Mode as required.
-
Click OK to create the application pool.
-
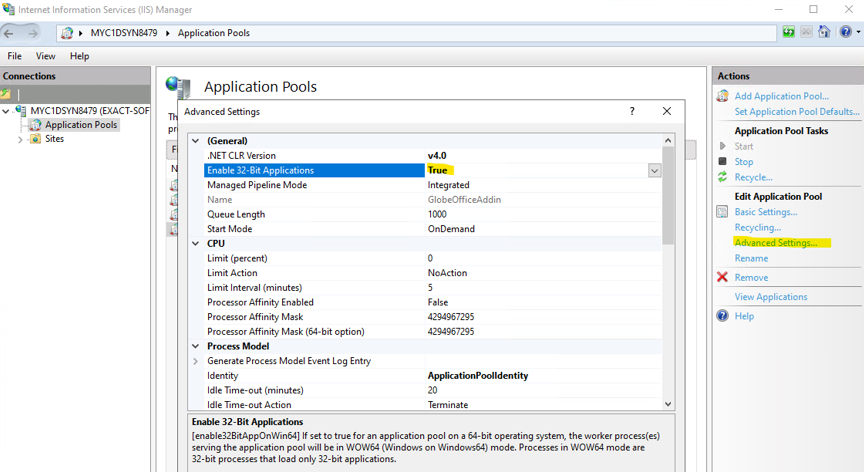
Enable 32-bit applications (if using Globe+ 32-bit):
-
Select the newly created application pool (GlobeOfficeAddin).
-
In the right pane, click Advanced Settings.
-
Set Enable 32-Bit Applications to True.
Choose deployment type
Important:
-
This procedure serves as a general guideline. You can choose specific configurations, such as the HTTPS port number or SSL certificate.
-
You may create a new website or use the default web site, depending on preference.
-
One HTTPS port can only bind to one website. If multiple applications need to share the same HTTPS port, add an application under the existing website instead of creating a new one.
Option A: Add an Application Under Default Web Site
-
In IIS Manager, go to Sites > Default Web Site.
-
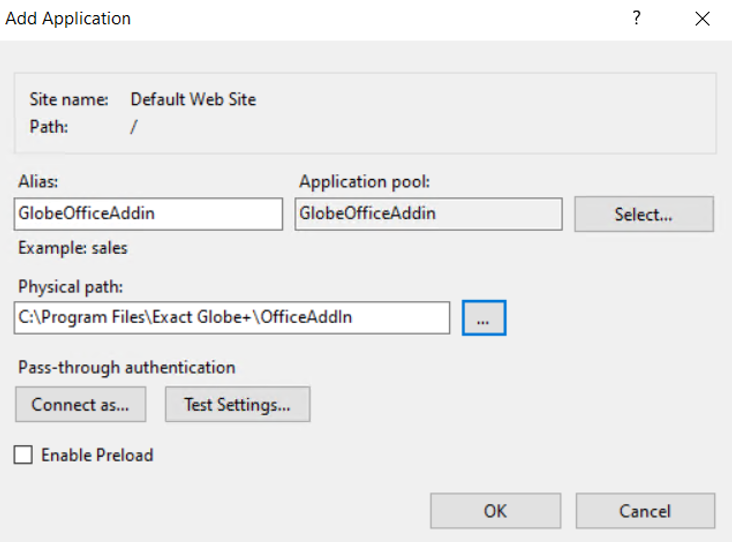
Right-click Default Web Site, then select Add Application.
-
Configure the following:
-
Alias: e.g., GlobeOfficeAddin
-
Application Pool: Select the pool created earlier (e.g., GlobeOfficeAddin).
-
Physical Path: Exact Globe+ installation folder for Office Add-in
(e.g., C:\Program Files\Exact Globe+\OfficeAddIn)
-
Click OK.
Option B: Create a New Website
-
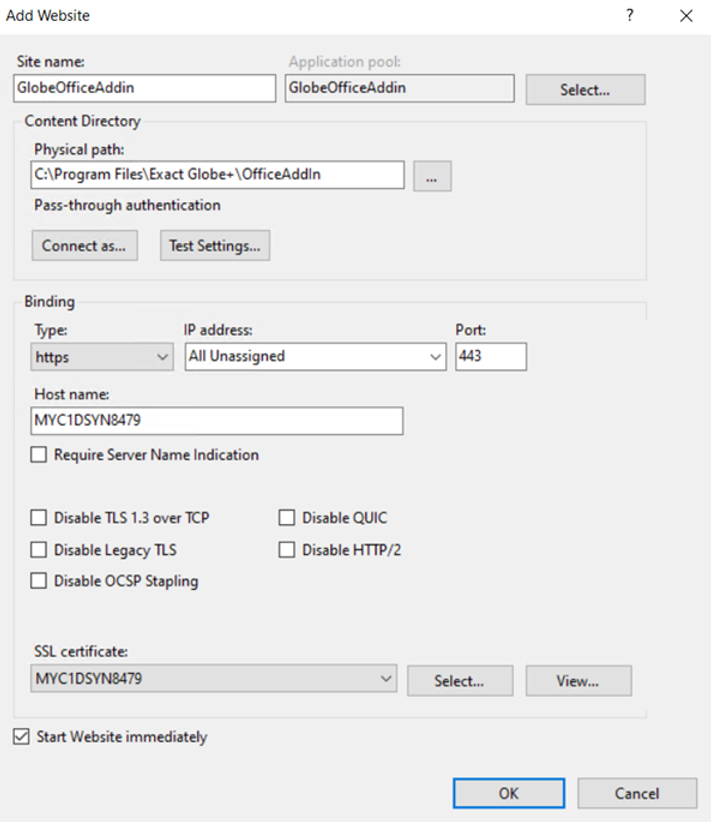
In IIS Manager, go to Sites, right-click, then select Add Website.
-
Configure the following:
-
Site Name: e.g., GlobeOfficeAddin
-
Application Pool: Select the pool created earlier (e.g., GlobeOfficeAddin).
-
Physical Path: Exact Globe+ installation folder for Office Add-in
(e.g., C:\Program Files\Exact Globe+\OfficeAddIn)
-
Binding:
-
Type: https
-
IP Address: Select or leave as All Unassigned
-
Port: e.g., 443
-
SSL certificate: Select a valid SSL certificate from the dropdown.
-
Host Name: Optional; use actual hostname or domain (e.g., MYC1DSYN8479).
-
Click OK.
Configure Authentication
For both options, double-click the Authentication icon and set as follows:
-
Federated Identity:
-
Anonymous Authentication = Enabled
-
Windows Authentication = Disabled
-
Windows Authentication:
-
Anonymous Authentication = Disabled
-
Windows Authentication = Enabled
Configure HTTPS
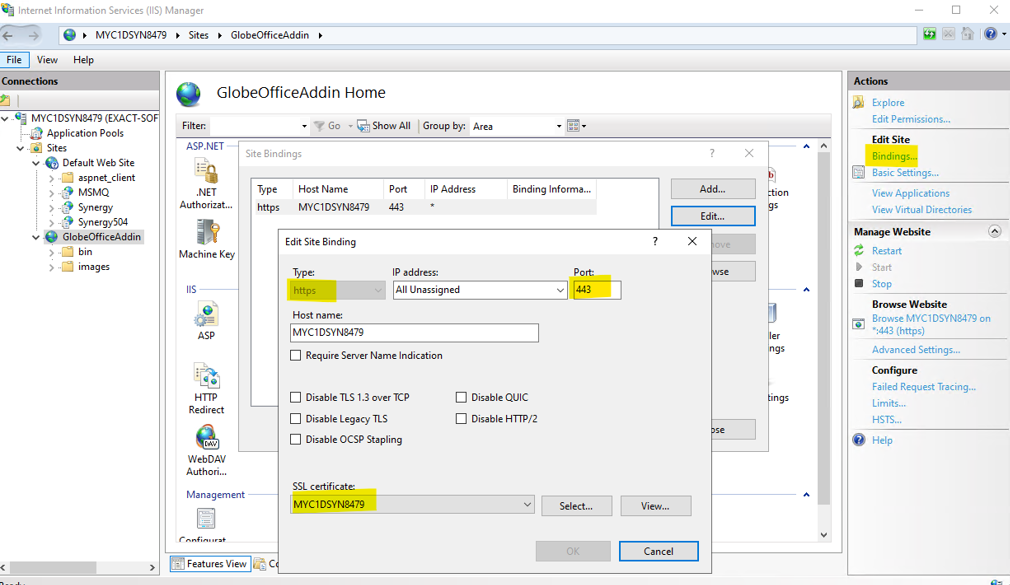
To Add an HTTPS Binding in IIS:
-
In IIS Manager, select your site (e.g., Default Web Site).
-
In the Actions pane, click Bindings, then select Add.
-
Configure the following settings:
-
Type: https
-
Port: Assign a port (e.g., 443).
-
SSL certificate: Select a valid SSL certificate from the dropdown.
-
Host Name: Optional; enter the actual hostname or domain (e.g., MYC1DSYN8479).
-
Click OK to apply the changes.
Configure settings that are not available via IIS Manager
These steps configure settings that are not available through IIS Manager. Use the command line with administrative privileges.
- Open Command Prompt.
- Run Command Prompt as Administrator.
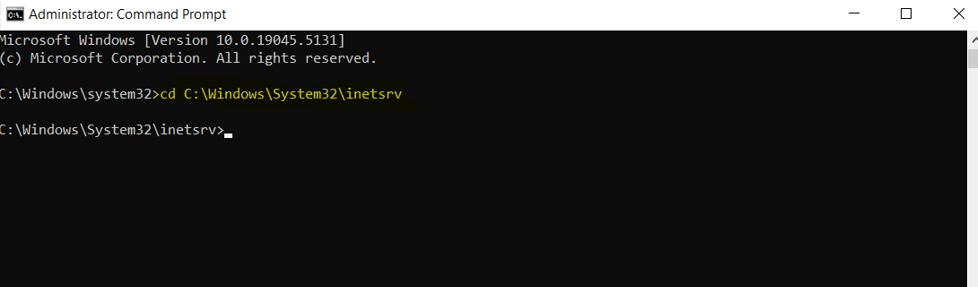
- Navigate to the IIS Directory.
Change the folder to: C:\Windows\System32\inetsrv
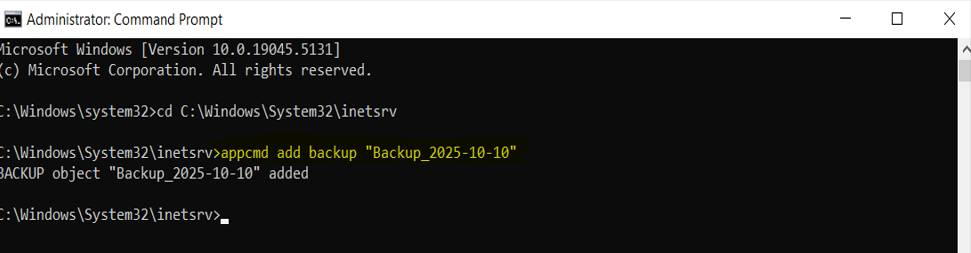
- Create a backup.
-
Type appcmd add backup “<backup name>”
-
Press Enter.
-
This backup can be used to restore settings if needed.
-
Restore backup (optional). If you want to restore previous settings, type the following command:
appcmd restore backup "<backup name>"
-
To turn on settings for multi-threading, type the command below. Replace the placeholders with your own values:
appcmd set config -section:system.applicationHost/applicationPools /[name='<Application pool name>'].CLRConfigFile:"<Globe+ installation path>\OfficeAddin\Exact.OfficeWebAddin.AppPool.config" /commit:apphost
-
Press Enter. A successful message will start with: “Applied configuration...”
-
To save setting files from the website, you must enable user profile retrieval. Type the following two commands, replacing placeholders with your own values:
First command:
appcmd set
config -section:system.applicationHost/applicationPools /[name='<Application
pool name>'].processModel.LoadUserProfile:true /commit:apphost
-
Press Enter. A successful message will start with: “Applied configuration...”
Second command:
appcmd set
config -section:system.applicationHost/applicationPools /[name='<Application
pool name>'].processModel.setProfileEnvironment:true /commit:apphost
-
Press Enter. A successful message will start with: “Applied configuration...”
-
To restart IIS, type the following command to apply the changes:
Iisreset
-
Press Enter.
-
Open the following file to confirm the settings have been applied: C:\Windows\System32\inetsrv\config\applicationHost.config
Deploy Microsoft Office add-ins
Note: Add-ins do not appear immediately after deployment. It may take up to 72 hours before they are usable. The same delay applies when uninstalling an add-in.
-
Go to https://admin.microsoft.com.
-
Sign in using an account with one of the following roles:
-
Global Administrator
-
Exchange Administrator
-
Office Apps Administrator
-
In the left-hand menu, go to Settings > Integrated apps.
-
Click Upload custom apps.
-
In the wizard, select Office Add-in.
-
Upload the ExactOutlookWebAddIn.xml file. This file is generated by OfficeAddinConfigurator.exe.
-
Choose the target user(s) or user group(s) for deployment.
-
Click Next.
-
Click Next to accept permission requests.
-
Click Next again to review and finish deployment.
-
Click Finish deployment. Deployment will begin.
Important: Add-ins will not appear in Outlook immediately. As noted, it can take up to 72 hours for the add-in to become available.
| Main Category: |
Attachments & notes |
Document Type: |
Online help main |
| Category: |
|
Security level: |
All - 0 |
| Sub category: |
|
Document ID: |
32.817.412 |
| Assortment: |
Exact Globe+
|
Date: |
05-01-2026 |
| Release: |
|
Attachment: |
|
| Disclaimer |