Introduction
In this tab, you can create, edit, or delete subsidiaries. It is also possible to add the relevant property and miscellaneous information for the debtor account.
Fields
Properties section
Sector
Type or select a sector for the debtor. For more information, see Creating and maintaining sectors.
Subsector
Type or select a subsector for the debtor. For more information, see Creating and maintaining subsectors.
Size
Type or select a company size for the debtor. For more information, see Creating and maintaining sizes.
Rating/Source
Type or select a rating and a source for the debtor. You can choose from rating 1 to 7. Source here refers to the debtor source. For example, a reseller, phone, coupon, and others. For more information, see Creating sources.
Note: The default information for Sector, Size, and Rating are as per the information in the CRM section at General settings.
DUNS number
Type a DUNS number to search for the risk profile of the account.
 Account validation and Risk profile report
Click this to connect to Dun & Bradstreet (D&B) and get an account validation and/or risk profile report. This button is enabled if you have function rights To include D&B Account validation and/or To inquire D&B Risk profile. However, depending on the function rights you have, you can either perform an account validation or get a risk profile report. For more information, see How-to: Getting Dun & Bradstreet account validation and risk profile.
Note: All types of accounts (supplier, associate, suspect, lead, customer, reseller, and prospect) can connect to D&B except employee accounts.
 Account D&B risk profile report
Click this to display all XML files returned by D&B from the data packages belonging to this account in Microsoft Excel. This button is enabled if you have function rights To inquire D&B Risk profile and/or To include D&B Account validation.
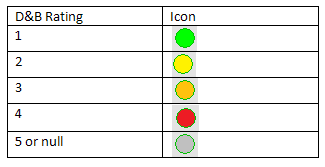
 Risk indicator
This displays the risk profile ratings of the relevant accounts. Different colours depict different ratings as displayed in the table below.
Miscellaneous section
Parent account
Type or select a parent account for the debtor. For more information, see Selecting account.
 Open: Parent account
Click this to open the parent account. For more information, see Creating and maintaining accounts receivable.
Reseller
Type or select a reseller account for the debtor. For more information, see Selecting account.
Open: Reseller
Click this to open the reseller account. For more information, see Creating and maintaining accounts receivable.
Representative
Type or select a HR representative for the debtor. For more information, see Selecting resources.
Security level
Type a security level code. By default, 10 is displayed.
Selection code
Type or select a selection code. For more information, see Creating and maintaining selection codes.
Subsidiaries section
Information such as the name, postcode, city, and others are displayed.
Note: It is possible that not all columns in this example are displayed. You can add or delete columns as required. For more information, see Inserting and deleting columns.
 New
New
Click this to add a new subsidiary to the relevant debtor account. You can choose from Suspect, Reseller, Supplier, or Associate. For more information, see Creating and maintaining accounts receivable.
 Edit
Edit
Click this to modify the details of the selected subsidiary.
 Delete
Click this to delete the selected subsidiary.
Sales commission section
This section will be displayed only if you select the Use sales commission check box in the Sales commissions section of Order Settings.
Commissionable
Select this check box to assign the Commissionable attribute to the debtor.
Territory code
Type or select a territory to link the debtor to this territory.
By default, the following columns are displayed:
Note: It is possible that not all columns in the example are displayed. You can add or delete columns as required. For more information see, Inserting and deleting columns.
Full name
This column displays the full names of sales employees.
Job title
This column displays the job titles of sales employees.
%
This column displays the percentages of commission defined for the debtor.
 New
New
Click this to add a sales employee to a debtor. Once clicked, the Sales commission screen will be displayed. The Debtor field is pre-filled with the code of the current debtor and cannot be edited. At Resource, type or select a sales employee to be added. At Commission %, type the percentage of sales commission split for the sales employee, whereby the cumulative percentage of sales commission split per debtor must be 100%. Then, click Save to save the sales employee and the sales commission percentage, click Close to exit the Sales commission screen, or New to add another sales employee. The sales employees and the sales commission percentage will be removed when removing a debtor.
Note: A resource is considered as a sales employee if he is an employee, a contractor, student, temporary employee, or partner of an organization, who has been assigned with the Representative role, and is currently active. For more information, see Creating and maintaining resources and Overview of roles. The Commissionable attribute of the debtor will also be imported or exported when importing or exporting the XML files of the debtors. Otherwise, the imported or exported debtors will be assigned with the default attribute.
Edit
Click this to edit the selected sales employee and/or the sales commission percentage.
Note: This icon is enabled only when a sales employee is selected.
 Delete
Click this to delete the data of the selected sales employee.
Note: This icon is enabled only when a sales employee is selected.
Related documents