How-to: Setting up Exact Lightweight Integration Server (ELIS) using federated identity
Note:
- This document is only relevant to the controlled release participants.
- This is not available for Exact Cloud customers.
Introduction
This document describes the steps to configure Exact Lightweight Integration Server (ELIS) and a client (product or
endpoint) using the federated identity. The usage of ELIS with SQL Azure is also described.
Scope
This
document describes the following:
- Prerequisites
- Overview of ELIS with
federated identity configuration
- Retrieving federated identity configuration details
- Configuring ELIS using
federated identity
- Connecting ELIS to SQL
Azure
Note:
Some of the information and screens in this document refer to external
websites, such as the “Manage Azure and Auth0” portals.
Prerequisites
- ELIS
management console
- Endpoint package (Exact Synergy Enterprise and Exact Globe+ only)
Overview of ELIS with federated identity
configuration
To use federated identity with ELIS, the following configuration
details must be made available in ELIS depending on the identity provider:
Identity provider: Auth0
- SAML Issuer Name
- JWT Issuer Name
- Allowed Audience
- Metadata
- Thumbprint
- Authority
- Client ID
- Auth0 connection
The configuration details stated must be entered in the Federated
Identity Configurator, to generate the federated identity configuration files
for ELIS.
Retrieving federated identity configuration details
To retrieve your Auth0 or WAAD configuration details, log in to
your Auth0 or WAAD account and view the Auth0 or WAAD application or client
that you have configured for ELIS.
For more information on how to retrieve these details, see How-to: Retrieving information for
Windows Azure Active Directory and Auth0.
Note:
All values are case-sensitive; you should use the exact value, including any
symbols. You are advised to always use lowercase to avoid a mismatch of the
values.
Configuring ELIS using federated identity
Configure the federated identity configuration files for ELIS using Auth0
To configure ELIS to use Auth0 as the authentication provider, the
web application must have the following files configured for the token-based
authentication:
- XMD\Exact.ELISVersion.config
- XMD\Exact.EntityServiceIdentity.config
These files should be configured and generated by the Federated
Identity Configurator.
- Start the Federated Identity Configurator, by starting
FIDConfigurator.exe in the Cab folder of the Exact Globe+ or Exact
Synergy Enterprise installation folder. The tool requires read and write access
to the installed folders of Exact software. Therefore, it is recommended the
tool be used with Administrator privileges.
- Select Exact Lightweight
Integration Server from the Products menu on the left.
- Type or select the installation directory of Exact Lightweight
Integration Server at Installation Folder. When a path is specified, the
tool will validate the path. If the path is validated successfully, the
configuration section and buttons will be enabled.
- Select Auth0 at the Identity Provider field.
- Define the following fields:
- SAML
Issuer Name
- JWT
Issuer Name
- Allowed
Audience
- Metadata
- Thumbprint
- Authority
(this value will be used only for validation, and will not be
stored in the configuration files)
- Client
ID (this value will be used only for validation and will not be
stored in the configuration files)
- Auth0
connection (this value will be used only for validation and will not be
stored in the configuration files)
- Click Validate. The
validation screen will be displayed.
- The values from the product screen will be checked for common
mistakes, such as formatting, typos, et cetera. The tool will warn you when a
value is suspected to be wrong so that you can verify and correct it if needed.
- Type a username and password (from your federated identity
account) to test if the configuration values are correct for authentication
use.
- Click Validate.
- If the validation is successful, click Generate. The federated identity configuration files will be
generated in the installation folder for the product. It will also be retained
for future product updates.
Note:
- Only after a successful validation, the configuration files can be
generated.
- All values are case-sensitive; you should use the exact value,
including any symbols. You are advised to always use lowercase to avoid a
mismatch of the values.
- For more information on how to retrieve these details, see
How-to: Retrieving information for
Windows Azure Active Directory and Auth0.
- The tool requires read and write access to the installed folders
of Exact software. Therefore, it is recommended the tool be used with
Administrator privileges.
- For more information about the Federated Identity Configurator,
see
Federated Identity Configurator.
Additional information
Restart the Exact Integration Entity service
After generating the federated identity configuration files, the
Exact Entity Service should be restarted.
- Open
services.msc.
- Restart
Exact Integration Entity Service.
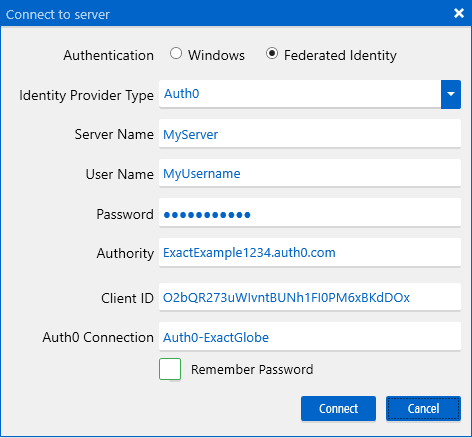
Log on to ELIS
When the ELIS console
is started, the Connect to server
screen with the Federated Identity
option for authentication will be displayed.
If ELIS is configured
to use the federated identity authentication, the information must be provided
in the console.
Firstly, the identity provider type must be selected, such as WAAD
or Auth0. Once the identity provider type has been selected, the following
fields will be displayed, and these have to be defined:
Identity provider: Auth0
- User name
- Password
- Authority
- Client ID
- Auth0 connection
Note: The
Resource value is
case-sensitive; you should use the value exactly as it is in your portal,
including any symbols. You are advised to always use lowercase to avoid a
mismatch of the values.
The Authority, Client ID, Auth0 connection and Resource
values can be retrieved in your Auth0 or WAAD account. For more information on
how to retrieve these details, see How-to: Retrieving information for
Windows Azure Active Directory and Auth0.
Server name
This is the name of the machine where the ELIS components are installed or hosted.
User Name, Password
These are the user’s credentials and the information is stored in
Windows Azure Active Directory or the Auth0 connection.
Database setup for ELIS to use SQL Azure
If ELIS is configured
to use federated identity, you can connect or create a database on SQL Azure. The
details for the SQL Azure server are required upon creation or connection.
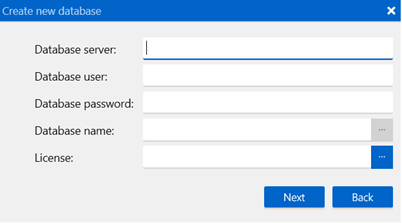
The fields are as follows:
- Database
server
- Database
user
- Database
password
- Database
name
- License
Log
in to https://manage.windowsazure.com.
- Go to SQL DATABASES.
- Under the DATABASES tab,
select a database to open the dashboard page.
- Note the server name under the quick glance section. This is the value of the
Database server.
- Go to SQL DATABASES,
and click the SERVERS tab.
- Click the server that is used for ELIS to open the dashboard page. Under the
quick glance section, note the administrator login. This is the value
of the Database user.
Note:
The Database password is not
displayed from the portal, but is only defined when creating the SQL server.
However, you can reset the password on this page using the Reset Administrator Password hyperlink.
Related documents
| Main Category: |
Attachments & notes |
Document Type: |
Online help main |
| Category: |
|
Security level: |
All - 0 |
| Sub category: |
|
Document ID: |
27.626.406 |
| Assortment: |
Exact Synergy Enterprise
|
Date: |
22-11-2022 |
| Release: |
|
Attachment: |
|
| Disclaimer |