Discovering workspaces
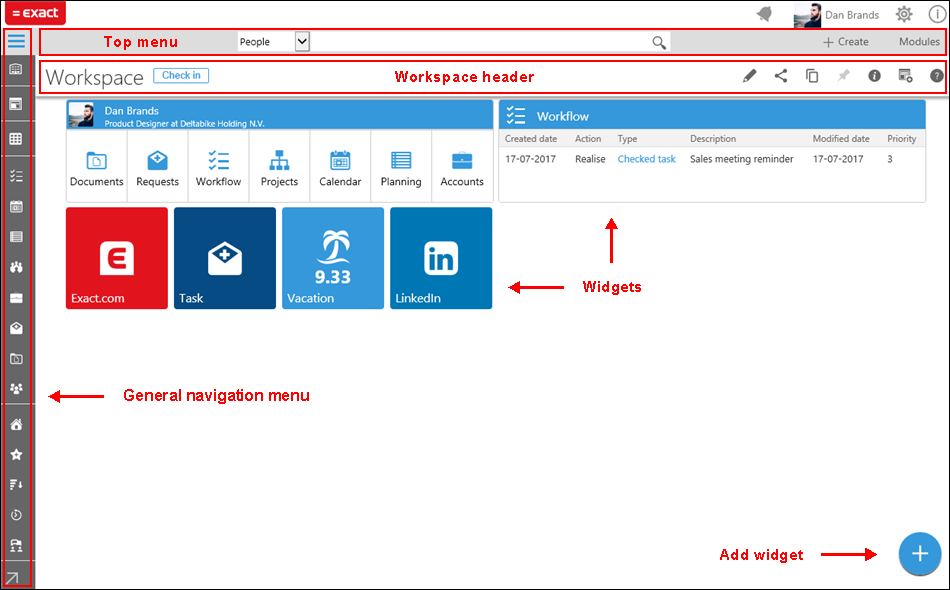
Workspace is the page that is displayed firsthand when you
log in to Exact Synergy Enterprise (ESE). The workspace concept allows you to
organize the information in the form of widgets on the page based on your
preferences, job scope, or responsibilities.
People with the Professional, CRM, or Employee
self-service role, as well as customers, resellers, and suppliers are able
to access to workspaces. However, certain features and widgets may not be
available for people with the Employee self-service role, customers,
resellers, and suppliers.
The following is an example of a workspace:
This document comprises the following chapters:
1.1 Types of workspaces
1.2 Introduction to top menu
1.3 Introduction to general navigation menu
1.4 Introduction to search feature
1.5 Introduction to workspace header
1.6 How do I ...?
1.7 What happens when I ...?
1.8 Related topics
1.1
Types of workspaces
There are two types of workspaces in ESE: personal and
company. You can set the type of the workspace during the creation of the
workspace, or when modifying existing workspaces.
1.1.1 Personal workspace
A personal workspace provides freedom for everyone to
organize the information based on their needs.
1.1.2 Company workspace
A company workspace appears the same for everyone in the
company, providing a platform for everyone in the company to focus on the same
strategies and to reach towards common goals.
1.1.3 Built-in company
workspace
The built-in company workspace is used in cases where there
is no company workspace in the system, or the user is redirected to the default
company workspace and none is available in the system. This built-in company
workspace acts as a page that guides people on how to create a company
workspace.
This built-in company workspace:
- is shared with everyone with the Can view right,
- is displayed in the Workspaces catalogue page for filtering,
- can be used as a template to create another workspace, and
- cannot be modified or deleted by anyone, as no one has the right
to edit or delete this workspace.
For an existing user, this built-in company workspace is pinned to the general navigation menu in the COMPANY WORKSPACES section by default. This workspace can be removed from the menu if preferred.
For a new user, this built-in company workspace can be accessed by clicking  Company workspaces (when the menu is docked and collapsed). However, this built-in workspace will not be pinned to the COMPANY WORKSPACES section (when the menu is expanded). In this case, the user is able to access this workspace via the Workspaces catalogue menu item.
Return to top
1.2
Introduction to top menu
The top menu on a workspace contains the following:
- General navigation menu
 — The general navigation
menu contains menu items, which provide quick access to features available in
ESE. More on this in section 1.3 Introduction to general navigation menu.
- Search feature — You can perform a quick search on an existing
person, account, request, document, project, or even a workspace via this
search box. More on this in section 1.4 Introduction to search feature.
- +Create hyperlink — You can easily create a request,
document, project, or data for a person using this hyperlink. As this document
revolves around workspaces, only the creation of workspaces will be explained. More
on the creation of other entities in Creating
entries. More on the creation of workspaces in section 1.6.1 How do
I create a workspace?.
- Modules hyperlink — This hyperlink contains modules that
are available within ESE. The modules that are displayed here match the modules
that you have selected at
 Preferences,
in the Modules sections under the Menu tab.
Return to top
1.3
Introduction to general navigation menu
The general navigation menu contains menu items, which
provide quick access to features, such as workspaces that you have created or
pinned to the menu, workspaces catalog, your workflow, planning, documents, and
history of documents viewed. The general navigation menu can be accessed via
the  icon at the top left of
your screen. Upon clicking this icon, it will change to
  .
.
1.3.1 Layout of general navigation menu
You can display this menu in a few different layouts.
a) Collapsed and docked layout
This is the default layout. This layout permanently displays
the icons of the menu items at the left side of your screen. This is the only
layout that does not provide you an access to reorganize the sections in this
menu.

b) Expanded and docked layout
This layout permanently displays the icons and names of the
menu items at the left side of your screen.

c) Expanded and undocked layout
This layout allows the menu to be
displayed only when you click  . This menu will collapse
by clicking
  or
anywhere outside of the menu.

1.3.2 Features accessible
via general navigation menu
The following explanations on the menu items will be based
on the default layout of this menu, which is collapsed and docked.
 Company workspaces
Clicking this displays the company workspace that has been
set as default. If there is no company workspace in the system, you will be
redirected to the built-in company workspace. More on this in
section 1.1.3 Built-in company workspace.
To view other company workspaces that have been pinned to
this menu, you have to change the layout of this menu to either expanded and
docked, or expanded and undocked.
 My
workspaces
Clicking this displays the personal workspace that has been
set as default.
To view other personal workspaces that have been pinned to
this menu, you have to change the layout of this menu to either expanded and
docked, or expanded and undocked.
 Workspaces catalogue
Clicking this displays the Workspaces catalogue page,
which offers an easy interface for you to search for, share, and create
workspaces. More on this in Viewing
catalog of workspaces.
 My
section
This section contains menu items that provide easy access to
pages related to you, such as your workflow, calendar, planning, documents, groups, and
projects of which you are the member.
The menu items that are displayed here match the items that
you have selected at  Preferences,
in the My work and My work, create & search sections under
the Menu tab.
 Quick links section
This section contains menu items that provide quick access
to features such as news, list of documents set as favorite, recent documents
created or owned by you, and list of documents that you have viewed.
The menu items that are displayed here match the items that
you have selected at  Preferences,
in the Quick access section under the Menu tab.

Clicking this arrow will change the layout of the general
navigation menu to expanded and undocked.
1.3.3 Other simple but
useful features
You can easily set a personal workspace as default from the
general navigation menu, or remove workspaces (that you have pinned) from
this menu.
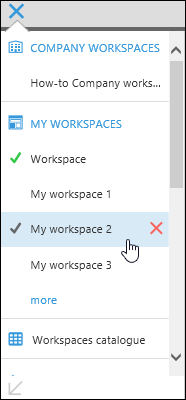
Hover your mouse over the preferred workspace. The following
actions can be done:
- Click
 to set a personal
workspace as default. This is not available for a company workspace, as you
need a right to set a company workspace as default. More on this in section
1.6.1
How do I create a workspace?. The
  icon next
to a workspace indicates that it is the current default workspace.
- Click
 to remove the workspace from
being pinned to this menu. Note that you cannot remove workspaces that have
been pinned to your menu by other people.
Return to top
1.4 Introduction to search feature
You can easily search for an existing person, account,
request, document, project, or even a workspace by typing the name in the
search box. The search text corresponds to the entity that you have selected at
the drop-down menu next to this box.
For an example, you have selected Documents as the
entity, and typed “test”. The search results will contain only documents that
have the word “test”. Other entities will not be included in the search
results.
You can view a history of your search by enabling this
feature at  Preferences,
in the Search section under the General tab. Simply select the Show history check box and save your preferences.
The next time when you type something in the search box, you
will see a history of your search. See the following for an example:
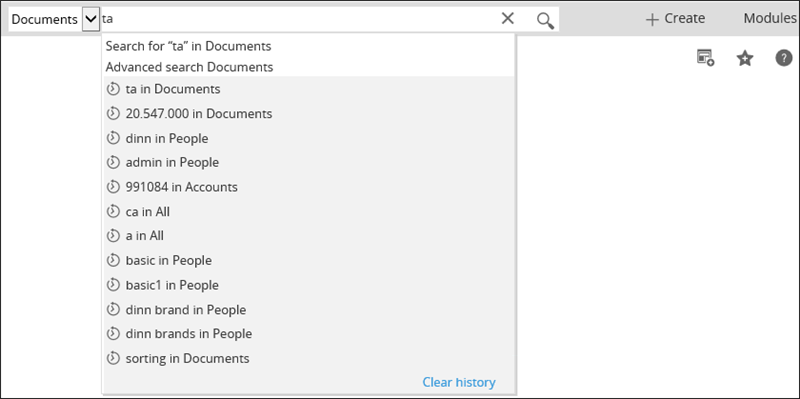
In the event that you do not want to keep the current search
history, simply click the Clear history hyperlink and the search history
will be removed. Note that clearing your search history will not affect the
search history by other people.
Return to top
1.5
Introduction to workspace header
The header of your workspace contains the title of your
workspace, the Check in or Check out button (if you have shared
this workspace with another person), and icons.
The icons are only displayed when you hover your mouse over
the header of the workspace. The following icons are available:
1.5.1  Edit,
Edit,  Share
Share
Click this to modify the information and sharing properties of
the workspace. In the edit mode, the workspace area that contains the widgets
will be greyed out, and the Information panel will be displayed on the
right.

At this moment, you can modify the details of the workspace,
set the workspace as default, or delete the workspace. The Sharing
section in this panel provides an easy way for you to select the people with
whom you want to share the workspace. More on modifying workspaces in sections 1.6.3
How do I modify my workspace? and 1.6.9 How do I modify a shared
workspace?, on sharing workspaces in section 1.6.8 How do I share a
workspace with another person?, and on deleting workspaces in section
1.6.12
How do I delete an existing workspace?.
1.5.2  Copy template & create
a new workspace
Click this to use the workspace that you are currently
viewing as a template to create another workspace. All widgets, settings, and
sharing options defined for this workspace will be copied to your new
workspace. At this moment, you can change the settings and sharing options. The
widgets and the layout can only be modified once the workspace has been saved.
You can use any company workspace (that has been shared with
you) as a template to create another personal or company workspace if you have
the Company workspace administrator role. Without this role, you can use
any workspace (that has been shared with you) as a template, but only to create
a personal workspace.
More on this in section 1.6.1 How do I create a workspace
— Using an existing workspace as a template?.
1.5.3
 Pin to others
This feature allows you to pin workspaces to other people.
This is useful when you have a shared group workspace that you want to set to
their general navigation menu for easy access.
Right to pin workspaces
This icon is available at the header only if these two
criteria are met:
- You have the Workspace pin role on the Corporate, Division,
or Project level. Function right 1018 – Allow to pin workspace for
others is linked to this role.
- The workspace has been shared with you, for which you have been given
the Can view or Can edit right.
See the following flow chart for further explanations on the
people to whom you can pin the workspaces:
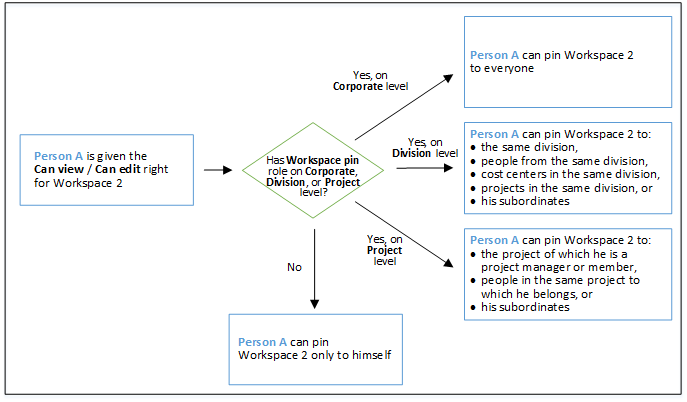
More on this in section 1.6.10 How do I pin a workspace
to another person?.
1.5.4
 Pin,
Pin,
 Unpin
Unpin
You can pin a workspace to the MY WORKSPACES section under your general navigation menu by hovering your mouse over the header of the
workspace, and then clicking  Pin. This icon
will then be changed to
  Unpin so that
you can remove the pinning of this workspace from this menu later.
You cannot unpin workspaces that have been pinned to your general
navigation menu by other people. When viewing these workspaces, the
 Unpin icon at
the header will be disabled. The name of the person who pinned the workspace
will be displayed as a tooltip when you hover the mouse over the icon.
1.5.5 Information
Click this to view more information of the workspace. The Information
panel will be displayed on the right, which contains information of the
workspace as well as the Export workspace button. If you are the owner
of the workspace, you can immediately reshuffle and resize the widgets in the
workspace area, as well as add widgets to or remove widgets from the workspace
area. Otherwise, you are required to have the Can edit right for this
workspace in order to make changes to the widgets. More on this in section 1.6.8
How do I share a workspace with another person?.

1.5.6  Add a Link widget
to workspace
You can add a Link widget from any Exact Synergy Enterprise
page to your workspace. This Link widget provides quick access to a feature
that you frequently used. For an example, you have to create project entries
daily. Thus, you can add a Link widget that will redirect you straight to the
menu path of the project creation, Modules >
Projects >
Entry >
Project. With this, you can start creating projects with just one click on the
Link widget.
More on this in section 1.6.11 How do I add a Link widget
to my workspace?.
Note: If you have a screen reader installed in your system, such as NVDA, the screen reader will read out the title of the widget in the workspace when you tab through it.
1.5.7  Help
Help
Click this to display help files related to the selected page.
You can also perform a search of documents using the available criteria.
Return to top
1.6 How do I …?
This section provides a step-by-step guide on a list of
actions:
1.6.1 Create a workspace
You can create a person entry, account, request, document,
or workspace via the +Create hyperlink at the top menu. As this document
revolves around workspaces, only the creation of workspaces will be explained.
More on the creation of other entities in Creating
entries.
You can create a workspace via several ways. Before you
begin, it is good to know the following requirements regarding company workspaces:
- You can create a company workspace only if you have the Company workspace manager role (which is linked to function right 1020 — Allow to create and edit company workspace) or Company workspace administrator role (which is linked to function right 1019 — Allow to create, edit and set
default company workspace). Without any of these role, the Type field will not be available when creating a workspace.
- You can set a company workspace as default only if you have the Company workspace administrator role. Without this role, the Set as default company workspace check box will not be available when creating a workspace.
Create an empty workspace
You can create an empty workspace, which you can then
personalize by adding widgets and rearranging them according to your
preferences.
To create an empty workspace:
- Click +Create at the top menu, and then click Workspace.
- Click Empty workspace. You will see the following:
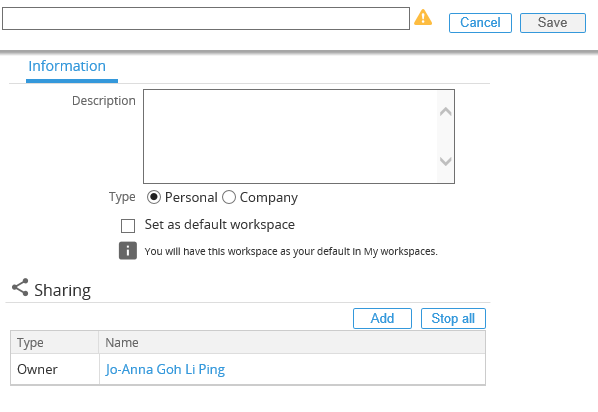
- Type the title of your workspace in the box located on top of the Information
panel. This is mandatory.
- At Description, type a description for your workspace.
- At Type, select Personal or Company as the type of the workspace.
- You can make this workspace as the page that is displayed firsthand when you log in to
ESE by selecting the Set as default workspace or Set as default company workspace check box respectively.
- In the Sharing section, click Add to select the people or account with whom you want to share the workspace. More
on this in section 1.6.8 How do I share a workspace with another person?.
- Click Save. You will be redirected to the workspace that you have just created. You can now add
widgets and arrange them according to your preferences. More on this in section
1.6.4 How do I add a widget to my workspace?.
Note:
-
You can access the workspace that you have created via the
general navigation menu. If the layout of this menu is collapsed and docked,
you can access only the default company and personal workspaces. You can access
other workspaces only if a different layout is applied to this menu.
-
You can also access this workspace at the
Workspaces catalogue page. More on this in Viewing
catalog of workspaces.
Using an existing workspace as a template
You can create a workspace using an existing workspace as a
template. Via this method, all widgets that are currently being displayed on
the workspace will be copied over to the new workspace, saving you the time in
adding and arranging widgets from scratch. The sharing properties are not
copied over.
To use an existing workspace as a template:
- Click +Create
at the top menu, and then click Workspace.
- Click Copy & Create. You will see the following:
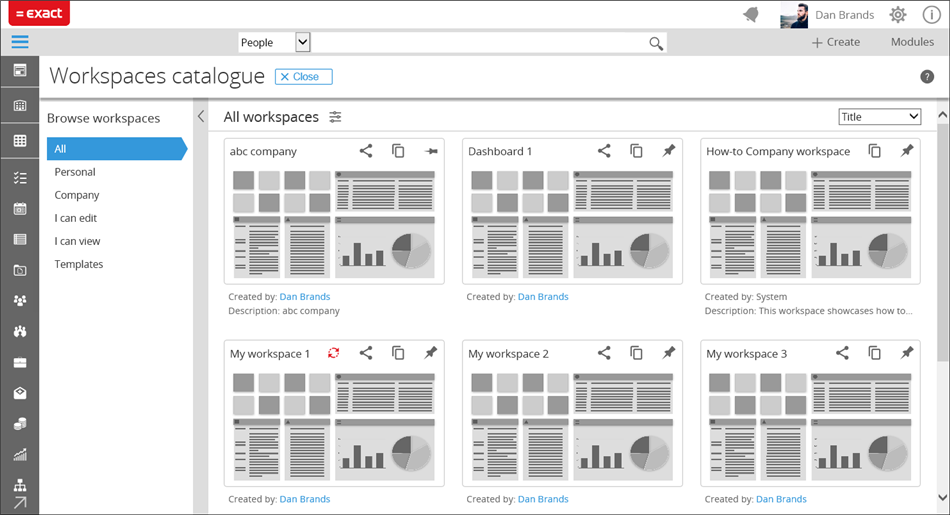
- From the workspace cards displayed, search for the one to be used
as a template, and then click
 Copy template & create a new workspace at the top right of the particular
workspace card. You will see the following:

- Type the title of the workspace in the box located on top of the Information
panel. This is mandatory.
- At Description, type a description for the workspace.
- At Type, select Personal or Company as the type of the workspace.
- You can make this workspace as the page that is displayed firsthand when you log in to
ESE by selecting the Set as default workspace or Set as default company workspace check box.
- Define the sharing properties in the Sharing section.
More on this in section 1.6.8 How do I share a workspace with another
person?.
- Click Save. You will be redirected to the workspace that you have just created. You can now
add more widgets and rearrange them accordingly. More on this in section 1.6.4 How do I add a widget to my workspace?.
Note:
-
You can access the workspace that you have created via the
general navigation menu. If the layout of this menu is collapsed and docked,
you can access only the default company and personal workspaces. You can access
other workspaces only if a different layout is applied to this menu.
-
You can also access this workspace at the
Workspaces catalogue page. More on this in Viewing
catalog of workspaces.
Export and import a workspace
You can save a workspace as an XML file, which makes it
possible for you to export and import the workspace between different Exact
Synergy Enterprise databases.
To export a workspace:
- Go to the workspace to be exported, and then hover your mouse over the header of the workspace.
- Click
 Information.
- At the Information panel, click Export workspace. You will be asked to open or save the XML file.
- Click Save or Save as to define the location to save the XML file.
- Click Save. The XML file will be saved to the location defined.
To import a workspace:
- Go to any workspace, click +Create at the top menu, and then click Workspace.
- Click Import. You will see the following pop-up page:

- Click Browse to select the XML file.
- Once you have selected, click Save. You will be redirected to the workspace that you have imported.
Note:
-
Regardless of the type of workspaces, all imported workspaces
will be set to Personal.
-
Other than the title and description of the workspace, it is not
advisable to change other information via the XML file.
The following table lists some scenarios related to the exporting and importing of workspaces:
|
Scenario
|
Expected
behavior after the import process
|
|
Workspace contains Me
widget with a person selected.
|
If the person exists in the Exact
Synergy Enterprise database to which the XML file is imported, the
information of the person selected will be displayed. Otherwise, the
information of the workspace creator will be displayed.
|
|
Workspace contains Document
widget.
|
During the export of this
workspace, the document defined will be excluded from the XML file.
Therefore, this widget displayed on the imported workspace will be empty.
|
|
Workspace contains link or embed
widgets with images.
|
Selected images will be created
in the Exact Synergy Enterprise database to which the XML file is imported.
|
|
Workspace contains other widgets.
|
All filter criteria will be
successfully exported to the XML file. However, if any of the filter
criterion is not available in the Exact Synergy Enterprise database to which
the XML file is imported, then the particular information will not be displayed
on the widgets on the imported workspace.
|
|
Workspace contains customized
widgets.
|
If the ascx files for the respective customized widgets are not present in the Exact Synergy Enterprise database, then error messages will be displayed for the respective customized widgets on the imported workspace.
|
|
Sharing and pinning information
have been defined for the workspace.
|
The imported workspace will not
contain the sharing and pinning information that were previously defined.
|
|
Workspace is a built-in company
workspace or of type Company workspace.
|
The type of the imported
workspace will be set to Personal.
|
|
Tom checks out the workspace,
makes changes to it but has not check in the changes.
|
If Tom exports the workspace in
an XML file, and imports it to a different Exact Synergy Enterprise database,
the changes that have yet to be checked in will be available.
If another person other than Tom
exports the workspace in an XML file, and imports it to a different Exact
Synergy Enterprise database, the changes that have yet to be checked in will not
be available.
In short, whatever that you
currently see on the workspace that you exported will be available in the imported
workspace.
|
1.6.2 View or search for a
workspace
To view a workspace via the general navigation menu:
- Click
 at the top menu. If the
default layout is currently applied to this menu, it will change to the expanded
and docked layout.
- Click the title of the workspace in the COMPANY WORKSPACES or MY WORKSPACES
section. If the workspace is not displayed in the section, click the more
hyperlink to display more workspaces.
To search for a workspace via search box:

- In the search box at the top menu, type the full or partial title of the workspace.
- On the left of the search box, click the arrow to display a list of entities, and then
select Workspaces.
- Click
 . The Workspaces
catalogue page will be displayed with a catalog of workspaces (in the form
of workspace cards) that match the text entered.
- Click the desired workspace card. The workspace will be displayed.
To search for a workspace via Workspace Catalogue:
- If the default layout is currently applied to this menu, click
 Workspaces catalogue. The Workspaces catalogue
page will be displayed.
- You have two ways to search for the workspace. One way is via the Browse workspaces
section. Click the respective hyperlink to search for the workspace:
- All — This hyperlink displays the workspaces that are
created by you, and those that have been shared with you with the Can edit,
Can view, or Can use as a template right.
- Personal — This hyperlink displays the workspaces
that you have created but are not shared with anyone.
- Company — This hyperlink displays the company
workspaces that you have created and those that have been shared with you with
the Can edit, Can view, or Can use as a template right.
- I can edit — This hyperlink displays
the workspaces that have been created by you and those shared with you with the
Can edit right.
- I can view — This hyperlink displays the
workspaces that have been created by you and those shared with you with the Can
view right.
- Templates — This hyperlink
displays the workspaces that have been shared with you with the Can use as a
template right.
- Another way you can search for the workspace is via the Criteria section. In the
available fields, type the title of the workspace and/or select the person who
created the workspace, and then click Apply.
- Finally, click the desired workspace card. The workspace will be displayed.
To search for a workspace via the Quick search widget:
In order to search for workspaces using this widget, you
must first add this widget to your workspace. More on this in section 1.6.4
How do I add a widget to my workspace?.
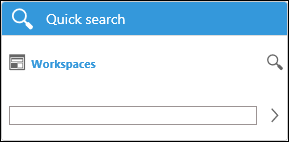
- On the widget, type the full or partial title of the workspace, and then click >.
The Workspaces catalogue page will be displayed with a catalog of
workspaces (in the form of workspace cards) that match the text entered.
- Click the desired workspace card. The workspace will be displayed.
1.6.3 Modify my workspace
- Go to the workspace, and then hover your mouse over the header of the workspace.
- Click
 Edit.
The Information panel will be displayed on the right.
- Make the necessary changes.
- Click Save.
1.6.4 Add a widget to my
workspace
- Go to the workspace, and then click
 Add
widget located at the bottom right. If this workspace has been shared with
other people, hover your mouse over the header of the workspace, click Check
out, and then click
 Add widget.
Note:
If the workspace has been shared with other people, and one of them has checked out this workspace for editing,
 Add widget will not be available.
- On the widgets catalog, search for the desired widget, and then
click on the widget. The widget editor page will be displayed. Depending on the
widget selected, different fields and options will be available on this page.
See the following for an example of the widget editor page for the Quick
search widget:
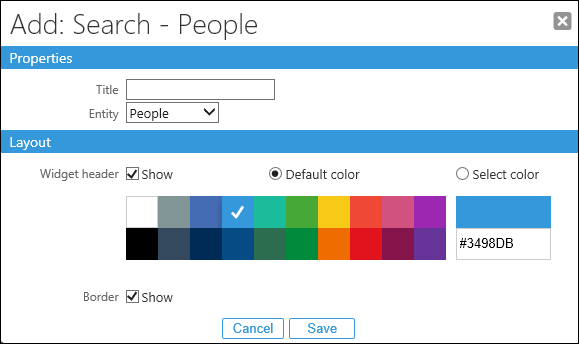
- In the Properties section, define the settings for the widget.
- You can define the layout of the widget including its background color in the Layout section.
- Click Save. The widget will then be added to the workspace. You can then rearrange the widget according to your preference.
Depending on the role that you have been assigned with,
certain widgets may or may not be available for your usage. More on this in Widgets
available for different roles.
1.6.5 Resize a widget on
my workspace
- On the workspace, hover your mouse over the widget.
- Click
 at the bottom of the
required widget.
- Drag the widget to the required size. The changes will automatically be saved.
1.6.6 Remove a widget on
my workspace
- On the workspace, hover your mouse over the widget.
- Click
 . The Edit: [Name of the
widget] page will be displayed. For example, if you are editing the Calendar
widget, the Edit: Calendar page will be displayed.
- Click
 Delete. The message
“Are you sure you want to delete this widget?” will be displayed.
- Click Yes to remove the widget from your workspace.
1.6.7 Customize my own
widget
You can customize your own widgets by creating an XML file
named “Webparts.Ext.xml”, and then add this file to the xml folder of
your Exact Synergy Enterprise installation path. More on this in How-to:
Defining custom widgets in widgets catalog.
1.6.8 Share a workspace with another person
You can select the person with whom the workspace is to be
shared, and then specify whether the person can view or edit the workspace, or
only use it as a template to create a workspace. It is also possible to share
your workspace based on projects, divisions, job titles, et cetera. The
following rights are available:
- Can use as a template — This person can use the
workspace as a template to create another workspace.
- Can view — This person can view the workspace, and
use the workspace as a template to create another workspace.
- Can edit — This person can view, edit, or delete
the workspace, use the workspace as a template to create another
workspace, and specify the people with whom the workspace is to be shared.
When this right is given to one person or more, the check in and check out
modes apply to the workspace. This right is not available if you are
sharing the workspace by account.
When sharing workspaces based on the Account option:
- Customers — Selecting this option at the Security
level field indicates that customers at security level 1 and partners
at security level 2 will be able to view the workspace or use it as a
template to create another workspace. Internal users will not be able to
view the workspace or use it as a template.
- Partners — Selecting this option at the Security level
field indicates that only partners at security level 2 will be able to view the
workspace or use it as a template to create another workspace. Customers and
internal users will not be able to view the workspace or use it as a template.
For an example, you would like to share a workspace named
“My workspace 1” with James Brouw. You can perform the following steps:
- Go to “My workspace 1”, and then hover your mouse over the header of the workspace.
- Click
 Share. The Information
panel will be displayed:

- In the Sharing section, click Add. You will see the following:
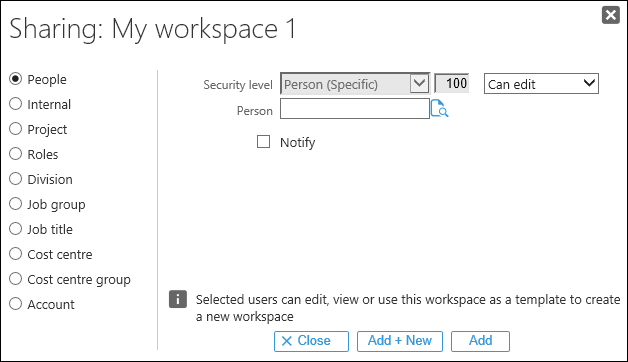
- Select the entity on the left panel, and fill in the relevant information. The fields
that are displayed on the right depend on the selection of entity. In this
example, select People.
- Type the ID of James Brouw or his name at the Person field.
- Next to the Security level field, select the right to be given to James Brouw.
- Select the Notify check box if you want to notify James Brouw (via a request) that
this workspace has been shared with him.
- Click Add. You will be redirected to the Information panel, and James Brouw will be
listed in the table in the Sharing section:

Note:
-
As the
Notify
check box is selected at step 7, a Task request will be created for and
sent to James Brouw once the Exact.Jobs.Workspaces background job is
performed.
-
When the Task request cannot be created for the
selected person, a Task request will be created for and sent to you (the
person performing the sharing action) for notification purpose. This error will
also be logged at Modules > System > Reports > Log >
Errors
-
You can easily share the workspace to more people by
clicking Add + New at step 8.
-
If the user becomes inactive, the shared workspace(s) that belong to the inactive user will be automatically assigned to the manager of the inactive user. If the inactive user does not have a manager, the shared workspace(s) will not be assigned to anyone.
Notification feature for customers and partners
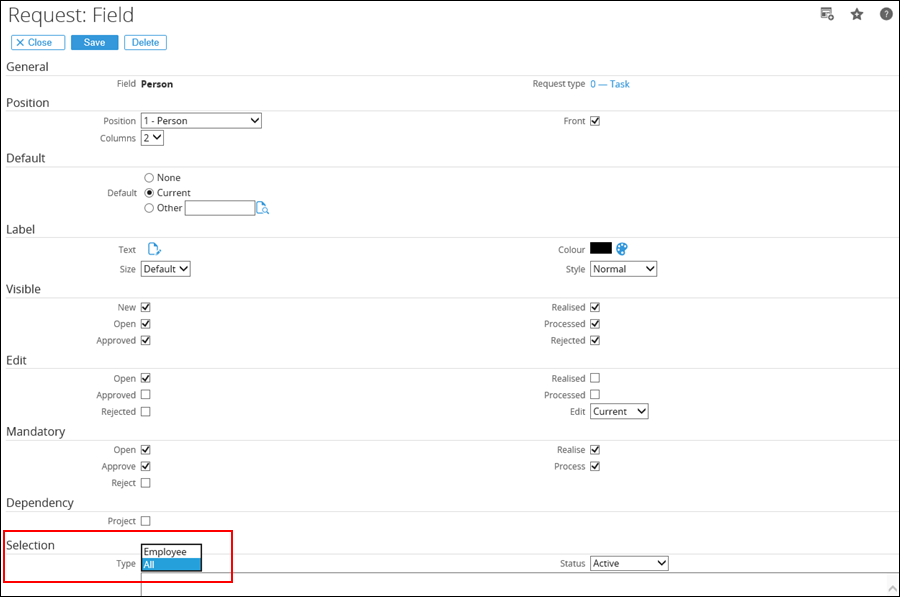
The Notify check box is only available to the
customers and partners if in the request type definition of the Task
request, the All option is selected at Type for the Person
field. See the following for an example:
Sharing feature for a company workspace
When it comes to sharing, there is a slight difference
between the default company workspace and other company workspaces. The default
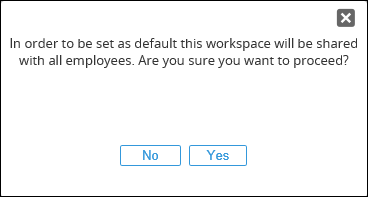
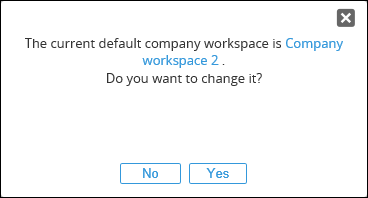
company workspace has to be shared with all employees. Thus, upon selecting the
Set as default company workspace check box for a company workspace, the
following message will be displayed depending on the situation:
- When no other company workspace has been set as default:
- When there is another company workspace that has been set as default:
Once a company workspace is set as default, the sharing option for the Internal entity will be automatically defined with the Can view right, as shown in the following:
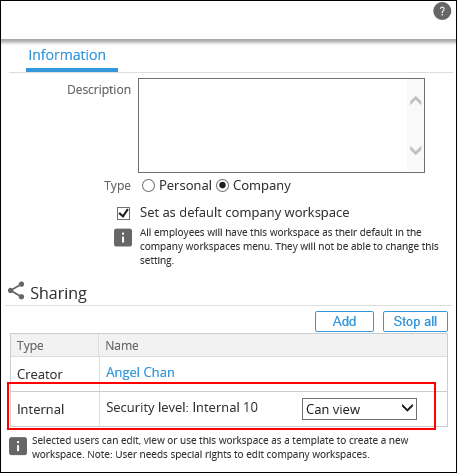
For this sharing option, you can change the right to Can
edit. However, you cannot change the right to Can use as a template.
Upon saving with this right, the message “In order to set this workspace as
default, it needs to be shared to view or edit with all employees. Please,
change viewing rights for “Internal 10”.” will be prompted.
1.6.9 Modify a shared
workspace
When a workspace is shared with one person or more, the
check in and check out modes are applied to prevent the workspace from being edited
by more than one person at the same time.
To modify a shared workspace:
- Go to the workspace, and then hover your mouse over the header of the workspace.
- Click
 Edit.
The Information panel will be displayed on the right.
- Make the changes, and then click Save. A message “Check in workspace?” will be displayed.
- Click Yes to check in the workspace and allow other people to modify the workspace.
Note:
The  Edit icon is not available at the header if you do not
have the right to edit the workspace, or the workspace has been checked out by someone,
thus preventing other people from editing the workspace at the same time.
Let’s look at the following example to understand how the
check in and check out modes work.
In section 1.6.8, you have shared “My workspace 1” with
James Brouw. At this moment, you are not able to add any widget to this
workspace ( Add widget is not
displayed at the bottom right).
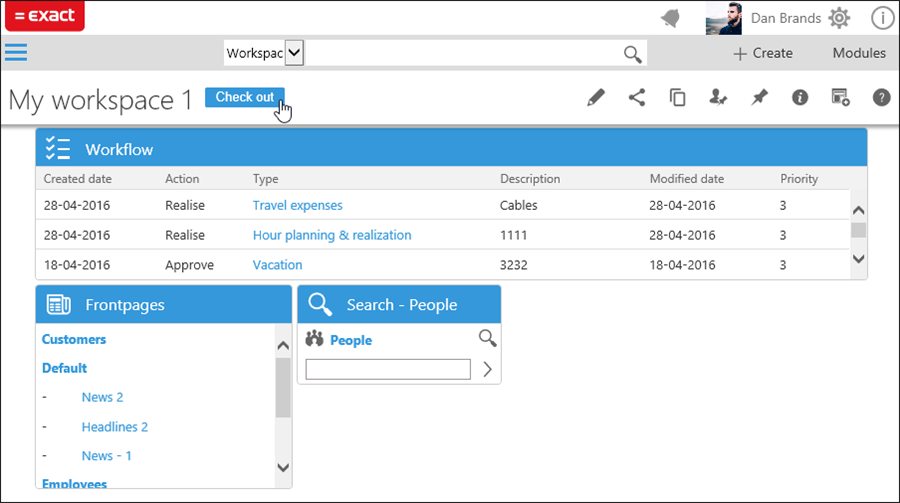
To modify this workspace, you have to check out the
workspace either by clicking the Check out button,  Edit,
or
  Share.
By clicking the Check out button, the following will
occur:
- This workspace is now in the checked out mode.
- This workspace is now locked by you for editing.
- The Check out button will be replaced with the Check in button.
-
 Add widget is
available for you to add more widgets to the workspace.
By clicking  Edit or
  Share, the
following will occur:
- This workspace is now in the checked out mode.
- This workspace is now locked by you for editing.
- The Information panel is displayed for editing, with the workspace area greyed out.
When James Brouw views “My workspace 1”, the workspace will
be displayed as follows:
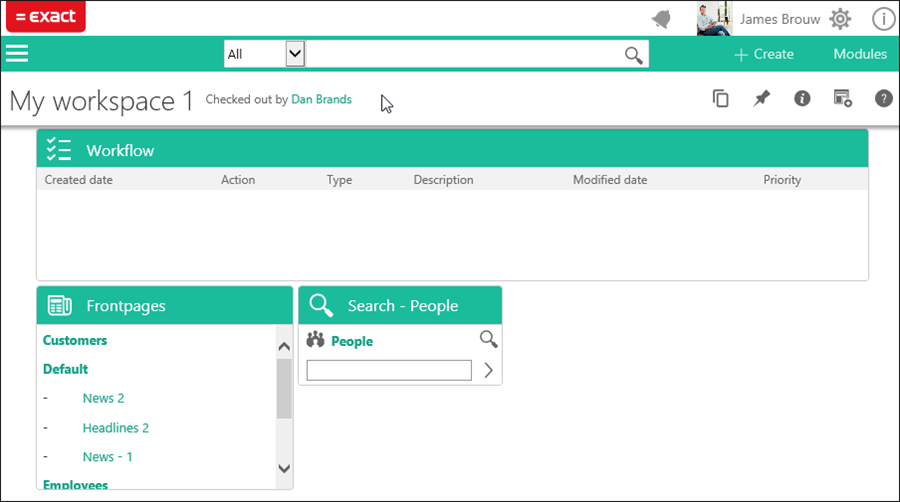
At this moment:
- At the header of the workspace, the name of the person who is
currently checking out the workspace is displayed.
- James Brouw is not able to add any widget to this workspace (
 Add widget is not
displayed at the bottom right).
- James Brouw is not able to modify the workspace (
 Edit and
  Share are not
displayed at the header of the workspace).
- If you have saved the changes made to the workspace title and in
the Information panel, but have yet to check in the workspace, these
changes can be seen by James Brouw. However, if you have made changes to the
widgets, these changes can only be seen by James Brouw once you have checked in
the workspace by clicking the Check in button.
1.6.10 Pin a workspace to
another person
With the Workspace pin role, you can pin a workspace
to the general navigation menu of other people. Note that you can only pin a
workspace to people with whom you have shared the workspace. More on sharing
workspaces in section 1.6.8 How do I share a workspace with another person?.
For an example, you would like to pin a workspace named “My
workspace 1” to James Brouw. You can perform the following steps:
- Go to “My workspace 1”, and then hover the mouse over the header of the workspace.
- Click
 Pin
to others. You will see the following:
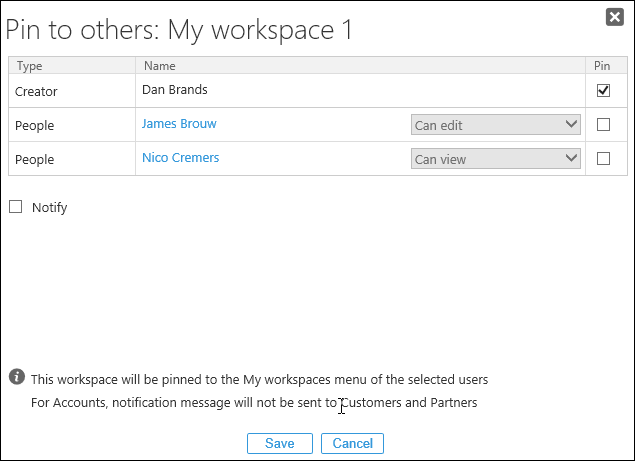
- Select the check box next to James Brouw.
- Select the Notify check box to notify James Brouw (via a request) that you have
pinned this workspace to his menu.
- Click Save.
Note:
-
As the
Notify
check box is selected at step 4, a Task request will be created for and
sent to James Brouw once the Exact.Jobs.Workspaces background job is
performed.
-
When the Task request cannot be created for the
selected person, a Task request will be created for and sent to you (the
person performing the pinning action) for notification purpose. This error will
also be logged at Modules > System > Reports > Log > Errors.
Notification feature for customers and partners
The Notify check box is only available to the
customers and partners if in the request type definition of the Task
request, the All option is selected at Type for the Person
field. See the following for an example:

If you pin the same workspace to the same person for more
than one time, no request will be sent for the second time. If there is a need
to send another Task request to the same person, you will have to unpin
the workspace from his My workspaces, and then pin the workspace to the
person again.
1.6.11 Add a Link widget
to my workspace
You can add a Link widget from any Exact Synergy Enterprise
page to your workspace. If for an example, you have to create project entries
daily, you can add a Link widget that will redirect you straight to the menu
path of the project creation.
To add a Link widget to workspace:
- Go to any page in Exact Synergy Enterprise. Based on the example, go to the project creation page.
- Click
 Add a Link widget to workspace. You will see the following:
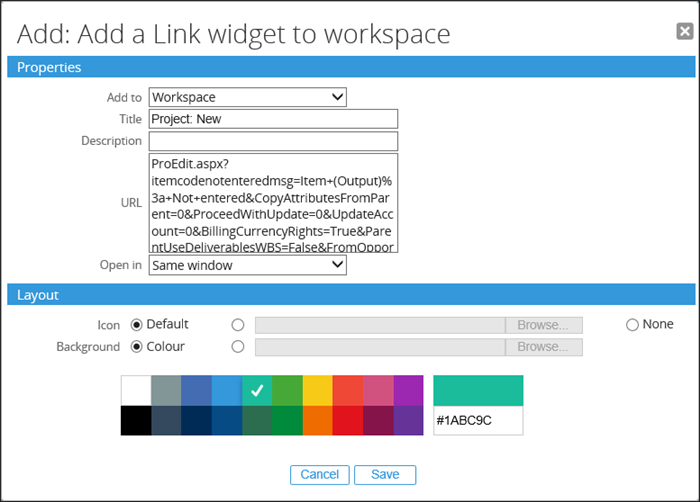
- At Add to, select the workspace to which you want to add the Link widget.
- Type the title and description of the workspace at Title and Description
respectively. By default, the name of the page will be filled.
- At URL, type the hyperlink of the page to which you want to add to the workspace. By
default, the hyperlink of the current page that you are viewing will be filled.
- Define other property and layout settings, if required.
- Click Save.
Once you have clicked Save at step 7, one of the
following scenarios may occur:
|
No
|
Scenario
|
Message displayed
|
|
1
|
You are the creator of the
workspace defined at the Add to field, and the workspace is not shared with anyone.
|
The following message will be
displayed:
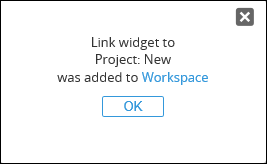
Click OK.
|
|
2
|
The workspace is shared with other
people.
|
The following message will be
displayed:
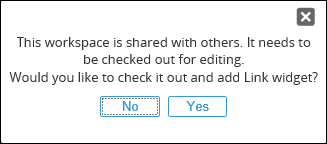
Click Yes to change the
workspace to the check out mode. The following message will then be displayed:

Click OK.
|
|
3
|
The workspace is currently checked
out by someone else.
|
The following message will be
displayed:
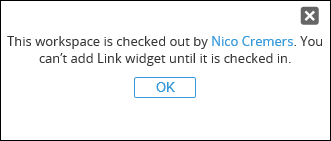
Click OK.
|
1.6.12 Delete an existing
workspace
You can delete a workspace that you have created.
To delete an existing workspace
- Go to the workspace, and then hover your mouse over the header of the workspace.
- Click
 Edit
or
  Share.
- Click Delete. The message “Are you sure you want to delete this workspace? This action can't
be undone.” will be displayed.
- Click Yes to confirm the deletion.
Note:
You cannot delete a workspace that you have set as default, or if the creator of the workspace is using it as the default workspace.
For a shared workspace, you can only delete the workspace if
you have the Can edit right for the workspace. However, there
are times when you cannot delete a shared workspace. See the following
scenarios:
Scenario 1
Andrew creates “Workspace ABC”. He then shares the workspace
with Kimi and Roy and grants them the Can edit right.
|
Person
|
Set Workspace ABC as default workspace?
|
Can delete Workspace ABC?
|
|
Andrew
|
Yes
|

|
|
Kimi
|
No
|

|
|
Roy
|
No
|

|
In this scenario, no one can delete “Workspace ABC” because
the creator of this workspace, Andrew, has set this workspace as his default
workspace. In order to delete “Workspace ABC”, Andrew has to first set a
different workspace as default.
Scenario 2
Andrew creates “Workspace ABC”. He then shares the workspace
with Kimi and Roy and grants them the Can edit right.
|
Person
|
Set Workspace ABC as default workspace?
|
Can delete Workspace ABC?
|
|
Andrew
|
No
|

|
|
Kimi
|
No
|

|
|
Roy
|
No
|

|
In this scenario, Andrew, Kimi, or Roy is able to delete “Workspace
ABC” because Andrew did not set this workspace as his default workspace.
Scenario 3
Andrew creates “Workspace ABC”. He then shares the workspace
with Kimi and Roy and grants them the Can edit right.
|
Person
|
Set Workspace ABC as default workspace?
|
Can delete Workspace ABC?
|
|
Andrew
|
No
|

|
|
Kimi
|
Yes
|

|
|
Roy
|
No
|

|
In this scenario, Andrew, Kimi, or Roy is able to delete “Workspace
ABC” because Andrew did not set this workspace as his default workspace. As for
Kimi, another workspace will automatically be set as default for him once “Workspace
ABC” has been deleted.
The workspace that is automatically selected for Kimi will
be based on the IDs of the workspaces under his My workspaces listing.
When there is no other workspace in his listing, a default workspace will be
automatically created for him and pinned to his My workspaces listing.
1.6.13 Rearrange
order of sections and menu items in general navigation menu
The order of the sections and menu items in the general navigation menu can be rearranged according to your preference. The Reorganize sections hyperlink is made available at the bottom of this menu when the layout is expanded and docked, or expanded and undocked.
Reorganizing sections
- Go to the workspace, and then click Reorganize sections at the bottom of the general navigation menu. The sections are now indicated with the
 icon.
icon.
- Drag the section, and then drop it to the preferred order.
- Click Done.
Reorganizing menu items
- Go to the workspace, and then click Reorganize sections at the
bottom of the general navigation menu.
- Click the
 or
or  icon to rearrange the menu item in an ascending or
descending order respectively.
- Alternatively, you can drag the menu item, and then drop it to the preferred order within the same section.
- Click Done.
Return to top
1.7 What happens when I ...?
1.7.1 Change the type of an existing shared workspace
When switching an existing shared workspace from one type to another, the message “This workspace is shared with others. Changing its type will remove all shares and pins. Are you sure you want to proceed?” will be displayed.
The following will occur:
- If you are the creator of this workspace, clicking Yes will remove all sharing and/or pinning of the workspace.
- If you are not the creator of this workspace, clicking Yes will remove all sharing and/or pinning of the workspace.
Upon saving or checking in the workspace, another message “All shares and pins will be removed and you are unable to access the workspace after this. Do you want to grant yourself with edit right?”
will be displayed. The following will occur:
- By clicking Yes, this workspace will be shared with you again
with the Can edit right, allowing you to modify this workspace
later on.
- By clicking No, you will no longer be able to modify this workspace
as your Can edit right to this workspace has already been removed. At this time, only the creator of this workspace has the right to modify it.
Return to top
| Main Category: |
Attachments & notes |
Document Type: |
Online help main |
| Category: |
|
Security level: |
All - 0 |
| Sub category: |
|
Document ID: |
27.609.178 |
| Assortment: |
Exact Synergy Enterprise
|
Date: |
16-10-2024 |
| Release: |
|
Attachment: |
|
| Disclaimer |