E-WMS - how to configure Datalogic devices for GS-128 scanning in E-WMS
E-WMS
Introduction
This document describes how to enable and configure use of a prefix,
suffix, group separator and code identifier on Datalogic
devices.
Description
This document contains following sections:
Prerequisites
This procedure only applies to Windows CE devices. In the sample screenshots
a Datalogic Skorpio X3 model was used.
Accessing the scanner settings
On the device, go to Start, Settings, Control panel.
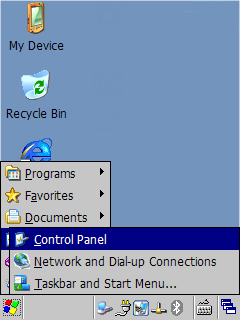
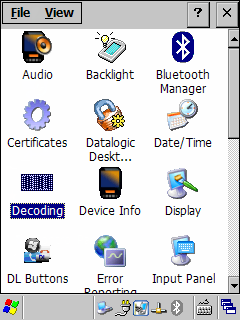
In the control panel, double click Decoding.
Configure prefix and suffix
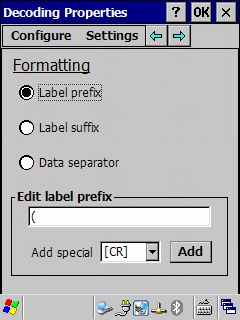
If you do not see the screen Formatting, select menu Configure,
General, Formatting.
Select the option Label prefix and click on the text box below 'Edit
label prefix'. The keyboard will now show, enter the character you will be using
as prefix, for example '(' or '{'.
Make sure no extra characters, especially no 'special characters', are added
here.
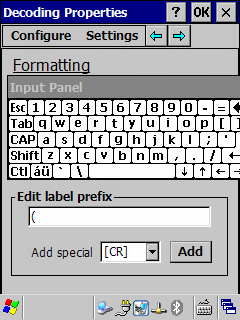
Close the keyboard again by touching the keyboard icon on the taskbar, and
choosing 'Hide Input Panel'.
Select the option Label suffix and click on the text box below 'Edit
label suffix'. Enable the keyboard again.
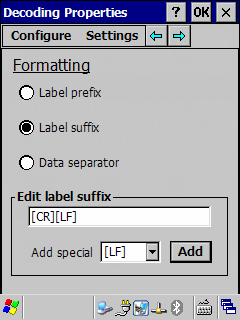
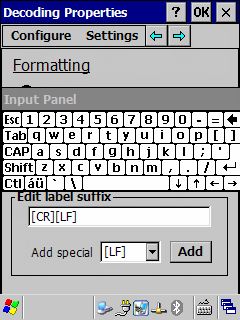
Default, the suffix will be [CR][LF], which means the scanner will give an
automatic ENTER after each scan, which is desirable when you do not want to
press ENTER manually after each scan. You have to insert the suffix character
before these characters. You first have to delete the characters [CR][LF] by
pressing the BKSP (backspace) key on the real keyboard of the device.
Now type the suffix sign ")" or "}" and next, in the dropdown list, select [CR]
and press Add, then select [LF] and press Add.
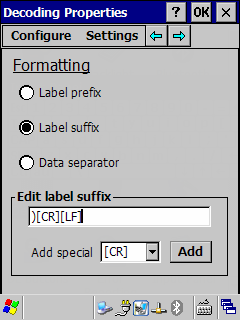
Press OK (on top) to save and close this screen.
The same characters as used here (except [CR] and [LF]) have to be configured
in E-WMS scanner settings as
prefix and suffix.
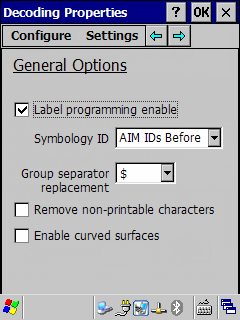
Configure AIM code identifier and group separator
The 'group separator' is needed to translate a hidden data separator sign in
GS-128 bar codes, which defines where data fields with variable length end. Without
the group separator, GS-128 cannot be used properly.
Follow the steps in previous section 'Accessing the scanner settings' and
select Configure, General, General options.
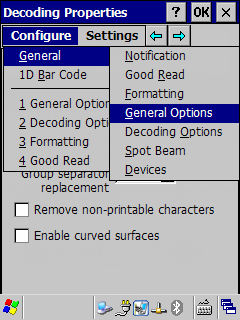
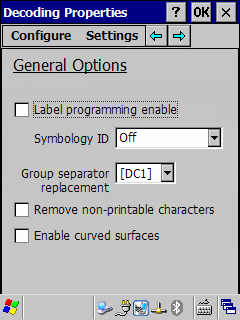
- Enable the option Label programming enable.
- At 'Symbology ID', select AIM IDs Before
- At 'Group separator replacement', set the cursor focus in the drop down
list, activate the keyboard, and press the $ sign (first press
Shift), or the character you will use as group separator.
This should be the result:
Test the configuration
Start WordPad on the device in Start, Programs, Microsoft Wordpad.
Scan several types of barcodes, preferable one of each type used in the
warehouse. Depending on your configured settings and the scanned barcodes, the scan in WordPad should look like
this:
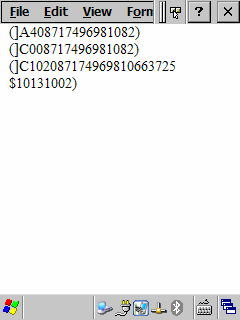
In this sample were scanned:
- a CODE39 barcode '08717496981082'
- a CODE128 barcode '08717496981082'
- a GS-128 barcode '08717496981066372510131002' (with a data terminator
between 5 and 1)
Verify no extra characters or 'ENTER' (empty lines) are returned by a scan. Also
verify that each new scan begins on a new line. If the cursor remains directly
behind the scanned barcode instead of moving to a new line, then the 'ENTER' is
not configured (see [CR][LF] in chapter 'Configure prefix and suffix').
Next, test the barcodes in E-WMS (for example in Transfers or Stock
Transactions), after E-WMS has been configured properly.
Related documents
| Main Category: |
Support Product Know How |
Document Type: |
Support - On-line help |
| Category: |
On-line help files |
Security level: |
All - 0 |
| Sub category: |
Details |
Document ID: |
25.609.833 |
| Assortment: |
E-WMS
|
Date: |
03-02-2014 |
| Release: |
|
Attachment: |
|
| Disclaimer |