The structure of an XML file
With the
XML module you can import XML files in your company. It is possible to
import XML files that are exported from other companies, but it is also possible
to import XML files from other software solutions. In that case it is important
that the XML file complies to the definition for importing XML files. Also the
XML file has to contain all necessary information that Exact Globe Next needs to
successfully import the file.
When importing data in Exact Globe Next the same logic applies when manually
creating the entry. invoice, sales order etc. For instance the payment method in
a sales entry is determined by the payment condition that is used. This applies
when manually creating a sales entry, but also when importing a sales entry.
When no payment condition is defined in the entry, the system will automatically
use the payment condition that is linked to the account and the payment
method that is selected in that payment condition. When there is no payment
condition linked to the account, the system will use the payment condition that
is defined in the general ledger settings. Whether you manually create the entry
or import it, the logic is the same.
Another example is the employee. When creating a sales invoice you can link
an employee. By default this is the employee that is linked as a representative
to the account. When no employee is linked as a representative to the account,
the employee that creates the sales invoice will be used.
The same applies when importing a sales invoice. When you do not define an
employee, the representative linked to the account will be used. When here no
representative is linked, the employee that performs the import will be used. In
this case you have to make sure that this employee is linked to the role Representative otherwise the import will fail
This document explains how an XML file should look, based on an example. This
example applies to a sales entry with minimal information. Depending on your
situation and license the XML file can be extended with extra information such
as a cost center, cost unit, project, item, etc. However in this example we will
only cover the basics.
You have to keep in mind that for creating XML files you need solid knowledge
of XML in general but also (technical) knowledge of Exact Globe Next. A
consultant of Exact or an Exact partner will be glad to help you with it.
When looking at an XML file in notepad you can see that the file exists out of
several tags. These are the open- and close tags. Every part contains an open
tag and a close tag. Within these tags you can find the information about the
specific part. An open- and close can also be part of the open- and close of
other parts. A close tag can be recognized by the /-sign. For instance a closing
tag can look like </EXAMPLE> while the corresponding opening tag does not
have the /-sign <EXAMPLE>.
When looking at the sales entry from our example, you can see it exists out
of multiple parts. First we have the entry itself. The entry contains an entry
line, and the entry line contains a general ledger account. This same principle
applies to the XML file of a sales entry. The open- and close of the entry
contain the open- and close tags of the entry line. The open- and close of the
entry line contain the open- and close tags of the general ledger account.
To gain insight in the structure of an XML file you can for instance create an
entry, sales invoice, sales order etc. in Exact Globe Next and then export it.
When you open the XML file in notepad you have an example file.
The tags that are used are defined in the eExact-Schema.xsd file which is
located in the '...\Exact Software\Docs'-directory. This file contains all
tags and conditions that apply to an XML file. This file can also be viewed as a
document, which is explained in more detail later in this document.
There are several applications that can be used to view, edit or generate the
content of an XML file. Depending on which application you use it might be
possible to import the Exact scheme in this application. This document only
describes the basics, and only used notepad to display the content of an XML
file.
Looking close at the XML file
The first line of an XML file always contains information about th eversion of
the XML file.
<?xml version="1.0" ?>
Next the open tag is used that refers to the scheme.
<eExact xmlns:xsi="http://www.w3.org/2001/XMLSchema-instance" xsi:noNamespaceSchemaLocation="eExact-Schema.xsd">
At the end of the XML file you can find the corresponding close tag. This can
be recognized by the /-sign.
</eExact>
Within these (Exact Scheme) open- and close tags, the tags and information of
the entry are available.
When looking at the
Mandatory fields and XML file formats, you can see that for an entry (GL
Entries) the following fields are mandatory:
<?xml version="1.0" encoding="utf-8" ?>
<eExact>
<GLEntries>
<GLEntry>
<Journal code="*dagbk.dagbknr - string - mandatory">
</Journal>
<FinEntryLine>
<GLAccount code="*grtbk.reknr - string - mandatory">
</GLAccount>
</FinEntryLine>
</GLEntry>
</GLEntries>
</eExact>
When converting this example of mandatory fields to an XML file that can be
imported, it can look like this:
<?xml version="1.0" ?>
<eExact>
<GLEntries>
<GLEntry>
<Journal code=" 70">
</Journal>
<FinEntryLine>
<GLAccount code=" 8000">
</GLAccount>
<Debtor code=" 60013">
</Debtor>
</FinEntryLine>
</GLEntry>
</GLEntries>
</eExact>
In the example above the corresponding tags have the same color to make it
more clear.
In this case it is a sales entry, and then a debtor is also mandatory. If it
would be a purchase entry, it would not be allowed to link a debtor, but it would be
mandatory to link a creditor. Of course the general ledger account and debtor
that are used in the XML file should be available master data in the company.
In this example journal 70 is used. Journal 70 is a sales journal in the
company. General ledger account 8000 is a revenue account.
You can import the entry above in a company. But as you can see the
information available is only limited. For instance no entry number is defined.
In that case Exact Globe Next will automatically assign the first available
entry number of the journal. This works the same way when manually creating a
sales entry. In that case the entry number is also automatically filled.
Further there is also no currency code present in the file. Exact Globe Next
will use the defaults for this, similar as when manually creating an entry. Also
no date is defined. During the import the date will automatically be filled with
the date on which the import is performed.
Another thing that is missing is the amount. When adding an amount it is
important that you know which tags are used to add an amount in the XML file. In
the XML-scheme
document you can find an overview of all tags and their structure, which is
explained in more detail later in this
document.
To add the amount we will use the following tags:
<Amount>
<Debit>0</Debit>
<Credit>150</Credit>
</Amount>
When adding these tags to the example entry it looks like this:
<?xml version="1.0" ?>
<eExact>
<GLEntries>
<GLEntry>
<Journal code=" 70">
</Journal>
<FinEntryLine>
<GLAccount code=" 8000">
</GLAccount>
<Debtor code=" 60013">
</Debtor>
<Amount>
<Debit>0</Debit>
<Credit>150</Credit>
</Amount>
</FinEntryLine>
</GLEntry>
</GLEntries>
</eExact>
Now we have added the amount in the entry lines but not in the header of the
entry. In that case Exact Globe Next will calculate the header amount itself
when importing the file When you also want to add the amount in the header of
the XML file, it will look like this:
<?xml version="1.0" ?>
<eExact>
<GLEntries>
<GLEntry>
<Journal code=" 70">
</Journal>
<Amount>
<Value>150</Value>
</Amount>
<FinEntryLine>
<GLAccount code=" 8000">
</GLAccount>
<Debtor code=" 60013">
</Debtor>
<Amount>
<Debit>0</Debit>
<Credit>150</Credit>
</Amount>
</FinEntryLine>
</GLEntry>
</GLEntries>
</eExact>
In the example above the entry contains an amount in the header and in the
entry line.
When adding VAT to the import file it becomes a bit more difficult. Depending
of which type VAT-code is used, the amount including the VAT has to match the
total amount of the invoice.
<?xml version="1.0" ?>
<eExact>
<GLEntries>
<GLEntry>
<Journal code=" 70">
</Journal>
<Amount>
<Value>150</Value>
</Amount>
<FinEntryLine>
<GLAccount code=" 8000">
</GLAccount>
<Debtor code=" 60013">
</Debtor>
<Amount>
<Debit>0</Debit>
<Credit>150</Credit>
<VAT code="2">
</VAT>
</Amount>
</FinEntryLine>
</GLEntry>
</GLEntries>
</eExact>
In the example above VAT-code 2 is added. VAT-code 2 is present in the
company with the following properties:
- Transaction type: Both, this means the VAT-code can also be used in
sales entries. When this was not the case the VAT-code would not be
accepted. This is the same when manually creating an entry. In that case it
is also possible to select only VAT-codes with the transaction type Both
or Sales.
- VAT type: Excluding
- Percentage: 19%
When importing this sales entry the amount in the header would automatically
be adjusted. The imported entry would have a header amount of 178,50. The entry
exists out of a revenue line of 150,- and a VAT -line of 28,50.
However, in this example the sales amount is 150,- and this is the revenue
including the VAT. To make sure this is correctly defined in the XML file, it
has to look like this:
<?xml version="1.0" ?>
<eExact>
<GLEntries>
<GLEntry>
<Journal code=" 70">
</Journal>
<Amount>
<Value>150</Value>
</Amount>
<FinEntryLine>
<GLAccount code=" 8000">
</GLAccount>
<Debtor code=" 60013">
</Debtor>
<Amount>
<Debit>0</Debit>
<Credit>126,05</Credit>
<VAT code="2">
</VAT>
</Amount>
</FinEntryLine>
</GLEntry>
</GLEntries>
</eExact>
As you can see the amount of the revenue line of the entry is adjusted to
126,05. This is the amount of 150,- reduced with 19% VAT. The imported entry
will have a header with an amount of 150,- a revenue line of 126,05 and a VAT
line of 23,95,
Depending on your situation and license the XML file can be extended with
extra information such as a cost center, cost unit, project, item, etc.
To view which tags can be used within other tags you can check
this
overview. Here you can find the Exact scheme which contains the available
tags and structure. As an example about how to use the schema you can use the
sales entry as an example.
The sales entry is an entry. An entry belongs to the GLentries. When looking
up this part in the overview you can see that <GLEntry> belongs to <GLEntries>.
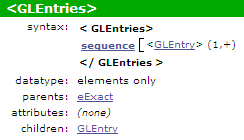
When clicking the GLEntry link in the overview, the structure of GLEntry is
displayed.
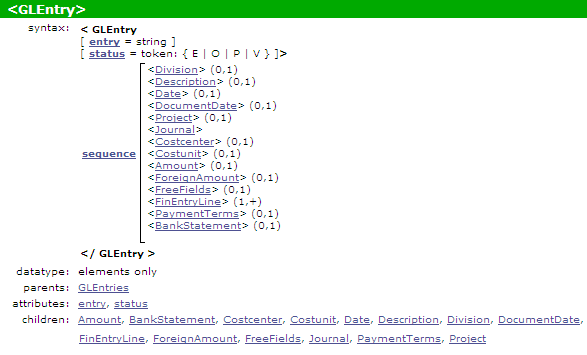
GLEntry can contain several other parts such as Amount that we've used in
the example. But also the Date, Description, Journal, an entry line (FinEntryLine),
a cost center (Costcenter), etc.In the example we've added an amount. For this
we've used the part Amount. To view the structure of Amount you can click
it:
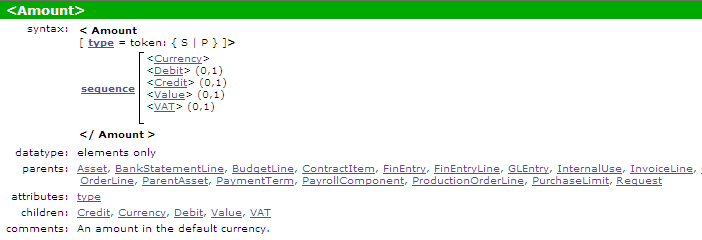
Here you'll see the parts Value, Debit and Credit, These we've used in
the example XML file. In the example we used Value for the header of the entry.
The header of an entry can only contain one amount, so you can use Value. For
the entry lines this is different. An entry line can have a debit or credit
amount (for instance in a general journal entry). To view the properties of
value you can click the hyperlink in the overview:
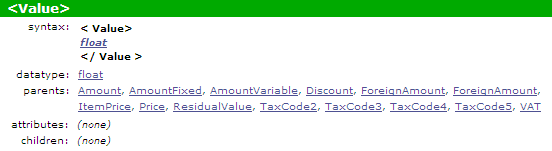
Here you can see that Value is a float. A float is a variable in which a floating point number (number
with decimals) is stored. In this case the amount in the header of the entry.
Another part of GLEntry is FinEntryLine, the entry file. An
entry can contain multiple entry lines, so within the open- and close tag of GLEntry in
the XML file there multiple entry lines (FinEntryLine) tags. In the example
we've used only one entry line.
To view the structure of FinEntryLine you
can click the link.
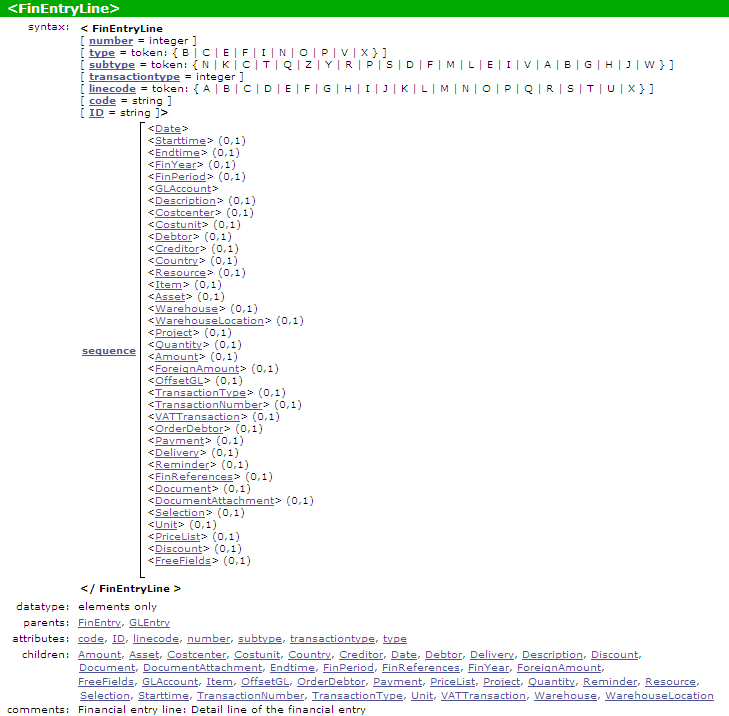
As you can see the entry line can contain various parts. You can click on
every part to view the details of that part. Amount is also part of the entry
line. When clicking Amount you will see the same information as when clicking
Amount on the header of the entry.
Frequently asked questions?
- Where can I find the Exact Scheme?
You can view the
Exact XML scheme as a document in document
12.252.025 - XML-scheme.
The scheme is also available as a file. This is the 'eExact-Schema.xsd'
file that can be found in the 'Docs' folder of your Exact Globe Next installation.
- Can I use external tools for mapping an XML file to the XML scheme?
When you have an XML file that you want to import in Exact Globe Next
you can map it to the XML scheme of Exact Globe Next. There are several
external tools available for this. For an example, see document 01.046.575 - How to map
an XML file to the Exact Scheme?.
- What does the 'Choice' option in the XML scheme mean?
At some parts the Choice option is available. The option
Choice
indicates that there are multiple parts and one has to be chosen. For
instance for a purchase order. When creating a purchase order you can
define that it has to be delivered to a debtor or a warehouse. When
creating a purchase order you always have to make a choice whether to
deliver it to a debtor or a warehouse. In the XML scheme this is also
available. For instance at the <DeliverTo> part.
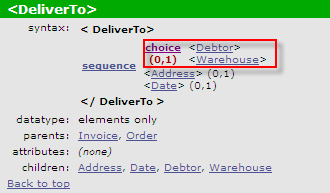
Here the option Choice with the parts <Debtor> and <Warehouse>
is displayed. As mentioned in the example of the purchase order you have to make
a choice between a debtor or a warehouse.
- Which values are possible and what do these values stand for?
Some parts in the XML file have values. For instance when importing
general ledger account. In the part of general ledger accounts <GLAccount>
you see for instance at Type and Subtype several options:
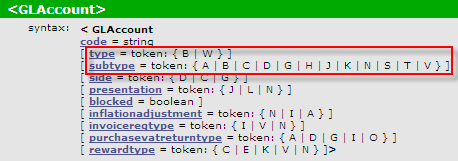
For Type this is B and W and for Subtype this is
A, B, C, D,
G, H, J, K, N, S, T and V.
The type refers to the type of general ledger account. This can be B or
W. The subtype applies to the subtype of the general ledger account. To learn
what these mean you can click the Type or Subtype hyperlink to view the
details:
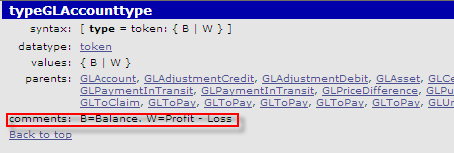
At Comments you can see what these characters mean. In this case B is
Balance which indicates that the general account is a balance sheet
account. The W is Profit - Loss. The same applies when clicking the
subtype of the general ledger account.

In this case you can see that the subtype A indicates that it is an Asset
account, the subtype B indicates it is a bank account, the subtype C is a
creditor account, etc.
This information can also be found in the
database documentation.
More information
| Main Category: |
Support Product Know How |
Document Type: |
Support - On-line help |
| Category: |
On-line help files |
Security level: |
All - 0 |
| Sub category: |
Details |
Document ID: |
27.512.900 |
| Assortment: |
Exact Globe+
|
Date: |
26-09-2022 |
| Release: |
|
Attachment: |
|
| Disclaimer |