How-to: Setting up Exact Exchange Integrator in Exact Lightweight Integration Server (ELIS)
Introduction
This document describes the configuration
steps required to set up the synchronization between Microsoft Exchange and Exact Synergy Enterprise in ELIS. For more information on the supported operating
systems for the Microsoft Exchange server and the system requirements for Exact
Synergy Enterprise, see Exchange Server Supportability Matrix at http://technet.microsoft.com/en-us/library/ff728623(v=exchg.150).aspx and Hardware and software requirements for Exact Synergy
Enterprise.
Note that the current version of Exact Exchange Integration in ELIS supports the use of the two different domains (the active directory domain and the Exchange Online email domain) for Exact Synergy Enterprise and Exact Exchange Integration, and is only applicable for Microsoft Exchange Online. The following are the examples of the related domains:
- Active directory domain: ABC (ABC\username)
- Exchange Online email domain: ABCCorp.com (John.Smith@ABCCorp.com)
Scope
This document describes the following:
- Setting up the Exact Exchange Integrator solution in ELIS
- Configuring Exact Exchange Integrator
Pre-requisites
To start the setup, the server must have the following:
- ELIS is installed (for more information on the ELIS installation process, see How-to: Installing Exact Lightweight Integration Server (ELIS)).
- Microsoft Exchange Web Services (EWS) Managed API (minimum version 2.2) must be installed via the EwsManagedApi.msi installer.
- Exact Synergy Enterprise must be installed.
- Microsoft Message Queuing (MSMQ) Server must be installed and enabled in the Exact Synergy Enterprise web server and ELIS server. For more information, see Turning on Microsoft Message Queuing.
- Exact Integration Dispatcher (ExactDispatcher x64.msi or ExactDispatcher
x86.msi) must be installed in the Exact Synergy Enterprise web server. The installation package is stored in the CAB folder of the Exact Synergy Enterprise installation folder.
Setting up
To install the Exact Exchange Integrator solution via
FTP, go to the ELIS management console and then click Check for
updates. The following screen will be displayed. The Check for updates
screen allows you to download and update the existing version, and install all
the dependencies.
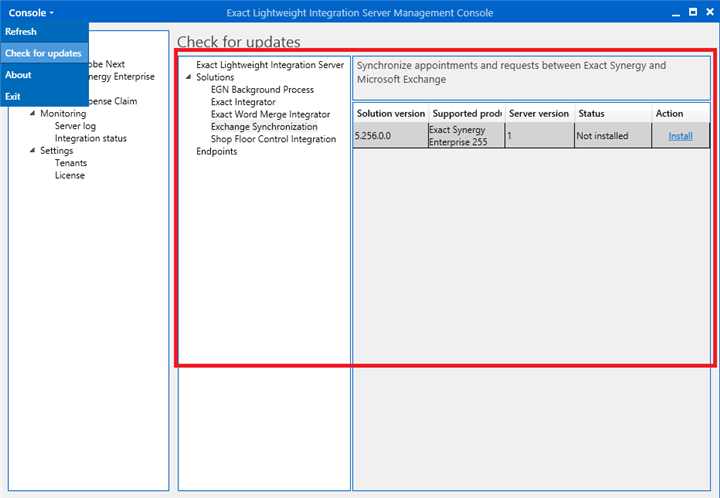
Under Solutions on the right panel, select Exchange
Synchronization. The following screen will be displayed:
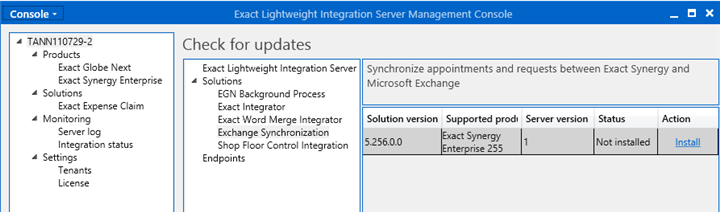
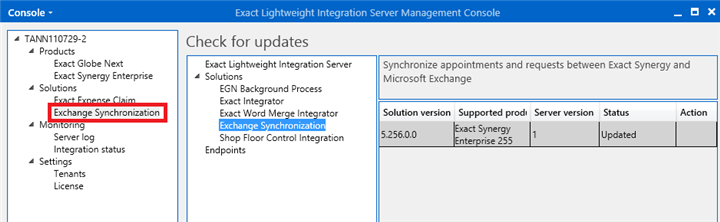
Click Install under the Action column, and the
ELIS management console will download and install the c solution.
Once the installation is completed, “Updated” will be displayed under the Status
column and the installed application(s) will be displayed on the left panel.
When you update or install the Exchange Synchronization
solution, the product packages will also be updated without any warning
message. The updates for the product packages will take effect immediately and
based on the activation configuration, you have to manually update the
configuration or activation.
Note: Before configuring the Exchange Synchronization
solution, the Exact Synergy Enterprise package must be configured. The product
package will be automatically installed once you have set up the Exchange
Synchronization solution. For more information on configuring the product
packages, see How-to:
Setting up client endpoints for Exact Lightweight Integration Server (ELIS).
Configuring
After setting up the Exchange Synchronization solution,
you have to configure and activate the solution before the solution can be
used.
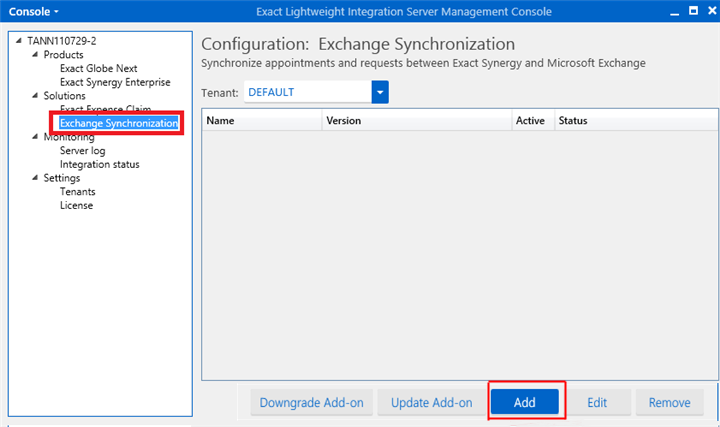
To activate the Exchange Synchronization solution,
click Exchange Synchronization under Solutions on the left panel,
and then click Add. The following screen will be displayed:

In the New configuration: Exchange Synchronization screen,
select a product under the Select client(s) section, and then click Next.
The following screen will be displayed:
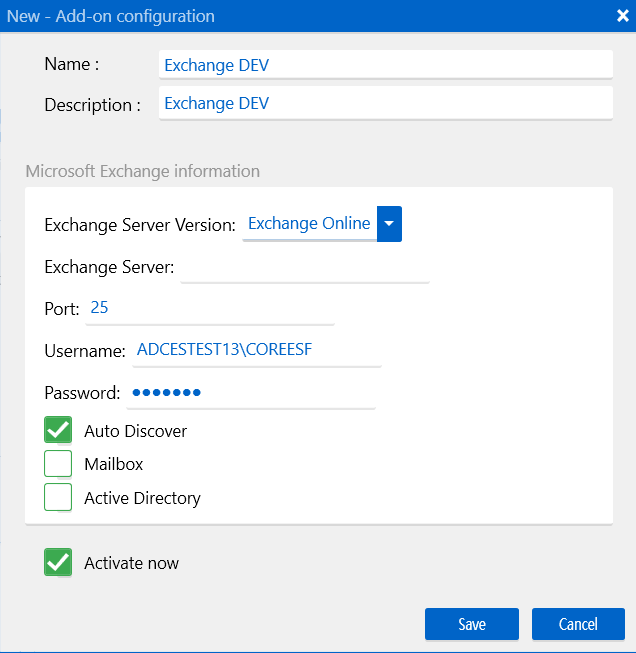
In the New – Add-on configuration screen, define the relevant fields.
Below are the descriptions of each field:
- Name: Type the name of the configuration at this field.
- Description: Type the description for the configuration at this field.
Microsoft Exchange information section
- Exchange Server Version: Select the Microsoft Exchange Online version at this field.
- Exchange Server: This field is to be left blank.
- Port: By default, port "25" must be used.
- Username: The format of the username at this field is 'domain name\username'. The domain is based on the premise active directory domain and the user name is based on the service account user of the active directory.
- Password: The password is the password of the service account user of the active directory.
- Auto Discover: This option must be selected at all times to ensure that the connection to Microsoft Exchange Online is successful.
- Mailbox: This option must not be enabled.
- Active Directory.This option must not be enabled.
Activate now: You can select this option during the configuration, or after saving the configuration to activate the solution.
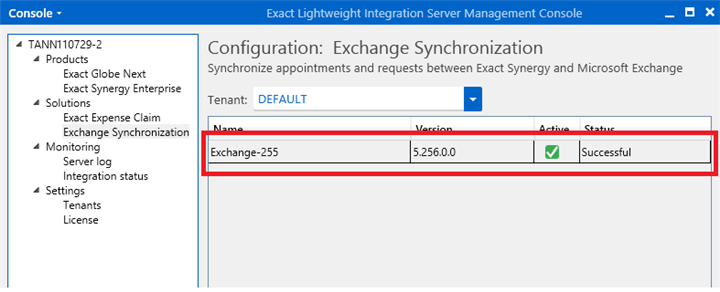
Next, select the Activate now check box to activate the
solution, and then click Save.
The following screen will be displayed:
For more information on the role and rights for the service account, see How-to:
Installing Exact Exchange Integrator (Microsoft Exchange 2010).
Configuration for on-premise Exchange servers
For on-premise Exchange servers, for example, Exchange 2013, 2016, or 2019, the server can be optionally configured with Auto Discover.
Exchange 2013, 2016, or 2019 with Auto Discover enabled
In the New – Add-on configuration screen, define the relevant fields.
Below are the descriptions of each field:
- Name: Type the name of the configuration at this field.
- Description: Type the description for the configuration at this field.
Microsoft Exchange information section
- Exchange Server Version: Select the Exchange server version at this field.
- Exchange Server: This field is to be left blank.
- Port: By default, port "25" must be used.
- Username: The format of the username at this field is 'domain name\username'. The domain is based on the premise active directory domain and the user name is based on the service account user of the active directory.
- Password: The password is the password of the service account user of the active directory.
- Auto Discover: This option must always be selected to ensure that the connection is successful.
- Mailbox: This option must not be enabled.
- Active Directory: This option must not be enabled.
- Activate now: You can select this option during the configuration, or after saving the configuration to activate the solution.
Next, select the
Activate now check box to activate the solution, and then click
Save.
Note that you don’t have to enable Auto Discover if you already have defined the Exchange server address.
| Main Category: |
Attachments & notes |
Document Type: |
Online help main |
| Category: |
|
Security level: |
All - 0 |
| Sub category: |
|
Document ID: |
26.569.255 |
| Assortment: |
Exact Synergy Enterprise
|
Date: |
10-09-2021 |
| Release: |
|
Attachment: |
|
| Disclaimer |