How-to: Installing and configuring Search All feature
Introduction
Note: Keep in mind that this solution requires an additional
implementation that may involve extra costs. Please contact your account manager
for more information.
Elasticsearch allows you to use the All option in the
quick search feature in Exact Synergy Enterprise (ESE). This document describes
the installation and configuration of Elasticsearch, which are recommended to
be performed by a consultant.
This document contains the following sections:
Requirements
Return to top
Installing Elasticsearch
Installing Elasticsearch on a separate server
Note: It is recommended to install Elasticsearch on a separate server.
- Download the elasticsearch-6.6.2
zip file.
- Unzip the file, preferably to a directory that can be easily accessed due to command line interactions.
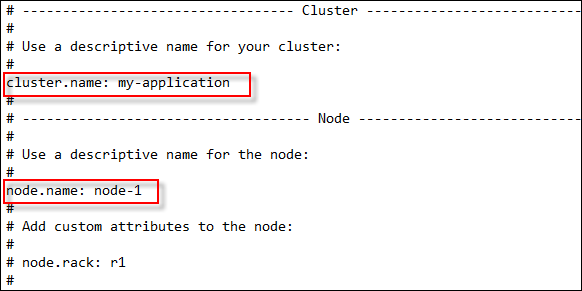
- Change the names of the cluster and node for the Elasticsearch node by going to the installation directory of Elasticsearch. This step is recommended to avoid any replication of indexes and data if there is another Elasticsearch with the same name running
on the network.
- Open the config folder, and then open the elasticsearch.yml configuration file with Notepad. See the following example on the naming of the cluster and node:
- Start the Elasticsearch service. This can be performed via the command prompt or through a Windows service. By using the command prompt, you must manually start
Elasticsearch every time you restart your PC. Hence, it is recommended to perform this via a Windows service, so that Elasticsearch can be started automatically
when you restart your PC.
a. Via command
prompt
- Go to the Windows command prompt.
- Go to the installation folder where you have unzipped the file.
- Run “bin\elasticsearch.bat”.
- Elasticsearch has now started and the window should remain open.
Note: If the message “JAVA_HOME environment variable must be set!” is displayed, you will have to first set the
environment. For more information, see
How-to: Setting JAVA_HOME environment variable.
b. Via Windows service
- Go to the Windows command prompt.
- Go to the installation folder where you have unzipped the file.
- Run “bin/elasticsearchservice.bat install”.
- The service will be installed. Once completed, the window can be closed. You can go to Windows Administrative Tools ? Services to check if the Elasticsearch service has started.
- Customize the properties of the service so that it will automatically start when Windows starts.
Note: If the message “JAVA_HOME environment variable must be set!” is displayed, you will have to first set the
environment. For more information, see
How-to: Setting JAVA_HOME environment variable.
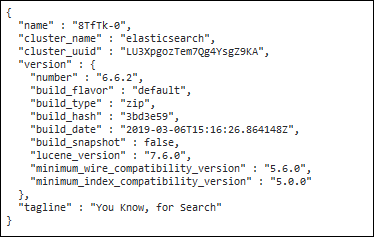
- Make sure the system is running Elasticsearch. To do so, open a browser (preferably Chrome) and type the URL of the Elasticsearch installation, including port 9200. For example:
“http://domain.com:9200”. The search engine will return the following result:
Installing Elasticsearch via the product updater
Elasticsearch can also be installed via the
product updater from product update 260 onwards.
- Run the “ProductUpdater_T15_AE.exe” file in the
Exact Synergy Enterprise “bin” folder. The following screen will be displayed.
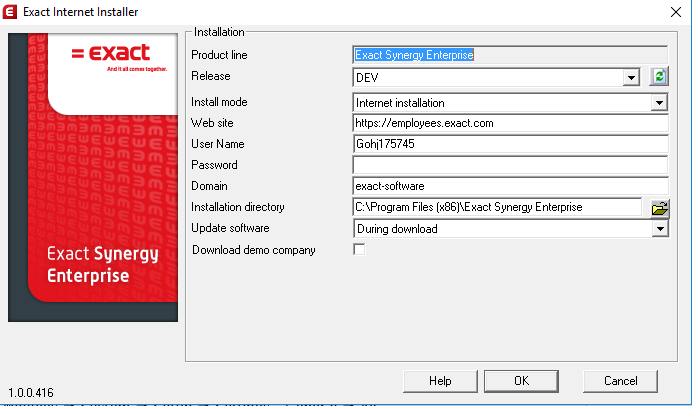
- Define the fields.
- Click OK.
- Click Install
to install Elasticsearch, or Skip if
you do not want to install Elasticsearch.
Note:
The Install Elasticsearch screen
will be displayed if the following conditions are met:
- Elasticsearch or Java is not installed.
- Exact Synergy Enterprise and Elasticsearch is
not installed for product update 260 and above.
- When updating Exact Synergy Enterprise to
product update 260 or above, and Elasticsearch is not installed.
Return to top
Updating Elasticsearch or Java
Normally, you will want to keep the Elasticsearch and Java installations
the same on all the nodes in the Elasticsearch cluster. Thus, updating of
Elasticsearch or Java requires some preparation.
Elasticsearch depends heavily on Java. Thus, any
Elasticsearch processes that are running can be interrupted by the Java
installation. Make sure the responsibilities are taken care of by the other
nodes before starting the update. This is to ensure there is zero down time.
Before you start to update all the nodes in the cluster, a
plan must be created whereby when a node is removed from the cluster, the other
nodes will take over the job of the cluster. Once the cluster is working again
(the status of the cluster will be green), the extracted node can be updated. When
the new Java is installed, and the variable is updated, you can stop and start
the service via the command prompt “service stop” and “service start”. Once
this is done, the node can be put back into the cluster, and all the responsibilities
will be redistributed again. The next node can be updated only when this is
completed.
For
more information, see https://www.elastic.co/guide/en/elasticsearch/reference/current/rolling-upgrades.html.
Return to top
Settings in Exact Synergy Enterprise
This setting needs to be performed to enable the
Elasticsearch engine in ESE.
- Go to Modules ? System ? Setup ? Settings -
General ? All.
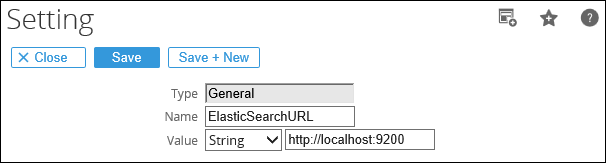
- Click New to create a setting.
- At Name, type “ElasticSearchURL”.
- At Value, select String from the drop-down box, and then type the URL of the Elasticsearch installation including port 9200. See the following for an
example:
Return to top
Retrieving data from ESE database to load into Elasticsearch
By using the Exact Elastisearch Tool, you can retrieve all the data from the ESE database and load them into Elasticsearch.
In addition, you can remove all indexed data and rebuild the index.
You should run this tool for the first time. It is not necessary to run this again when there are new documents, employees, et cetera, as these data will automatically be loaded into Elasticsearch.
The following steps describes the process of loading the data into Elasticsearch.
- Go to the installation directory of your ESE, and then open the bin folder.
- Run the Exact.Search.Tool.exe file.
- In the displayed screen, connect to the SQL server by typing the server name, the database of your ESE, your username, and password, and then clicking Connect.
Note that the information provided will be remembered when you start up the tool again
the next time. Once the connection is established, the Home tab will be
displayed by default.
- Click the Elasticsearch tab on the left panel to display a list of supported entities in ESE which you can load into Elasticsearch.
- Select one check box or more to retrieve the selected data from the ESE database and load them into Elasticsearch.
- Click Create. An indicator will be displayed in the screen to show the creation progress.
- Once the process is completed, click Thanks!.
Note: It may take some time to create the indexed data and you cannot perform any action on the database while the process is running.
Return to top
Defining settings
The engine for the search feature uses a standard set of
boost values. You can change the values according to your preferences by using
the Exact Elastisearch Tool. These settings are saved in a BoostFile,
which you can then export as an .xml file.
You can skip this step if you prefer to use the default boost
values.
- Go to the installation directory of your ESE, and then open the bin folder.
- Run the Exact.Search.Tool.exe file.
- In the displayed screen, connect to the SQL server by typing the server name, the database of your ESE, your username, and password, and then click Connect.
Note that the information provided will be remembered when you start up the tool again the next time.
- Click the Settings Editor tab on the left panel to display a list properties available for modifications.
- At Minimum relevancy, drag the slider to the appropriate value.
Note: As the value goes higher, the
search results will display more relevant records. You can use this setting to limit
the number of records that will be displayed, thus, allowing for better
performance of the search feature.
- At Index boost, drag the slider to the appropriate value.
Note: As the value goes higher, it makes the index more relevant than the other. For an example, when searching for a full name, the documents with the employee’s name will always be
displayed before the personal card of the employee. This is because usually, the employee’s name appears more frequently in the document (at the Creator,
Modifier, and Owner fields, and possibly in the title and content of the document) than in the personal card (at the Full name field). Due
to this, documents are always displayed first before the personal card of the employee. To ensure that the personal card of the employee is displayed first
in the search results, you can increase the index boost value.
- Adjust the relevancy of the other properties.
- The Filter section is available for the Documents and Requests entities, whereby you can define additional criteria. Thus, you can include only a certain type of document or the specified security level of the document in the search.
- Click Export to export the settings to an .xml file. All the settings in each tab will be saved to the same
.xmlL file. This file needs to be copied to the xmd folder of the installation directory of your Exact Synergy Enterprise.
Note: If you have multiple web servers, you have to place the
.xml file in the xmd folder of all Exact Synergy Enterprise
installations.
Return to top
Defining sets of synonymous words
You can define sets of words as synonymous via the Synonyms tab on the left panel of the Exact Elastisearch Tool. A set of words defined as synonymous indicates that when searching for a given word, the data of other words (of the same set) are also displayed.
For example, if you have defined the words "Appraised" and "Approved" as synonymous, this means that when you search for the word "Appraised", documents with the word "Approved" are also displayed.
For more information on defining synonyms, see Exact search tool help file.
Return to top
Defining noise words
You can define noise words by clicking the Noise words tab on the left panel of the Exact Elastisearch Tool. Noise words are words that are used often, such as "the" and "and". When such a word appears in a search command, the list of the search results can be very long.
For more information on defining synonyms, see Exact search tool help file.
Return to top
Installing Synergy Search Index Updater solution in ELIS
You need to install the Synergy Search Index Updater
solution in ELIS to ensure that the entities in ESE can be indexed by
Elasticsearch. For more information, see How-to:
Installing Synergy Search Index Updater in ELIS.
Return to top
Security
ESE has a complex security model and this security model is also applied when using the All option in the quick search feature. In this context, it is important to limit the access to the Elasticsearch servers, which is used by this feature. The connection from ESE to Elasticsearch makes use of the Elasticsearch REST API on port 9200. Elasticsearch can function also as a cluster (for more information, see the
Disaster recovery section). In this case, port 9300 is used for communication between the Elasticsearch nodes.
Two methods can be used to limit access to the Elasticsearch:
- Put the Elasticsearch nodes in a separate VLAN and only allow the Synergy Application to connect to that VLAN on port 9200, preferably through a load balancer to achieve high availability.
- Using Windows Firewall, implement a set of firewall rules on the servers where Elasticsearch is running. In this case, all traffic should be blocked, except traffic originating from the ESE application on port 9200. The same needs to be done between the ELIS server and Elasticsearch server.
Note: Port 9300 should be opened for communication between the Elasticsearch nodes.
Verify that the Elasticsearch server is only accessible from the ESE server. You can do this by contacting the Elasticsearch server from the Internet browser and see if you get a response back. On the internet browser, go to http://<Elasticsearch>:9200 and if the firewall is still open, you will receive the following message:
{
"name" : "8TfTk-0",
"cluster_name" : "elasticsearch",
"cluster_uuid" : "LU3XpgozTem7Qg4YsgZ9KA",
"version" : {
"number" : "6.6.2",
"build_flavor" : "default",
"build_type" : "zip",
"build_hash" : "3bd3e59",
"build_date" : "2019-03-06T15:16:26.864148Z",
"build_snapshot" : false,
"lucene_version" : "7.6.0",
"minimum_wire_compatibility_version" : "5.6.0",
"minimum_index_compatibility_version" : "5.0.0"
},
"tagline" : "You Know, for Search"
}
This message indicates that the Elasticsearch server is still accessible and you will have to take steps to restrict the access.
Return to top
Disaster recovery
In case of a disaster where the Elasticsearch database is corrupted or an Elasticsearch node is no longer available, there are two possible scenarios to perform a disaster recovery:
- Use one node for Elasticsearch — If the Elasticsearch database is corrupted, the database has to be completely rebuilt. Follow the same procedures for the disaster recovery, as if it is a new setup.
- Use at least three nodes for Elasticsearch — Elasticsearch can also handle the disaster recovery when using three or more nodes. This scenario requires an additional configuration. For more information, see
https://www.elastic.co/guide/en/elasticsearch/reference/current/modules-node.html#split-brain.
Note: In case of a disaster, using an Elasticsearch cluster with two nodes does not add any value as this is the same as using just one node.
Return to top
Related documents
| Main Category: |
Attachments & notes |
Document Type: |
Online help main |
| Category: |
|
Security level: |
All - 0 |
| Sub category: |
|
Document ID: |
27.423.750 |
| Assortment: |
Exact Synergy Enterprise
|
Date: |
30-05-2022 |
| Release: |
|
Attachment: |
|
| Disclaimer |