Exact Synergy Enterprise: Database conversion manual
Introduction
This manual will guide you in converting the database from Exact Synergy / Exact Synergy Enterprise (non-Unicode-compliant) / Exact Globe Next or Exact Globe+ to Exact Synergy Enterprise with the Unicode format. In order to execute a full migration of the database, the following steps must be fulfilled accordingly:
- Installation of Exact Synergy Enterprise and its related components. This is applicable only if you are converting your database from Exact Synergy to Exact Synergy Enterprise with the Unicode format. For more details, see Exact Synergy Enterprise: Installation manual.
- Database conversion.
- First start-up of Exact Synergy Enterprise and database upgrade.
There are various types of databases that are available for Exact Synergy Enterprise such as:
- Standard database
- Standard database customized with Exact Custom Solution or Exact Software Development Kit
- Standard database with customer's in-house custom solution
If you have the standard database customized with Exact Custom Solution or Exact Software Development Kit, or standard database with customer's in-house custom solution, the method of converting the database will be different. For more information, refer to section j below.
This document will refer to the new version of the software as Exact Synergy Enterprise. The previous version will be referred to as Exact Synergy.
This document is divided into the following sections for better viewing:
a) Why perform database conversion?
For some entities, the structure and usage of Exact Synergy Enterprise is different from Exact Synergy, hence a database conversion is necessary. For example, when operating a web portal via Exact Synergy Enterprise, the hyperlinks for documents may look like this: "BDDocument.asp?Action=View&ID={FDBF9FB4-E64E-46D0-B96C-B938F1524E38}". In this scenario, three conversions are required. The “BDDocument” needs to be replaced with “DocView”, the “.asp” needs to be replaced with “.aspx”, and the parameters of the application will need to be updated.
In addition, globalization has caused many companies to operate in different countries. This causes information to be presented in different languages. In order for different languages, especially characters that do not have English as a basis such as Arabic and Chinese, to be presented over the internet effectively, the Unicode standard has to be applied. This facilitates in reaching out to the global-based customers as the system is able to support multiple local languages simultaneously. To ensure that Exact Synergy Enterprise supports the Unicode standards, the conversion process must be carried out.
Top
b) Database conversion scenarios
To facilitate a controlled and comfortable conversion, you have the option to perform the conversion by using any of the two methods available, which are Basic Conversion Scenario and Step by step Conversion Scenario.
Basic Conversion Scenario allows you to perform the database conversion in a straightforward manner, whereby the individual conversion steps are executed all at once with a single click. If you have a large database and worry about the downtime of your system, Step by step Conversion Scenario comes in handy as it allows you to plan and execute the conversion steps separately.
To ensure a smooth transition of your database, an upgrade advisor has been incorporated into the conversion tool. The upgrade advisor acts as an assistance to check on the prerequisites needed before the conversion can be started. It also advises on the most suitable conversion scenario and provides information such as the current state of your database, the state of the database it will be upgraded to, and the estimated duration of the conversion process.
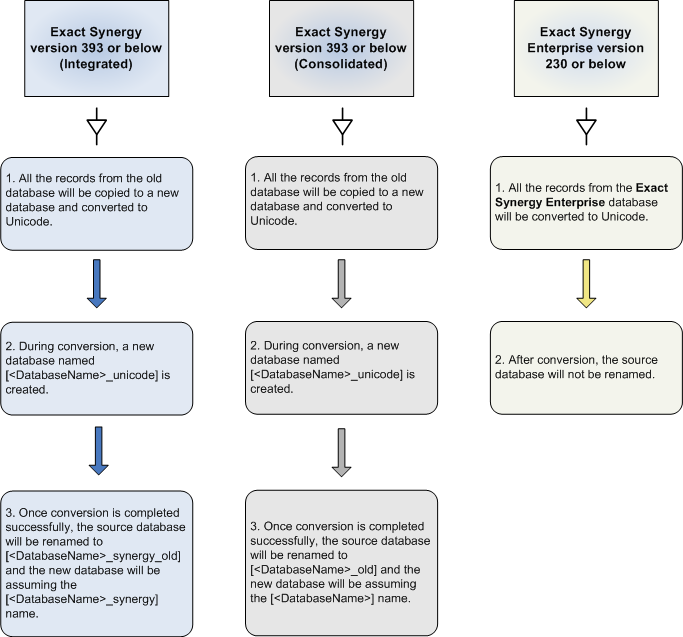
The following diagram is only an example and it is not applicable for the latest product update. Typically, the conversion process will run through the following steps (depending on your current database state):
Top
c) Before you begin
Before you begin the database conversion, there are a few steps you need to do to ensure a successful migration. This is depending on your current state of database. See the table below for more information:
| Current database state |
Exact Synergy version 393 or below
|
Exact Synergy Enterprise version 230 or below
|
Exact Globe Next version 393 or below / Exact Globe+ version 500
|
| |
You need to update to Exact Synergy version 394 before running the conversion tool. |
- |
You need to update to Exact Globe Next version 394 /Exact Globe+ version 501 before running the conversion tool. |
|
|
You need to back up your database. Ensure also that the backup copy of your database can be restored.
|
|
|
The database upgrade application can only be executed on a computer where Exact Synergy Enterprise is installed. Also, you must have the administrator rights to connect to the database server. Typically, this is one of your web servers.
|
|
|
Only an active Exact Synergy Enterprise user with the Administrator role at a Corporate level is able to perform the migration.
|
|
|
Ascertain the location of the program in your computer. For example, C:\Program Files\Synergy. This directory will later be referred to as <Exact_Synergy _installation_folder>.
|
|
|
You need to install .NET Framework 3.5 Service Pack 1 on your computer. To download, go to http://download.microsoft.com/download/2/0/e/20e90413-712f-438c-988e-fdaa79a8ac3d/dotnetfx35.exe.
|
|
|
Your database server must be SQL server 2008 or higher. For more information, see Microsoft SQL Server Start Page.
|
|
|
You need to download the following stand-alone packages for your SQL server:
- Microsoft Core XML Services (MSXML) 6.0
- Microsoft SQL Server 2008 Management Objects
- Microsoft SQL Server 2008 Native Client
- Microsoft SQL Server System CLR Types
To download, go to https://www.microsoft.com/en-us/download/details.aspx?id=44272.
Notes:
- Always install these packages in the server that is running ESEDbUpgrade.exe even though there is no SQL application installed.
- The installation file for SQL Server 2008 is included in the Service Pack 2 and does not have to be installed separately.
- Microsoft SQL Server 2008 Management Objects must be installed to run the ESEDBUpgrade.exe file.
|
|
|
As database conversion is a heavy process and requires exclusive access to your database, you must not to perform any other tasks in Exact Synergy Enterprise during this process.
|
|
|
Make sure that during the conversion process, all connections to the database are closed by stopping the web server(s) and closing down tools like the query analyzer.
|
|
|
If the database is customized based on your company's requirements, you have to ensure that the data structure of the customized database is exactly the same as the standard database before doing the database conversion.
If the database is customized by your company's in-house custom solution, you have to ensure that the customized database file (sql file stored in SQL folder) and standard database file (Database.xml file stored in XML folder) are both updated before doing the database conversion.
|
|
|
Make sure that during the conversion process, all connections to the database are closed by stopping the web server(s) and closing down tools like the query analyzer.
|
Also, if you are running the migration tool in Windows server 2008 R2, you NEED TO RUN the ESEDbUpgrade.exe file with "Run As Administrator" when the user access control is enabled.
Top
d) Basic conversion scenario
Note: The following screens may differ slightly depending on which software you are migrating from.
To perform the basic conversion:
1. If you installed Exact Synergy Enterprise via the MSI installer, double-click the ESEDbUpgrade.exe shortcut that has been created at your desktop or go to Microsoft Windows Start button, Programs, <location of the database upgrade application file>. You will see the following screen:
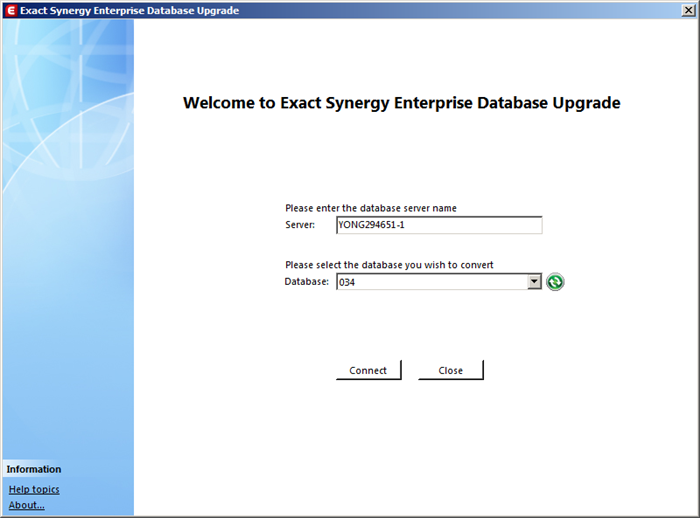
Note: If no shortcut has been created, you can click the Microsoft Windows Start button, and then click Run. Type <Exact_Synergy_Enterprise_installation_folder>\bin\ESEDbUpgrade.exe at Open and click OK. For example: C:\Program Files\Synergy\bin\ESEDbUpgrade.exe.
2. At Server, fill in the server name. A list of valid Exact Synergy or Exact Synergy Enterprise databases will be displayed in the list. Next, select the database that you want to convert at Database. By default, <your full computer name minus the domain name\database instance> will be filled in automatically at Server. For example: THAM112125\sql2005.
3. Next, click Connect to connect to the database. If the connection is successful, you will see the following screen:
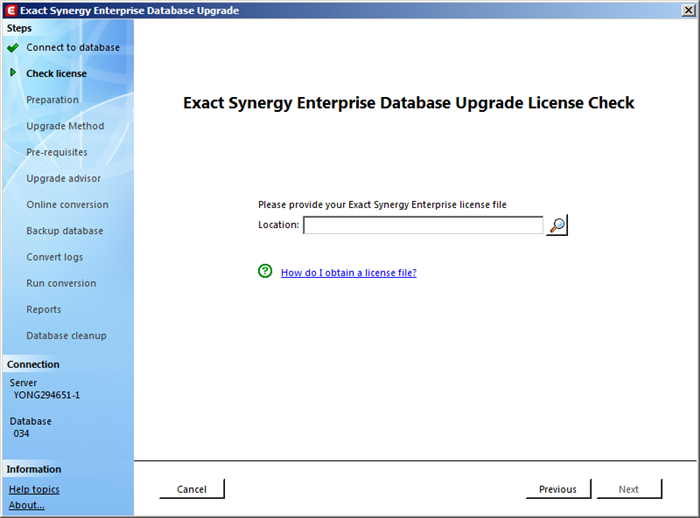
Note: You will only see this screen if you are converting an Exact Synergy database to an Exact Synergy Enterprise database. If you are converting an Exact Synergy Enterprise non-Unicode-compliant database to a Unicode-compliant database, this step will be skipped and you will proceed to Step 6.
4. Before you can begin the conversion process, type or select the location of a valid Exact Synergy Enterprise license file. For more information on where to download the license file, click the How do I obtain a license file? hyperlink, which will direct you to How-to: Retrieving Exact Synergy Enterprise License files via customer portals.
5. Once the license file is filled in, click Next and the following screen will be displayed:
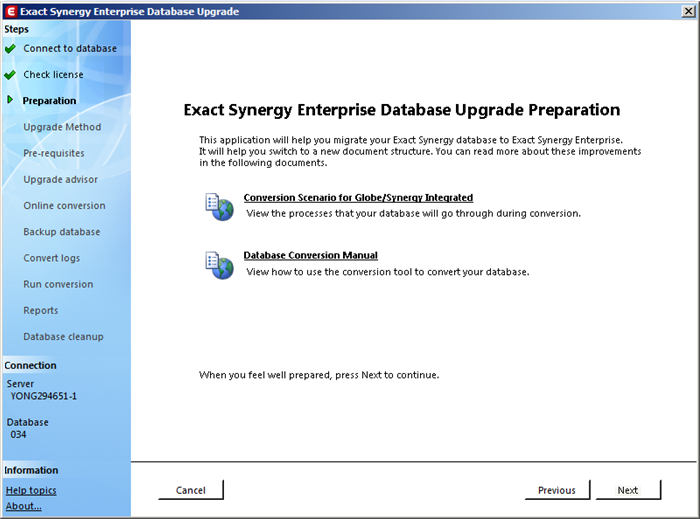
6. You can click the links to display documents for your references. Then, click Next. If the selected database is an Exact Globe Next, Exact Globe+ or Exact Synergy (integrated) database, you will see the following screen. Otherwise, go to Step 8.
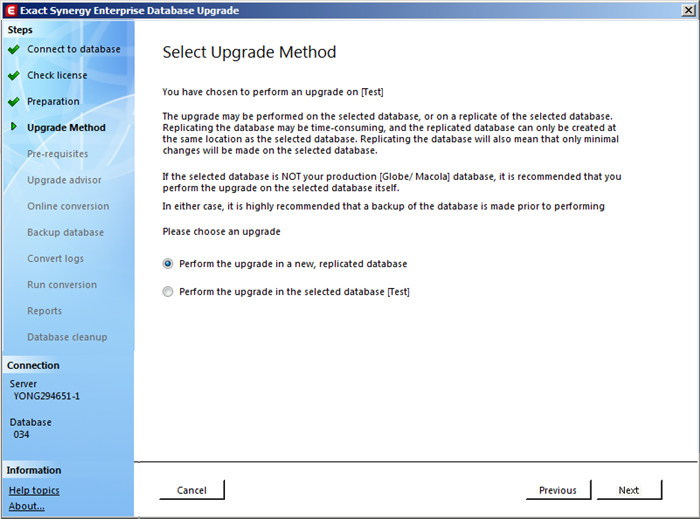
7. Select one of the following options:
- Perform the upgrade in a new, replicated database — This option creates a duplicate copy of the selected database. The conversion will then be performed on the duplicate database.
- Perform the upgrade in the selected database [database name] — This option allows you to select the location of the backup database.
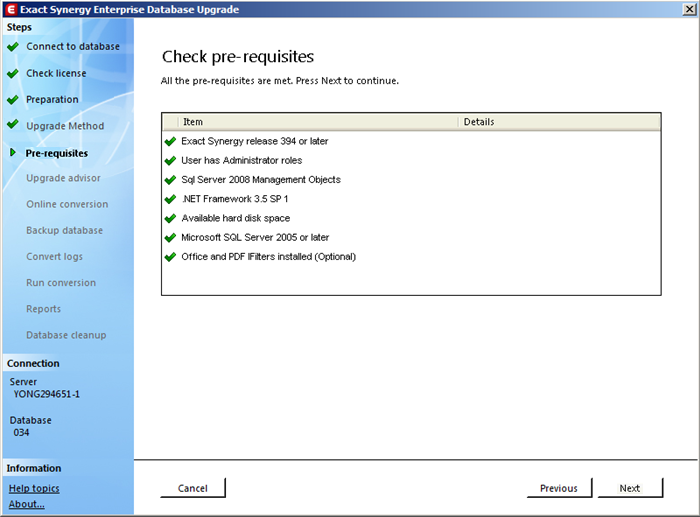
8. Click Next to begin the prerequisites checks. Once the check is completed and the requirements are met, the following screen will be displayed:
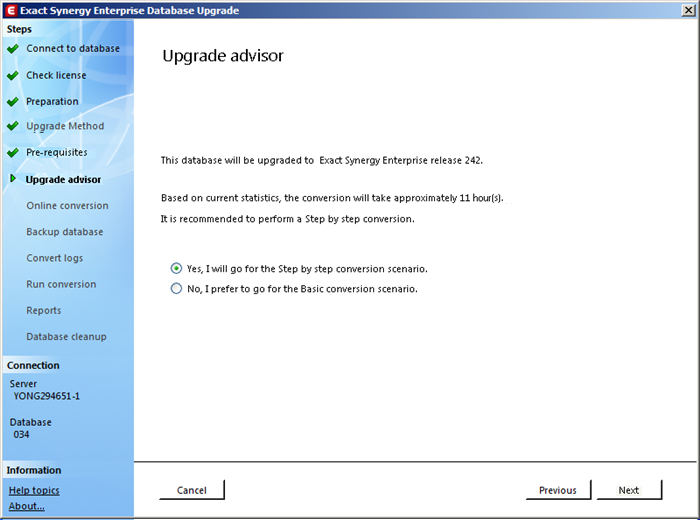
9. Click Next and the following screen is displayed to show the current state of your database and to which database it will be upgraded to, the estimated duration of the conversion process, as well as the scenario that is recommended for your upgrade based on your current situation:
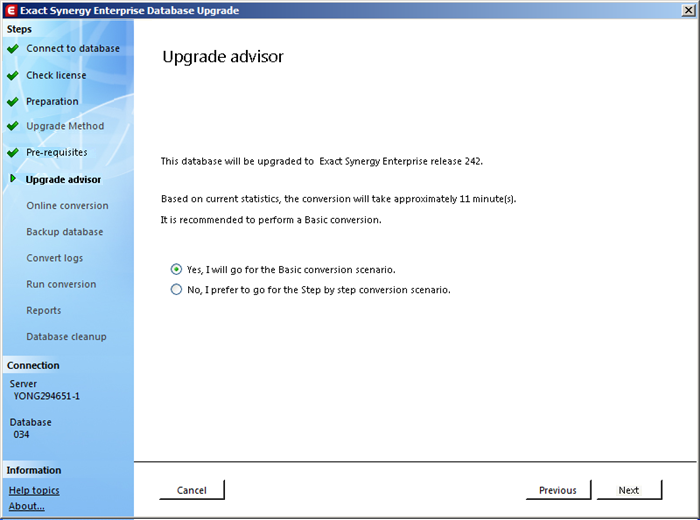
10. Select the basic conversion scenario, and then click Next. By default, the scenario recommended by the upgrade advisor will be selected. Once you have selected the basic conversion scenario and clicked Next, it is not possible to change to a different scenario. A database will then be created automatically for the conversion process. You will see the following screen:
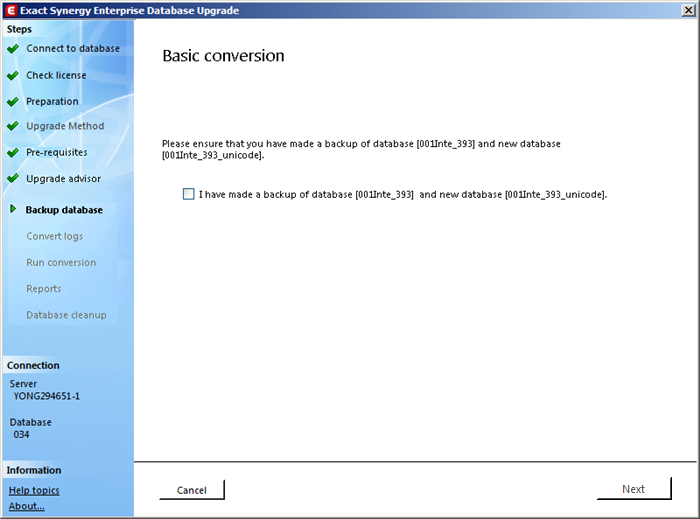
11. You can only proceed to the next step if you have made a backup copy of the database(s) that you want to upgrade. Select the I have made a backup of database [<database name>] and new database [<database name>_unicode] check box, and then click Next to begin the conversion process. You will see the following screen:
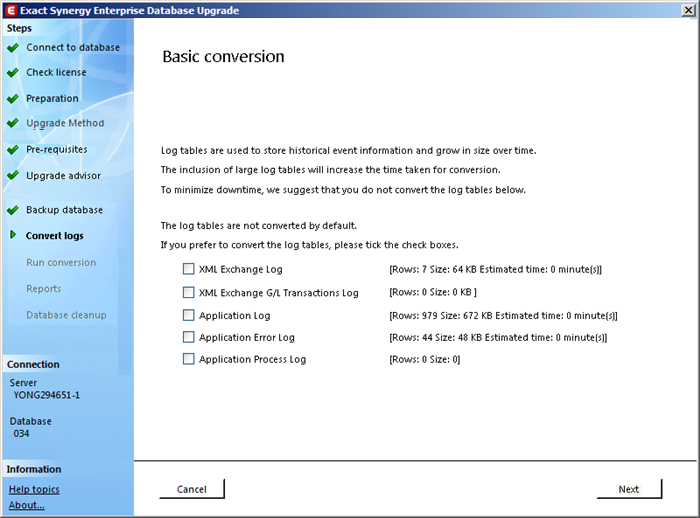
12. Before you begin the basic conversion process, you can opt to convert the log tables by selecting the XML Exchange Log, XML Exchange GL transactions Log, Application Log, Application Error Log, and/or Application Process Log check boxes. Otherwise, leave the check boxes blank and click Next. The database will then be updated and the processes will start to run. Once the processes have been completed, you will see the following screen:
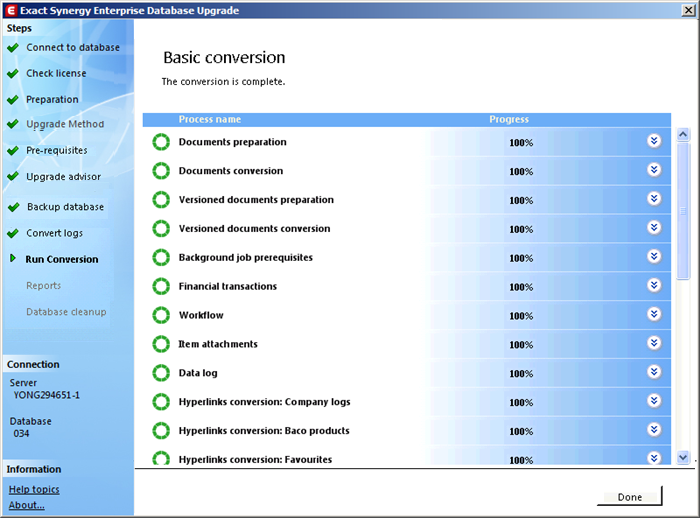
Legend:
 — This process has not been started or completed.
 — The process has been completed.
 — This process is not completed due to error.
13. Click Done to proceed to the following screen:
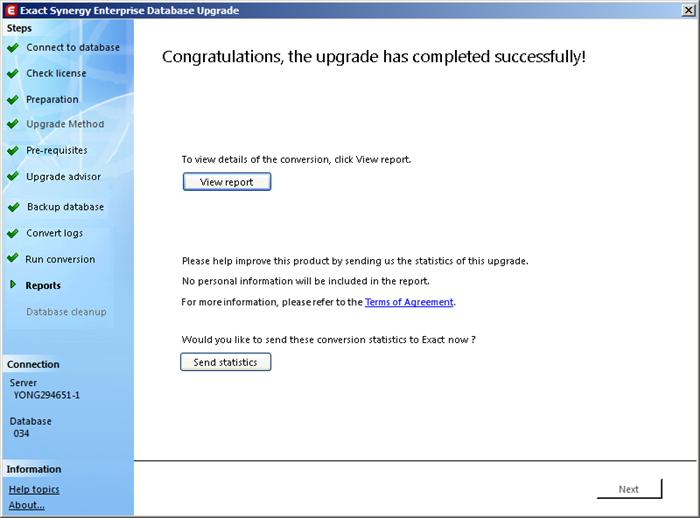
Note: If the conversion is not successfully completed, you cannot proceed to the next step. You can click View report to view the cause(s) of the failure.
14. Click View report to display the conversion log report in a new screen. You can also click Send statistics to send customer experience statistics of the conversion to Exact. For more information on the report and customer experience statistics, see f) When database is successfully converted - Conversion log.
Note: If your source database for conversion is an Exact Synergy consolidated or Exact Synergy Enterprise database, the Next button will be replaced with Finish. Please proceed to Step 17.
15. Then, click Next and you will see the following screen:
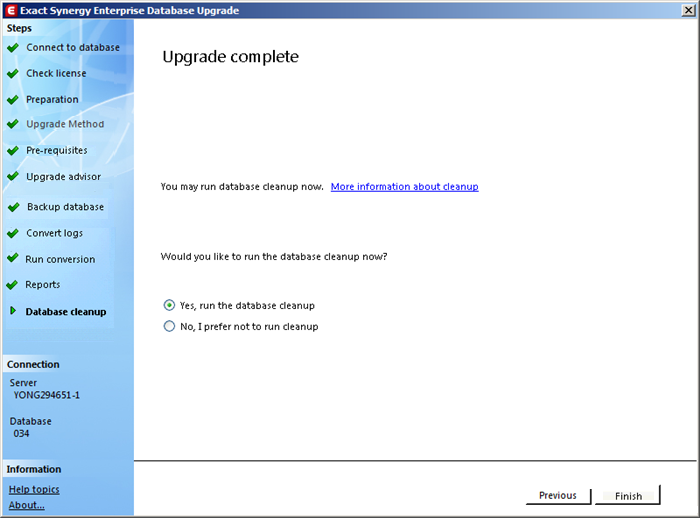
16. Select Yes, run the database cleanup or No, I prefer not to run cleanup. Once you have selected not to run the database cleanup now, you can always perform the cleanup manually. For more information on the database cleanup, click the More information about cleanup hyperlink, which will direct you to g) Database cleanup.
17. Finally, click Finish to proceed to the icons available after your database has been converted. See f) When database is successfully converted.
Note: All the customized tables, views, stored procedures, functions, and triggers from the non-Unicode compliant database will be copied to the Unicode compliant database.
Top
e) Step by step conversion scenario
Note: The following screens may differ slightly depending on which software you started the process from.
To perform the step by step conversion:
1. If you installed Exact Synergy Enterprise via the MSI installer, double-click the ESEDbUpgrade.exe shortcut that has been created at your desktop or go to the Microsoft Windows Start button, Programs, <location of the database upgrade application file>. You will see the following screen:

Note: If no shortcut has been created, you can click the Microsoft Windows Start button, and then click Run. Type Exact_Synergy_Enterprise_installation_folder\bin\ESEDbUpgrade.exe at Open and click OK. For example: C:\Program Files\Synergy\bin\ESEDbUpgrade.exe.
2. At Server, fill in the server name. A list of valid Exact Synergy or Exact Synergy Enterprise databases will be displayed in the list. Next, select the database that you want to convert at Database. By default, <your full computer name minus the domain name\database instance> will be filled in automatically at Server. For example: THAM112125\sql2005.
3. Next, click Connect to connect to the database. If the connection is successful, you will see the following screen:

Note: You will only see this screen if you are converting an Exact Synergy database to an Exact Synergy Enterprise database. If you are converting an Exact Synergy Enterprise non-Unicode-compliant database to a Unicode-compliant database, this step will be skipped and you will proceed to Step 6.
4. Before you can begin the conversion process, type or select the location of a valid Exact Synergy Enterprise license file. For more information on where to download the license file, click the How do I obtain a license file? hyperlink, which will direct you to How-to: Retrieving Exact Synergy Enterprise license files via customer portals.
5. Once the license file is filled in, click Next and the following screen will be displayed:

6. You can click the links to display documents for your references. Then, click Next. If the selected database is an Exact Globe Next, Exact Globe+ or Exact Synergy (integrated) database, you will see the following screen. Otherwise, go to Step 8.
7. Select one of the following options:
- Perform the upgrade in a new, replicated database — This option creates a duplicate copy of the selected database. The conversion will then be performed on the duplicate database.
- Perform the upgrade in the selected database [database name] — This option allows you to select the location of the backup database.
8. Click Next to begin the prerequisites checks. Once the check is completed and the requirements are met, the following screen will be displayed:
9. Click Next and the following screen is displayed to show the current state of your database and to which database it will be upgraded to, the estimated duration of the conversion process, as well as the scenario that is recommended for your upgrade based on your current situation:
10. Select the step by step conversion scenario, and then click Next. By default, the scenario recommended by the upgrade advisor will be selected. Do note that once you have selected the step by step scenario and clicked Next, it is not possible to change to a different scenario. A database will then be created automatically for the conversion process. You will see the following screen:
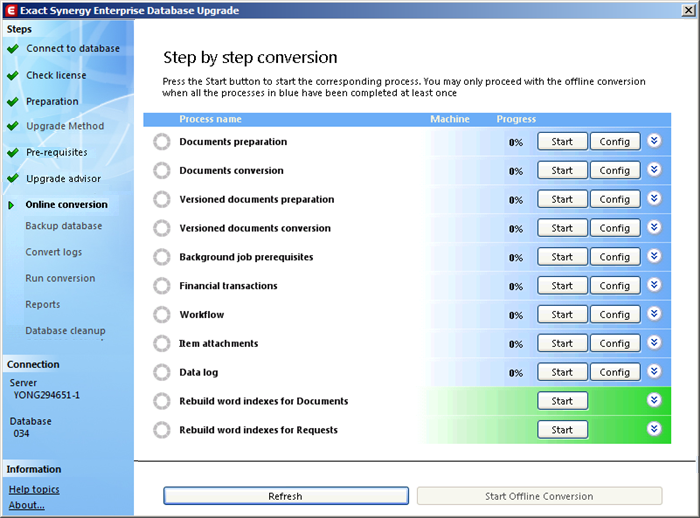
11. Next, you can do any of the following:
- Click Config to configure a batch size that is lower than the default batch size.
- Click Start to begin the conversion process of the selected step. Once you have clicked Start, you cannot configure the batch size for the particular process.
- Click Update to perform the conversion for the selected process again. This is available only when a process has been completed.
- Click Stop to stop the conversion process of the selected step. This is available only when a process has been stopped. If a process is stopped from a computer, it has to be restarted from the same computer.
- Click Refresh to refresh the status of all the processes.
Legend:
 — This process has not been started or completed.
 — The process has been completed.
 — This process is not completed due to error.
12. Once all the processes have been completed or the Rebuild word indexes for Documents and Rebuild word indexes for Requests processes have not been completed but have been stopped, the Start Offline Conversion button will be enabled. Click Start Offline Conversion to convert the remaining tables that have not been converted. You will see the following screen:
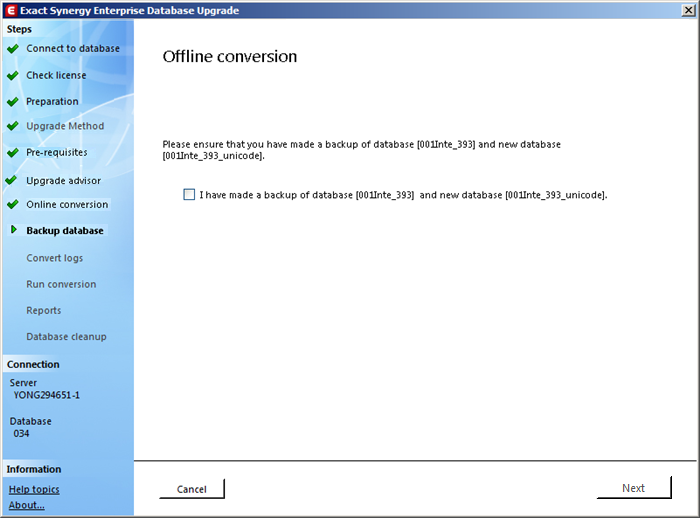
13. You can only proceed to the next step if you have made a backup copy of the databases. Select the I have made a backup of database [<database name>] and new database [<database name>_unicode] check box, and then click Next to begin the conversion process. You will see the following screen:
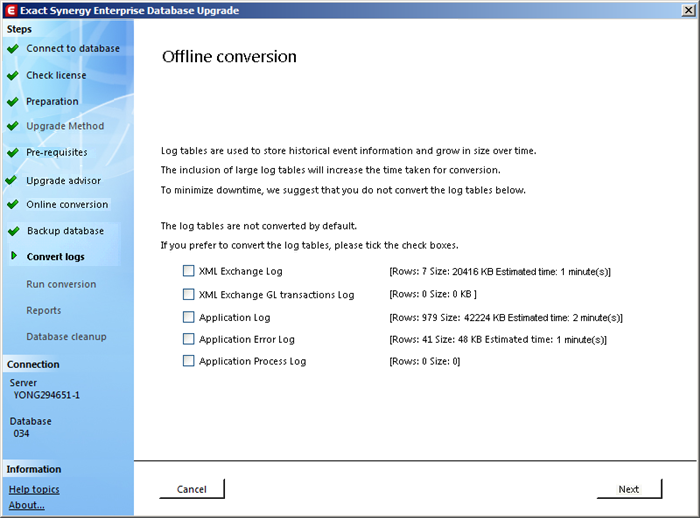
14. Before you begin the offline conversion process, you can opt to convert the log tables by selecting the XML Exchange Log, XML Exchange GL transactions Log, Application Log, Application Error Log, and/or Application Process Log check boxes. Otherwise, leave the check boxes blank and click Next. You will see the following screen:
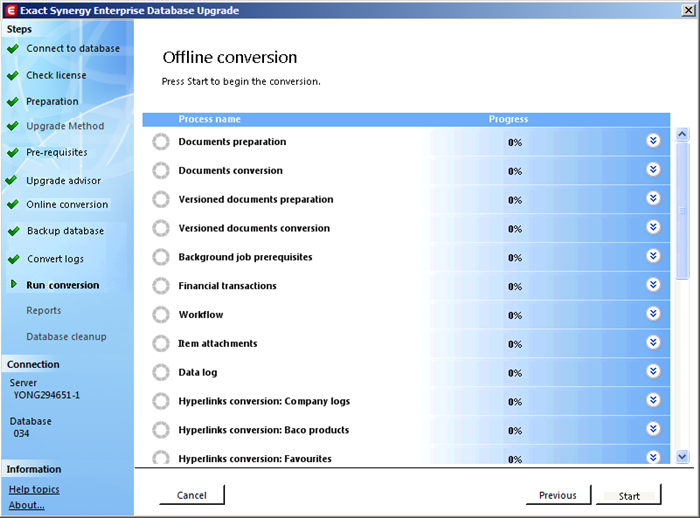
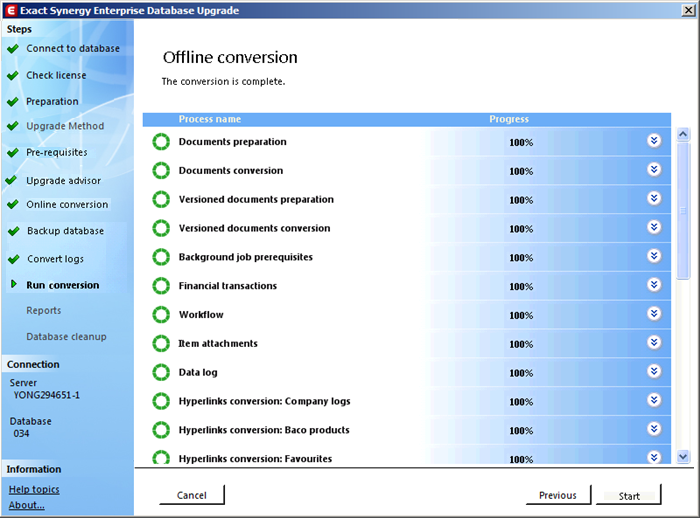
15. Click Start to begin the offline conversion process. The database will then be updated and the processes will start to run. Once the processes have been completed, you will see the following screen:
16. Click Done and the following screen will be displayed:
Note: If the conversion is not successfully completed, the cause(s) or failure will be displayed and a conversion log report can be retrieved. However, you cannot proceed to the next step.
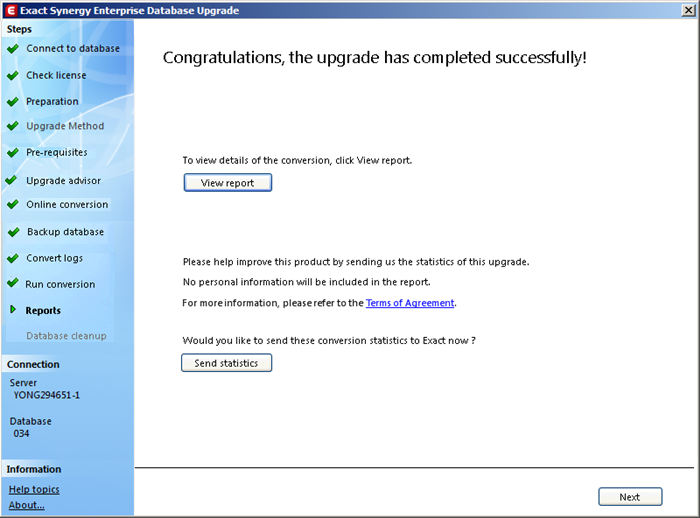
17. Click View report to display the conversion log report in a new screen. You can also click Send statistics to send customer experience statistics of the conversion to Exact. For more information on the report and customer experience statistics, see f) When database is successfully converted - Conversion log.
Note: If your source database for conversion is an Exact Synergy consolidated or Exact Synergy Enterprise database, the Next button will be replaced with Finish. Please proceed to Step 20.
18. Then, click Next and you will see the following screen:
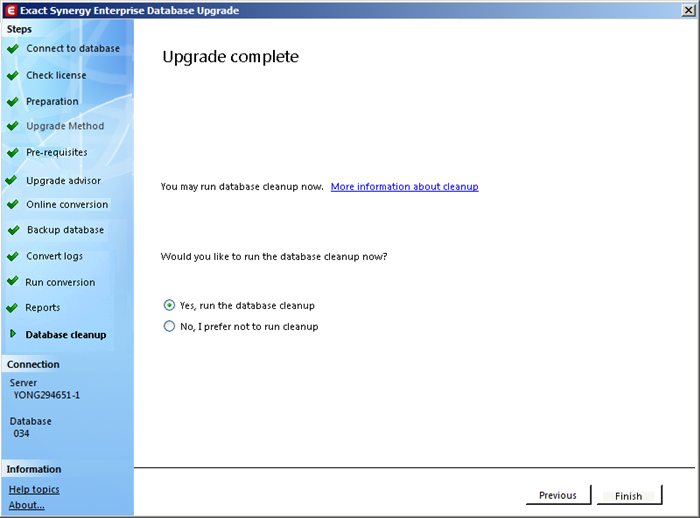
19. Select Yes, run the database cleanup or No, I prefer not to run cleanup. Once you have selected not to run the database cleanup now, you can always perform the cleanup manually. For more information on the database cleanup, click the More information about cleanup hyperlink, which will direct you to g) Database cleanup.
20. Finally, click Finish to proceed to the icons available after your database has been converted. See f) When database is successfully converted.
Note: All the customized tables, views, stored procedures, functions, and triggers from the non-Unicode compliant database will be copied to the Unicode compliant database.
Top
f) When database is successfully converted
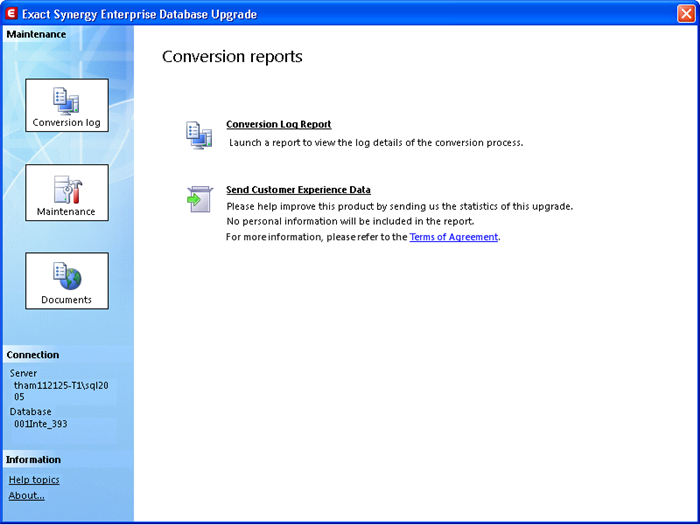
Once you are connected to the database that has been converted to Exact Synergy Enterprise with the Unicode format, the conversion tool will display three icons on the left, explained in the following:
- Conversion log — This allows you to retrieve conversion log reports and/or send customer experience information to Exact.
- Maintenance — This allows you to begin the document structure migration process.
- Documents — This allows you to retrieve conversion-related documents for reference purposes.
Conversion log
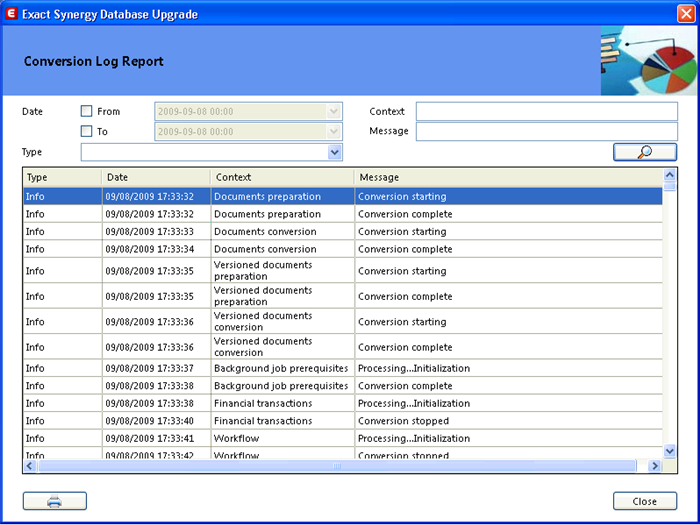
Conversion Log Report
The conversion log report provides you with the ability to view and/or print the conversion results regardless of whether the conversion has been successfully completed or not. With the available filter criteria, it is possible to retrieve the desired information for analysis purposes.
The conversion log report can be retrieved in two ways:
- By clicking the View report button once the database conversion is successful or not completed (See Step 12 in Basic conversion scenario or Step 15 in Step by step conversion scenario).
- By clicking the Conversion Log Report hyperlink in the Conversion Log icon if you are connected to the database that has been successfully converted.
See the following screen for an example of the conversion log report:
Send Customer Experience Data
With the customer experience statistics gathered during the conversion process, it is possible to have the data sent to Exact for analysis and improvement purposes.
You can send the customer experience statistics via two ways:
- By clicking the Send statistics button once the once the offline conversion is successfully completed (See Step 12 in Basic conversion scenario or Step 15 in Step by step conversion scenario).
- By clicking the Send Customer Experience Data hyperlink in the Conversion Log icon if you are connected to the database that has been successfully converted. This hyperlink will not be available if you have already sent the customer experience data.
To send customer experience statistics data:
1. Click Send statistics or Send Customer Experience Data (depending on your conversion stage). You will see the following screen:
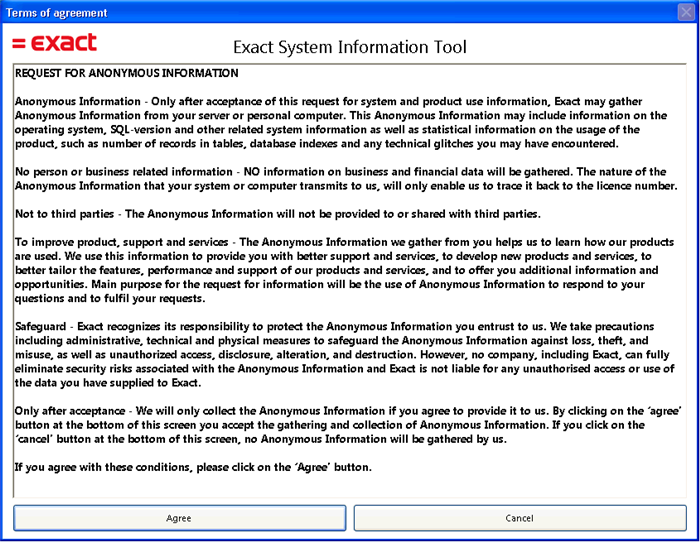
2. Click Agree and wait for the information to be sent. This screen will close automatically once the process is completed.
Note: This screen will not be displayed if you have clicked the Terms of Agreement hyperlink before you click Send statistics or Send Customer Experience Data.
Maintenance
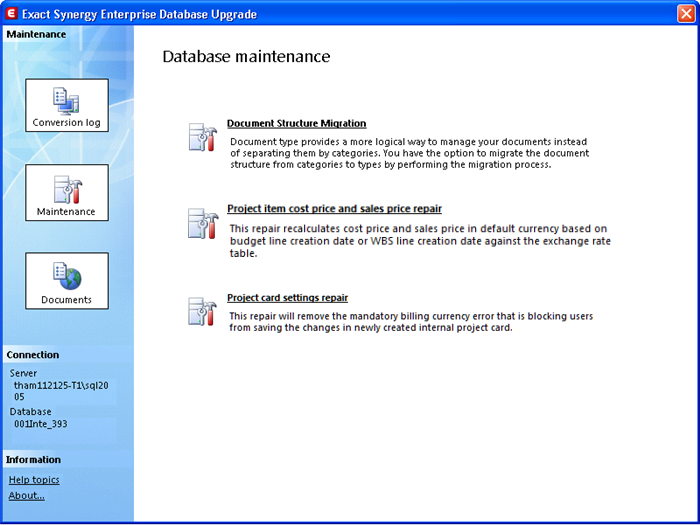
Document Structure Migration
The document structure in Exact Synergy Enterprise serves to organize the documents of an organization. The Classic document structure mode uses categories to organize the documents created while the Standard document structure mode uses document types. To improve user experience, it is recommended to migrate from the Classic document structure mode to the Standard document structure mode, if you have not done so. For more information, see How-to: Migrating to document type management structure.
This hyperlink is not available if you have already migrated to the Standard document structure mode.
Project item cost price and sales price repair
Cost and sales prices for WBS lines and budget lines are stored in the ProjectItemRates table in your Exact Synergy Enterprise database, under the Cost and SalesPrice columns respectively. Previously, the values of cost and sales prices followed the values of the foreign currency stored under the CostPriceFC and SalesPriceFC columns respectively.
To ensure the cost price and sales price values reflect the correct amount, you can repair the cost and sales prices and have them recalculated in the default currency based on the WBS or budget line creation date against the exchange rates defined.
When you click this hyperlink, a query will be executed to check if the exchange rates have been defined. The repair will only be started once the exchange rates have been defined. You will only be required to perform this repair once for each database. Hence, the Project item cost price and sales price repair hyperlink will not be available once the repair has been performed successfully.
However, if no exchange rates have been defined, the repair will not be started and an error message will be displayed. You can click the View Report button to view the report of the process and identify the errors that have occurred.
Project card settings repair
If you have upgraded your database from an earlier version to product update 249, an error would occur when you save a new or an existing internal project. This is due to the Billing currency field being hidden in the project card for projects of the Internal type from product update 249 onwards.
You can click this hyperlink to prevent the error from occurring. When you click the hyperlink, you will be able to begin the repairing process by clicking Start. A message will be displayed to make known if the repair is successful or not. You will only be required to perform this repair once for each database. Hence, the Project card settings repair hyperlink will not be available once the repair has been performed successfully.
If the repairing process is not successful, an error message will be displayed. You can click the View Report button to view the report of the process and identify the errors that have occurred.
Documents
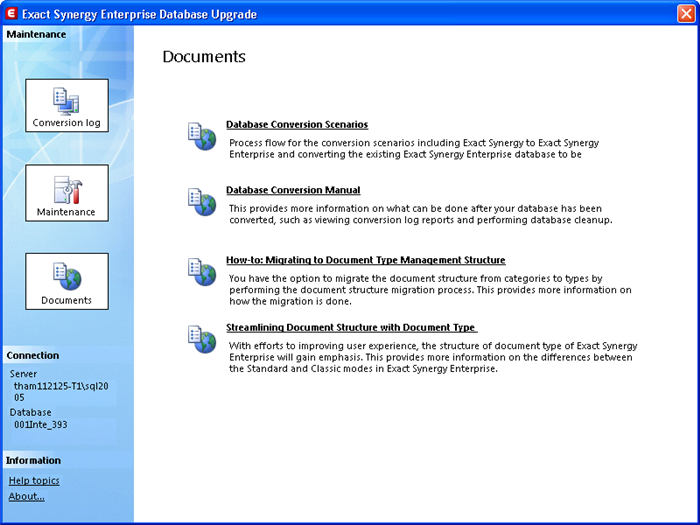
You can click on the available hyperlinks to view documents that are related to database conversion.
Top
g) Database cleanup
Database cleanup is recommended if your source database for conversion is an Exact Synergy integrated database. After conversion has been completed, you can opt to clean up the Exact Globe Next/Exact Globe+ tables that will not be used anymore.
You can begin the database cleanup process by selecting the Yes, run the database cleanup option once the offline conversion is successfully completed (See Step 16 in Basic conversion scenario or Step 19 in Step by step conversion scenario).
However, if you opt not to cleanup the database right after the offline conversion is completed, you can perform the cleanup manually later on.
To perform the database cleanup manually:
- Go to <Exact_Synergy_Enterprise_installation_folder>\SQL. For example: C:\Program Files\Synergy\SQL.
- Then, open the TruncateGlobeDBTables.sql file.
- Finally, run the scripts using your SQL server application.
Note: The database cleanup is available only to NoiseWords, RequestWords, WordReferences, Words, and the XMLGLTransactionsLog table.
Top
i) Troubleshooting
If the conversion process encounters a problem and is unable to proceed, the following will happen:
- You will be directed to a screen with the message indicating that the conversion has failed. Click View report to display the conversion log report to view the possible error.
- The database will not be changed back to the original name. Instead, it will be named [<DatabaseName>_unicode].
Top
j) Database conversion for customized databases
If your database is customized with Exact Custom Solution or Exact Software Development Kit, do the following:
- Run the Exact Synergy Enterprise product updater that was customized for your company. The updated database file called Database.xml will then be available in the XML folder.
- Perform the database conversion.
If your database is customized by your company's in-house custom solution (for example, you want to insert a column in the Absences table called "ColumnA"), do the following:
- Run the Exact Synergy Enterprise product updater that was customized for your company. The updated database file called Database.xml will then be available in the XML folder.
- Create a new file in the SQL folder (for example, customerscripts.sql). In the customerscripts.sql file, type the following query:
ALTER TABLE dbo.Absences ADD ColumnA NCHAR(1) NULL
- Go to the XML folder and open the Database.xml file.
- In the Database.xml file, insert the customerscripts.sql file under the <Scripts> section where all the tables are placed.
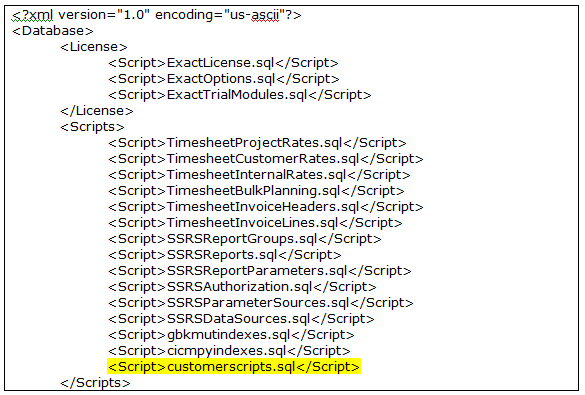
- Perform the database conversion.
Top
| Main Category: |
Attachments & notes |
Document Type: |
Online help main |
| Category: |
|
Security level: |
All - 0 |
| Sub category: |
|
Document ID: |
16.132.537 |
| Assortment: |
Exact Synergy Enterprise
|
Date: |
03-04-2024 |
| Release: |
|
Attachment: |
|
| Disclaimer |