How-to: Installing Exact Lightweight Integration Server (ELIS)
Introduction
Note: The Federated Identity feature is only available for the controlled release participants.Exact Lightweight Integration Server (ELIS) is a composite solution to host the external solutions whereby ELIS can work with different versions of Exact Synergy and Exact Globe.
Scope
This document describes ELIS and the management console component installation on the server, and the configuration of ELIS. This document also describes the way to configure the Microsoft Windows Firewall and connect to ELIS from the other computers.
Note: Some of the settings and names are different depending on the version of Microsoft Windows. This document is based on Microsoft Windows Server 2012 64-bit.
Pre-requisites
For more information on the server requirements for ELIS, see System requirements for Exact Lightweight Integration Server (ELIS). ELIS requires the following:
- Microsoft .NET Framework 4.7
- Microsoft Message Queue
Note: Internet connection is mandatory for the ELIS installation and update.
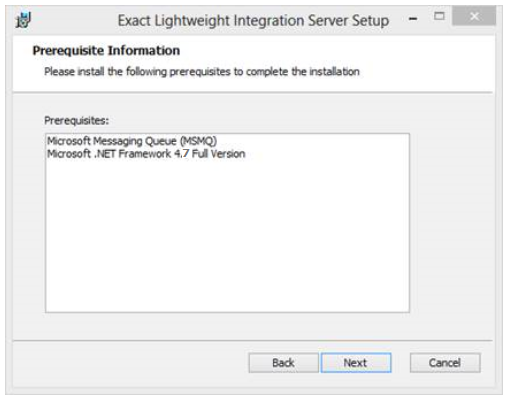
If there are no pre-requisites installed, the following setup wizard will be displayed and the setup will end.
Description
Installing ELIS
There are two versions of ELIS MSI available in the cab folder of the Exact Synergy Enterprise installation folder, namely Exact Integration Server x86 for the 32-bit operating system and Exact Integration Server x64 for the 64-bit operating system. You have to install the same version of ELIS on your operating system. You can install the 32-bit version of ELIS on the 64-bit operating system but you cannot install the 64-bit version of ELIS on the 32-bit operating system.
Note: If you are updating Exact Synergy Enterprise to product update 256 and Exact Glob Next to product update 411, the procedure to update ELIS will be different. For more information, see Important notice for customers who update to Exact Globe product update 411,
Exact Synergy Enterprise 256 and Exact Lightweight Integration Server
(ELIS).
To install ELIS, do the following:
- Run the MSI from the cab folder in the Exact Synergy Enterprise installation folder. Choose Exact Integration Server x86 if you are running on the 32-bit operating system or Exact Integration Server x64 on the 64-bit environment.
- Click Next.
- In the End-User License Agreement screen, select the I accept the term in the License Agreement check box.
- Click Next. The following screen will be displayed:
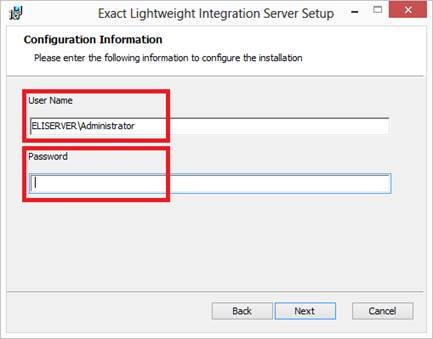
- Type a user name at User Name and password at Password to run the ELIS services. However, the following are required:
- The user must have access right to run Microsoft Window Services.
- The user must have access right to the Microsoft SQL Server database using the Microsoft Windows authentication (this can be defined later).
- The user name must be in the [Domain/Machine name]\[User name] format (for example, Exact.com\Administrator).
- The user must have access right to read and write from the location where ELIS is installed.
- Click Next. The following screen will be displayed:
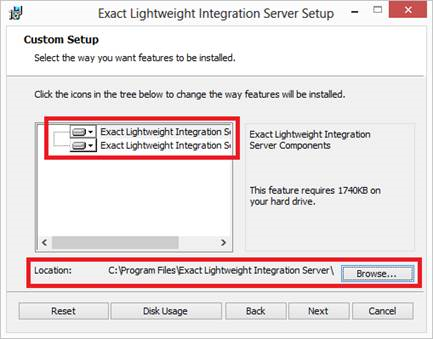
- Select the ELIS components to be installed, such as Exact Lightweight Integration Server Component or Exact Lightweight Integration Server Management Console. The installation folder can also be changed.
Note: The ELIS components must be installed in the same installation folder. Installation of the components in different installation folders are not supported.
- Click Next.
- Click Install to start the setup. The following screen will be displayed once the installation is completed:
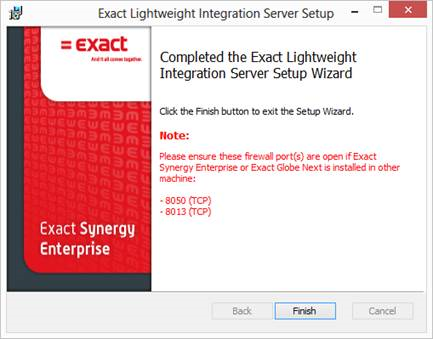
- Click Finish.
Note: If ELIS is installed on a different machine, two ports in the Microsoft Windows Firewall or other firewall applications that you are using must be opened. If other firewall applications are used, open port 8050 and 8013 on the TCP protocol. For more information on setting up firewall, see Firewall setup below.
Setup check
Once ELIS is installed successfully, you can check the ELIS services to ensure the services are installed successfully and running at Control panel ? Administrative Tools ? Services. Look for services that start with Exact Integration.
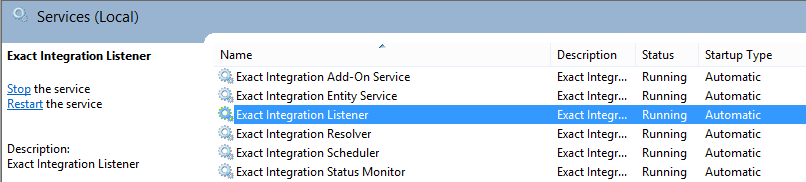
Services
The ELIS services are monitored by the Exact Integration Status Monitor service. If any of the ELIS services fail or crash, the Exact Integration Status Monitor service will try to restart the ELIS services. If the ELIS services fail several times or immediately after restart, the Exact Integration Status Monitor service will stop the recovery process and create an entry in the Microsoft Windows log (the monitor service is based on the internal configuration). By default, the Exact Integration Status Monitor service checks the statuses of the other services every 30 seconds.
Creating database
ELIS requires a database to store the information, solution files, and monitoring information. The database must be set up only once.
- To create a database, click Exact Lightweight Integration Server Management Console from the Start menu.

- The following screen will be displayed:
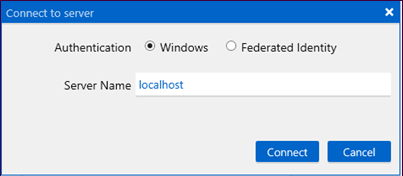
- Type the name of the machine where the ELIS components are installed at Server name. You can also use the IP address to connect to ELIS or if the ELIS management console is running on the same machine as the ELIS components, you can use “localhost”.
Note: You can connect to ELIS only if you have the administrator role, including domain administrator or ELIS server local administrator role.
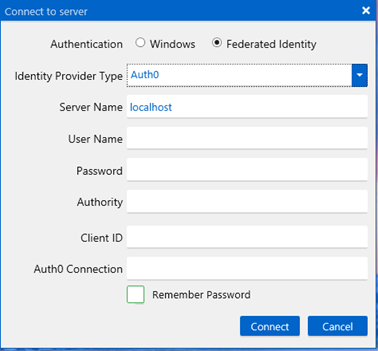
- Select the Windows or Federated Identity option at Authentication. If the Federated Identity option is selected, the following screen will be displayed. The federated identity information required is dependent on the Identity Provider Type:
- select Auth0
at Identity Provider Type, and then
define the User Name, Password, Authority, Client ID,
and Auth0 Connection, or
- select WAAD
at Identity Provider Type, and then
define the User Name, Password, Authority, Client ID,
and Resource.
The details are retrieved from your federated
identity configuration.

- Click Connect. Once the ELIS management console is connected to the server, it will check whether the database has been installed. If the database has not been installed, the following screen will be displayed:
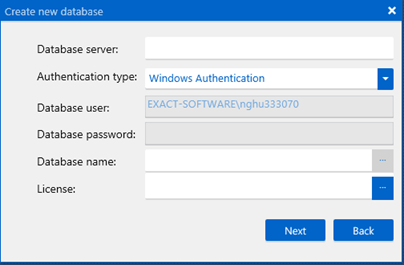
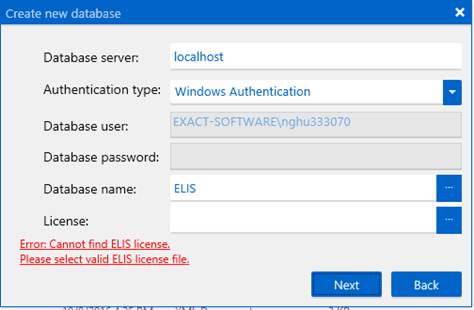
- Type the database server at Database server, database name at Database name, and license at License. The database server can be on the same machine or any other server on the network, as long as ELIS can be connected to the server.
- Select Windows Authentication or SQL Server Authentication at Authentication type. If Windows Authentication is selected, the current Windows credentials will be automatically detected. If SQL Server Authentication is selected, type the SQL login name at Database user, and password at Database password.
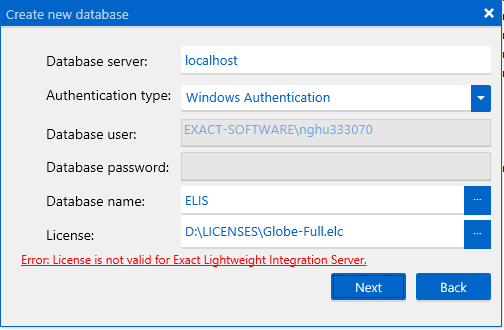
- Select the license file at License. A check will be performed to ensure the license to use ELIS and Exact solutions is valid. If the license is invalid, the message "License is not valid for Exact Lightweight Integration Server" will be displayed. However, if the license is valid but has expired, the database will not be created and the error "License has expired" will be displayed.
- Click Next. The following screen will be displayed when the database has been created successfully:
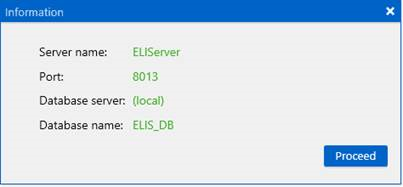
- Click Proceed to open the ELIS management console.
Note:
- Microsoft SQL Server 2008 and above is supported.
- The fixed user (the user that is used to run the ELIS services) must have access to the Microsoft SQL Server that is defined in the Create new database screen above. Otherwise, the database will not be created.
- If SQL authentication is used, the SQL user specified must have access to the Microsoft SQL server that is defined in the Create new database screen above. Otherwise, the database will not be created.
If the ELIS database already exists on the machine (either copied from another server or the database was restored), click  at Database name in the Create new database screen. The ELIS management console will display all the ELIS databases that are available on the Microsoft SQL Server, and a database can be selected.

Note: The version number under the Version column is the database version number.
When an existing database is opened, the license file does not have to be selected. ELIS will use the license stored in the database for the validation. If the license is valid, the connection will be started. Otherwise, another license file has to be selected.

If the existing database does not have a license, a valid license file must be selected before connecting to ELIS.
The new license must meet the following criteria. Otherwise, an error message will be displayed.
- The license must contain an option for the solutions.
- The license must not be expired.
- The license account must be the same as the existing license account.
- The license must have the same license number as the existing license.
- The license must have the same sequence number as the existing license.
- The issue date of the license must be after the issue date of the existing license.
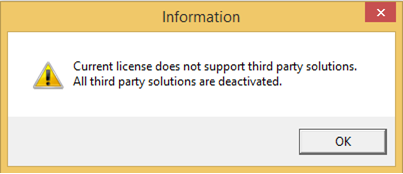
Once the license is updated with the new license, all the solutions that are not supported by the new license will be automatically deactivated.
Firewall setup - Inbound
To open the ports on the Microsoft Windows Firewall, do the following:
- Go to Control Panel ? Administrative Tools ? Windows Firewall with Advanced Security. The following screen will be displayed:
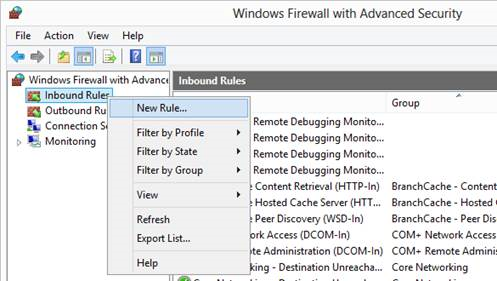
- Right-click Inbound Rules.
- Select New Rule. The following screen will be displayed:
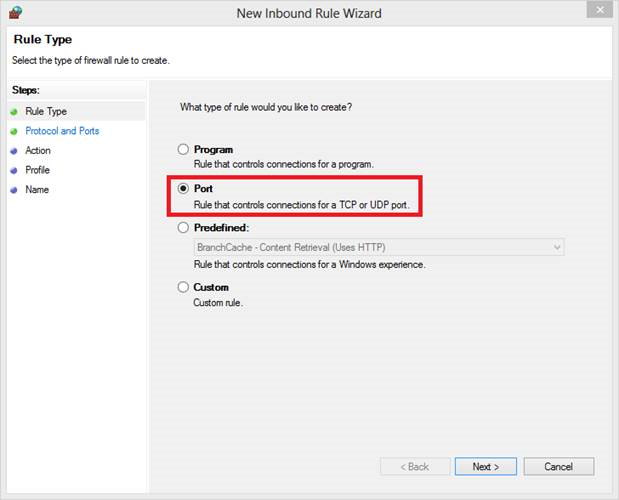
- Select the Port option.
- Click Next. The following screen will be displayed:
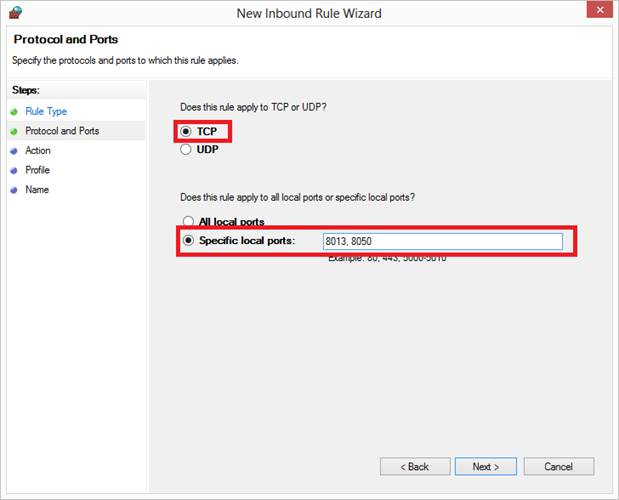
- Select the TCP option.
- Select the Specific local ports option and then type “8013, 8050”.
- Click Next. The following screen will be displayed:
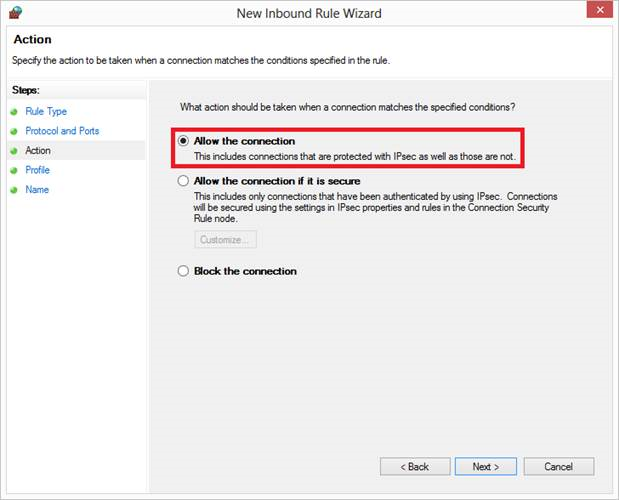
- Select the Allow the connection option.
- Click Next.
- In the Profile screen, select Private, Public, or Domain.
- Click Next.
- In the Name screen, type a name for the rule at Name.
- Click Finish.
Firewall setup - Outbound
To open the ports on the Microsoft Windows Firewall, do the following:
- Go to Control Panel ? Administrative Tools ? Windows Firewall with Advanced Security. The following screen will be displayed:
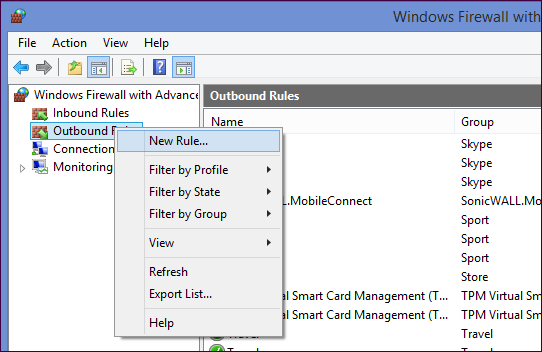
- Right-click Outbound Rules.
- Select New Rule. The following screen will be displayed:
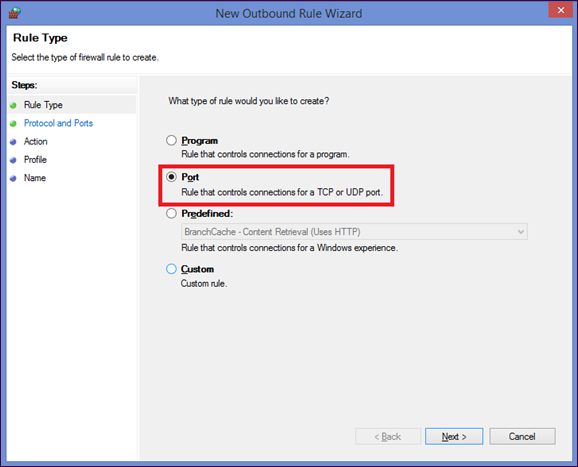
- Select the Port option.
- Click Next. The following screen will be displayed:
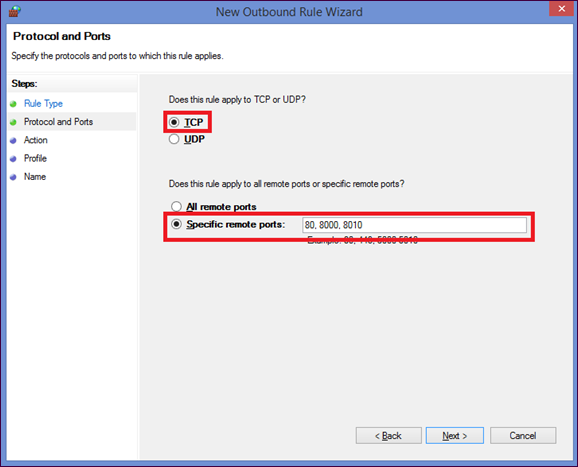
- Select the TCP option.
- Select the Specific remote ports option and then type “80, 8000, 8010”.
Note: “80”
is for the Exact Synergy web services, and “8000” and “8010” are for the Exact
Globe Next services.
- Click Next. The following screen will be displayed:
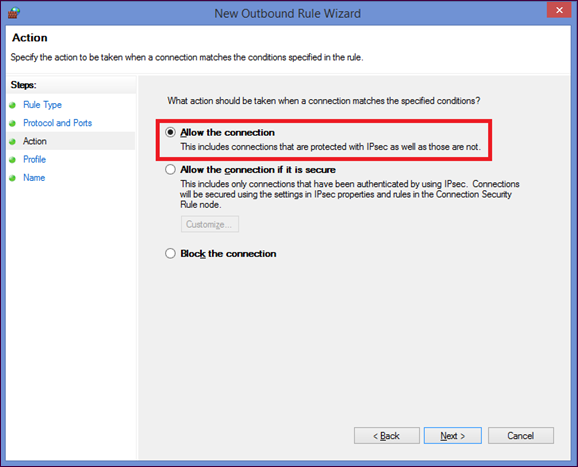
- Select the Allow the connection option.
- Click Next.
- In the Profile screen, select Private, Public, or Domain.
- Click Next.
- In the Name screen, type a name for the rule at Name.
- Click Finish.
Installing new versions
You can check for the new versions of ELIS using the ELIS management console by clicking Check for updates on the left panel in the management console.
Starting ELIS
To install the new versions of ELIS, solutions, or products, go to the ELIS management console and then click Check for updates. The following screen will be displayed. The Check for updates screen allows you to download and update the existing version, and install all the dependencies.

If Exact Lightweight Integration Server on the left panel is clicked, different versions of the ELIS setup file (MSI) will be displayed if the versions or release numbers are greater than the current ELIS version. Click Download under the Action column to download the ELIS setup file (MSI).
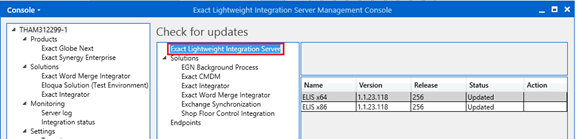
After downloading the setup file (MSI),copy the setup file to ELIS, and run the setup file. The setup file will automatically update the existing installation. Once the installation is successful, the database will be checked and updated if required. After the new version is installed, all your clients, solutions, and other settings will be intact. Once the installation is completed, "Updated" will be displayed under the Status column.
Note:
- The ELIS installer will automatically update the existing version and you do not have to uninstall the existing version. Once ELIS is upgraded, you cannot downgrade it using the older installation files.
- To update the database automatically, the new ELIS version must be installed in the same directory as the existing version.
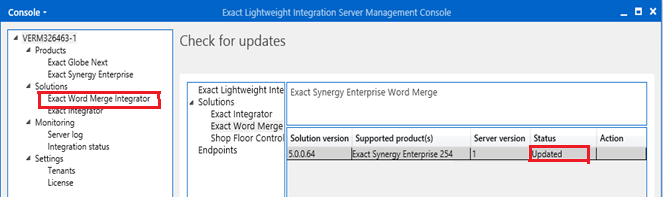
If Solutions on the left panel in the ELIS management console is clicked, different versions of the solution will be displayed with the products that are supported. You can select the various versions of solution required for the installed products and install them. For example, the following screen displays two versions of Exact Integrator that supports different versions of Exact Synergy and Exact Globe.
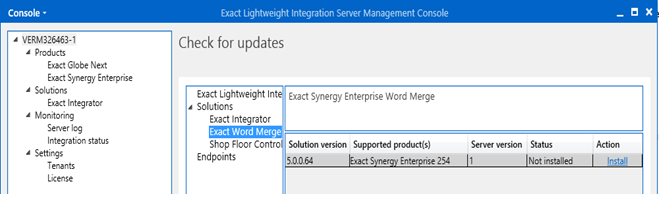
Click Install under the Action column, and the ELIS management console will download and install all the required applications. Once the installation is completed, “Updated” will be displayed under the Status column and the installed application(s) will be displayed on the left panel.
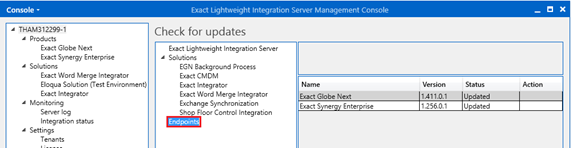
To update or install the product packages(endpoints), click Endpoints under the Packages section in the ELIS management console screen. All the updates with higher versions and new packages that have not been installed will be displayed. Click Install under the Action column to install the products.
Note:
- When you install an update or a new solution, the product packages will also be updated without any warning message. The updates for the product packages will take effect immediately and based on the activation configuration, you have to manually update the configuration or activation.
- After updating the solution, the Internet Information Services (IIS) on the machine that hosts Exact Synergy Enterprise must be restarted.
Related documents
| Main Category: |
Attachments & notes |
Document Type: |
Online help main |
| Category: |
|
Security level: |
All - 0 |
| Sub category: |
|
Document ID: |
26.173.390 |
| Assortment: |
Exact Synergy Enterprise
|
Date: |
25-01-2022 |
| Release: |
254 |
Attachment: |
|
| Disclaimer |