|
|
Exact Expense Management (Exact SRXP) in Exact Lightweight Integration Server (ELIS)
Introduction
Exact Expense Management saves
you time when processing declarations. The solution integrates your Exact
Globe+ company with the mobile app where your employees can submit expenses.
Conditions
To use this solution, you must meet the
following criteria:
Install
and configure the Exact Expense Management solution
When you have defined the
Exact Globe product and client in ELIS, you must install the solution. A
solution ensures that data can be synchronised between the clients.
To install the Exact
Expense Management solution in ELIS, do the following:
- Open
the ELIS management console.
- Connect
to the server.
- In
the ELIS management console, click Console and select Check
for updates from the drop-down menu. The overview of all available
solutions is displayed in the Check for updates section.
- Select
Exact Expense Management.
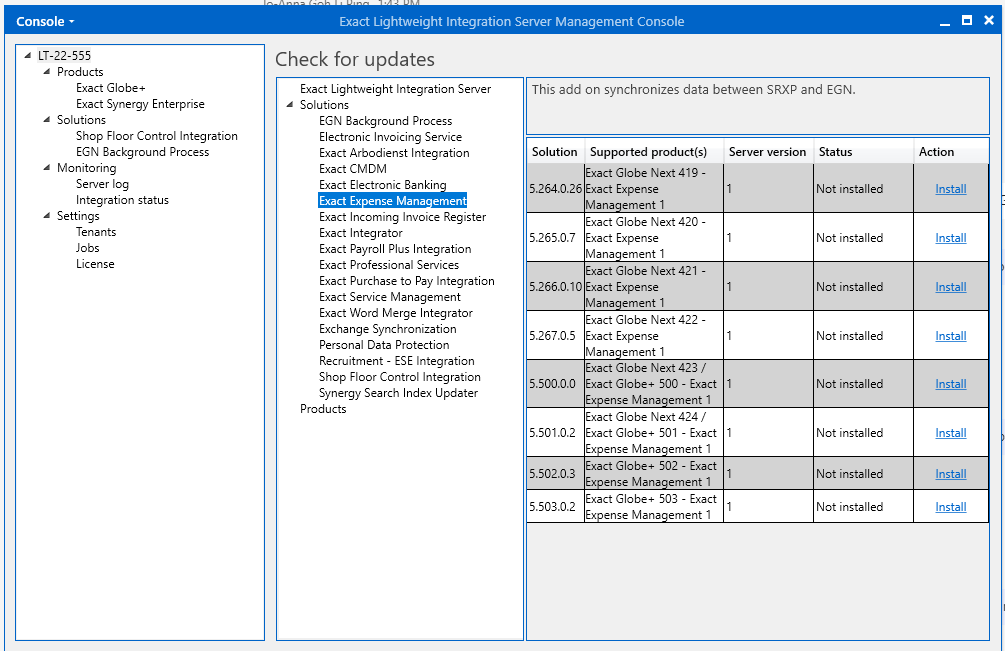
- You
can see the available versions of this solution on the right-hand side of
your screen.
- Click
Install in the Action column of the version you want to
install. The Supported product(s) column displays to which products
the version applies. For example, when you use product update 501 of Exact
Globe+, select the corresponding version, and then click Install. The
left panel displays the Exact Expense Management.
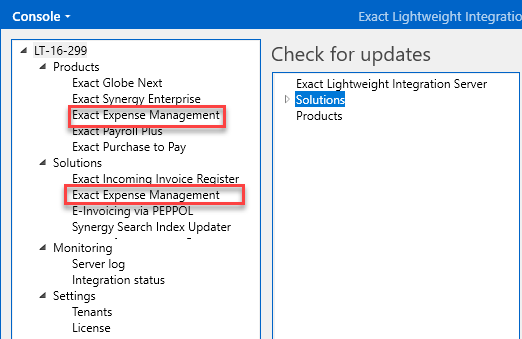
Configure Exact Expense Management
- To configure Exact Expense Management, click Exact Expense Management in the Products
section in the left panel.
- On
the right-hand side of the screen, click Add. You now see the Add
new client screen.
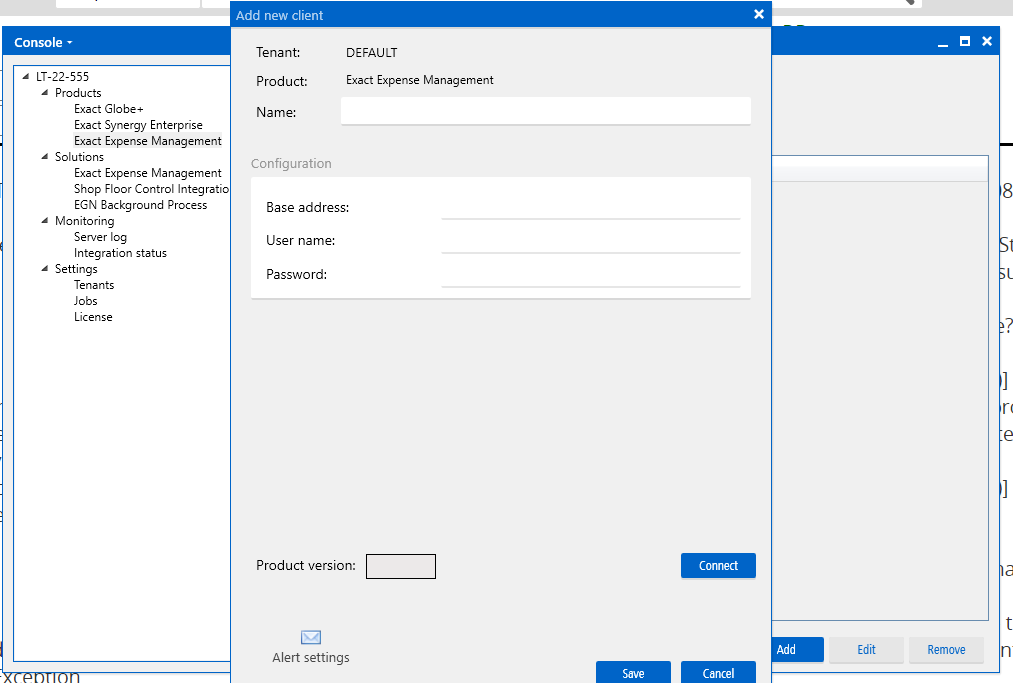
- Define the following:
- Base Address - Enter the URL of the Exact Expense Management
environment followed by /AP/1. For example, https://portal.srxp.com/api/1.
- User name - Enter the user name of the user who has rights to the Exact Expense Management web services. This user must have at least administrator rights in Exact Expense Management.
- Password - Enter the password of the Exact Expense Management environment.
- Click Connect and then Save.
- In the Solutions section of the left
panel, click Exact Expense Management.
- Click
Add on the right-hand side of the screen.
- Select the clients you want to use for this
solution. Select Exact Expense Management and one or more clients for the
Exact Globe+ companies.
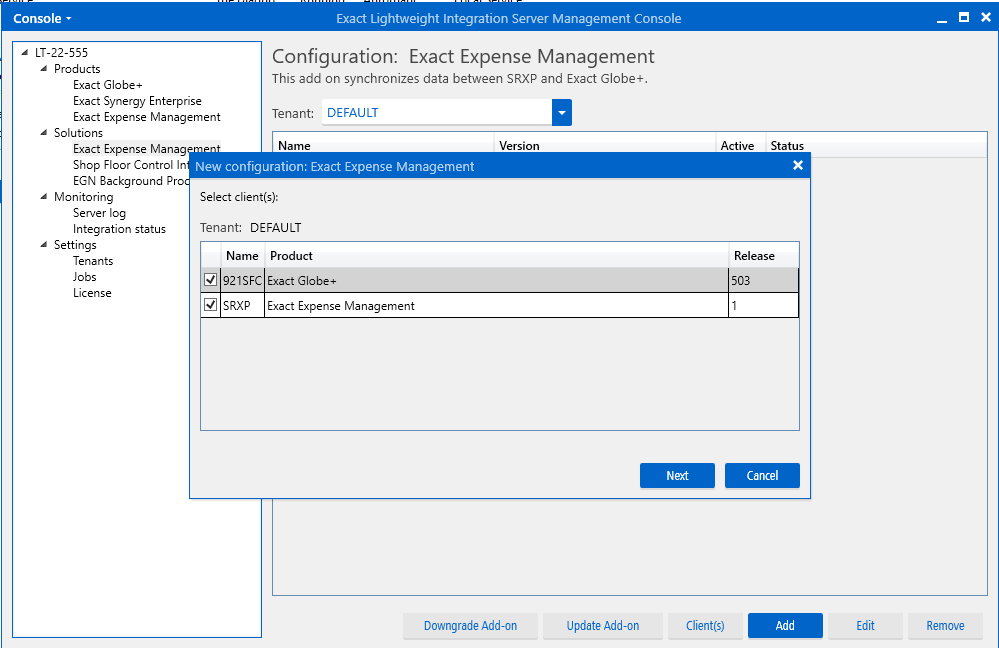
- Click Next. Enter a name and description
for the solution.

Define the following:
- Company
ID - Enter the company ID of the company in Exact
Expense Management. You can find this in Exact Expense Management at Management > Company account > General.
- Export
format ID - Enter the ID of the Globe export format from
Exact Expense Management. You can find this in the Exact Expense
Management. Go to Management > Connections > Export formats.
- Invoice
synchronization status - Select the state of the
expense claim that you want to synchronise to Exact Globe+. If you select
Ready to Export, the system will synchronise the expense claim
with the Ready to Export state to Exact Globe+, and if you select Approved,
the system will synchronise the expense claim with the Approve
state to Exact Globe+.
- Item
Group SRXP Categories - Leave this field blank. This field was used in the older releases but the field is still available for certain situations. If you need to configure this, use the advanced item filter under the Exact Expense Management section in the general settings in Exact Globe+.
- Description
Language - Select the language of the descriptions that
must be synchronised. This applies to languages that are selected in the Descriptions
in list boxes section. Go to System > General > Settings > General settings in Exact Globe+. Description
1, is the first language from Exact Globe+, Description 2, is the second
language from Exact Globe+, etc. This applies to the descriptions of
items, cost centres, VAT codes, and payment conditions.
- Schedule:
repeat task every - Select how often the synchronisation
is repeated.
- Time - Select at what time the synchronisation must be
performed. This schedule is used for synchronising the data between Exact Expense
Management and the Exact Globe+ company. The time is only used when the repeat task is set to once a day.
- Next,
select the Activate now check box to activate the solution
and click Save. You now see a message that requests confirmation about
saving and activating the configuration. Click Yes to continue. For more information about
activating and deactivating solutions, see How-to: Activating and deactivating
solutions for Exact Lightweight Integration Server (ELIS) and How-to: Setting up client endpoints
for Exact Lightweight Integration Server (ELIS).
Synchronised
information
The following information is synchronised. In this paragraph you can read more about it.
- Company data
- Cost centres
- Items
- VAT codes
- Payment conditions
- Financial entries
The entries are synchronised from Exact Expense Management to Exact
Globe+, and the master data mentioned below is synchronised from Exact
Globe+ to Exact Expense Management.
Note: As of release 502SP4, attachments will not be automatically synchronised to Exact Globe+. There will be an option for you to choose if you want the attachments to be synchronised automatically.
Company data
| Exact Globe+ (System > General > Settings > Company data settings)
|
Exact Expense Management (Admin > Company account > Company information)
|
| Company name |
Company name |
| Address line 1 |
Street |
| Postcode |
Zip/postal code |
| City |
City |
| Country code |
Country |
Note:
- Only the synchronisation of updates of company data from Exact Globe+ to Exact Expense
Management is supported.
- Creation or deletion of company data in Exact Expense Management is not synchronised to Exact Globe+.
Cost centres
| Exact Globe+ (System > Finance > Cost centres/units > Cost centers)
|
Exact Expense Management (Admin > User settings > Establishments)
|
| Cost center |
Code |
Description/Foreign languages
* Only one description is synchronised to Exact Expense Management.
|
Establishment* |
Note:
- For
synchronisation to be successful, you must define the Description
language field in the ELIS configuration.
- There
is no immediate change to Establishments in Exact Expense
Management if a cost centre in Exact Globe+ is recoded. The change will be
reflected only after the next edit of a
- Cost center field in Exact Globe+.
- If the status of a cost centre in Exact Globe+ is set to Inactive, the establishment in Exact Expense Management will be deleted.
Items
| Exact Globe+ (Inventory > Items > Maintain)
|
Exact Expense Management (Admin > Expense settings > Categories)
|
|
(GL Code for) Cost of goods sold
|
Code |
|
Item code
|
Category |
Description/Foreign languages
* Only one description is synchronised to Exact Expense Management. |
Description |
| Status |
Active |
| N/A |
Valid for
- During
item creation the default value for this field is Receipt.
- When
you update an existing item that is already synchronised from Exact
Globe+ to Exact Expense Management, the current value is not updated
|
Note:
- There
is no immediate change to the Category in Exact Expense Management
if an Item in Exact Globe+ is recoded. The change is only reflected
after the next edit of an Item field in Exact Globe+.
- The
item group specified in the ELIS configuration must be the same as te item
group that is linked to the items. If these are different, the items will
not be synchronised.
- The
Item code field is only mandatory when an item is to be included in
the purchase entry. When an item doesn’t have to be included in the
purchase entry, it is sufficient to create a category in Exact Expense
Management as long as the same value exists as a GL account in Exact Globe
+.
|
Item status in Exact Globe
|
Item status in Exact Expense Management
|
|
Inactive
|
Deleted
|
|
Blocked
|
Deleted
|
|
Discontinued
|
Deleted
|
|
Future
|
Deleted
|
Note:
- If
the status of an item in Exact Globe+ is updated to Active, this
creates a new category in Exact Expense Management.
VAT codes
| Exact Globe+ (System > General > Countries > Tax codes)
|
Exact Expense Management (Admin > Expense settings > VAT percentages)
|
| VAT code |
Code |
Description/Foreign languages
* Only one description is synchronised to Exact Expense Management. |
Description |
| Percentage |
Percentage |
Note:
- There
is no immediate change to a VAT percentage in Exact Expense
Management if the VAT code in Exact Globe+ is recoded. The
change is only reflected after the next edit of a VAT code
field in Exact Globe+.
- Synchronisation
to Exact Expense Management will only happen if the VAT type
field in Exact Globe+ is specified as Including.
- VAT with
three decimal points and above will be rounded up to two decimals in Exact
Expense Management.
Payment conditions
| Exact Globe+ (System > General > Countries > Payment conditions)
|
Exact Expense Management (Admin > Expense settings > Payment methods)
|
| Payment condition code |
Code |
Description/Foreign languages
* Only one description is synchronised to Exact Expense Management. |
Description |
|
Payment type
* If there are multiple payment terms the system selects the payment type of the first term
|
Payment method
|
|
NA
|
Reimbursement type
- When
you create a new Reimbursement type the default value is 'To receive'
- When
you update an existing payment condition that is already synchronised
from Exact Globe+ to Exact Expense Management the current value is not
updated
|
Note:
- There
is no immediate change to a Payment method in Exact Expense
Management if the Payment condition in Exact Globe+ is recoded. The
change is only reflected after the next edit of a Payment condition
field in Exact Globe+.
- The
synchronisation of payment conditions is only done when you click Save
in the maintenance of the payment condition (so not in the detail screen
of the maintenance of the payment condition).
Financial entries
The following field are synchronised as purchase entry from Exact Expense Management (Submit > New expense) to Exact Globe+:
Exact Expense Management - Report fields
|
Exact Expense Management - Value
|
Exact Globe+
|
| Journal |
Journal number purchase journal Exact Globe+
|
Jrnl.
|
Document date
|
A date field of choice
Preferably the same as the Date field to avoid the creation of balancing lines.
|
Reporting date in the header of the entry, and only the VAT lines in the entry.
|
| Date |
A date field of choice |
Date in the header of the entry |
Report description
|
SRXP **Smart**string
EC SRXP
{{report.account.firstname}} {{report.account.surname}}
For example:
SRXP First Name =
Marc
SRXP Last Name = Sanders
EC SRXP Marc Sanders
|
Description in the header of the purchase entry |
Project code
|
Expense (main) project code |
Project in the header of the purchase entry |
Cost center
|
Reporter establishment code
Admin > User management > Users > {applicable user} |
Cost centre in the header of the purchase entry |
Cost unit
|
Reporter free field or category free field
Admin > User management > Users > {applicable user}
Admin > Expense settings > Categories > {applicable category} |
Cost unit in the header of the purchase entry |
Debit amount
|
Export currency
Expense > Amount |
Debit amount in the header of the purchase entry |
Credit amount
|
Export currency
Expense > Amount |
Credit amount in the header of the purchase entry |
| Currency |
Export currency
Expense > Currency
|
Currency in the header of the purchase entry
This is always exported to Exact Globe+ in EUR with the relevant exchange
rate. The exchange rate is based on the exchange rate in Exact Expense
Management.
|
Exact Expense Management - Expense fields
|
Exact Expense Management - Value
|
Exact Globe+
|
| Date |
A date field of choice
|
Date and reporting date
If the dates in the lines are different from each other, or different from the date in the header, Exact Globe+ will create balancing lines to balance the entry on date. The accruals and prepayments account from the general ledger settings of Exact Globe+ will be used to balance the entry.
|
| Currency |
Export currency
Expense > Currency
|
This will always be exported to Exact Globe+ in EUR with the relevant
exchange rate. The exchange rate is based on the exchange rate in Exact
Expense Management.
|
Cost center
|
Reporter establishment code
Admin > User management > Users > {applicable user} |
Cost centre in the lines of the purchase entry |
Cost unit
|
Reporter free field or category free field
Admin > User management > Users > {applicable user}
Admin > Expense settings > Categories > {applicable category} |
Cost unit in the lines of the purchase entry |
|
Reference |
'SRXP+ReportID+Expense payment condition
For example:
Expense method=Timesheet
ReportID = 4586
SRXP4586-timesheet
|
Your reference in the header of the purchase entry and document
When attachments are synchronized this field is mandatory
|
| Description |
Expense description
|
Description in the lines of the purchase entry |
GL account
|
Expense category code
Admin > Expense settings > Categories > {applicable category} > Code
|
G/L in the lines of the purchase entry
|
Creditor code
|
Reporter Employee/creditor number
Admin > User management > Users > {applicable user} > Employee/creditor number
|
Creditor (creditor number of the employee in Exact Globe+)
|
|
Creditor code ‘no reimbursement’ or ‘to pay’ |
Payment method free field 1
Admin > Expense settings > Payment methods > Free field 1
|
Creditor (creditor number of the credit card company in Exact Globe+) |
| Employee |
Reporter Employee/creditor number
If the employee number in Exact Globe+ is not equal to the creditor number of the employee in Exact Globe+, one of the free fields in the maintenance of the employee in Exact Expense
Management must be used for the employee number.
Admin > User management > Users > {applicable user}
|
Employee (employee number of the employee in Exact Globe+)
|
Payment condition code
|
Expense payment condition code
|
PC (payment condition in the header of the purchase entry)
|
Debit amount
|
Expense amount incl. (export currency) |
Amount in the lines of the purchase entry |
VAT code
|
Expense amount VAT code
|
VAT (VAT code in the lines of the purchase entry)
|
|
- |
(Expense > Amount) - (Expense > VAT amount)
|
VAT basis in the lines of the purchase entry
|
|
Item code |
Expense category name
Admin > Expense settings > Categories > {applicable category}
|
Item code in the lines of the purchase entry
|
|
Item description |
Expense category name
Admin > Expense settings > Categories > {applicable category} |
Item - Description in the lines of the purchase entry |
|
Free text 1
|
Expense currency
|
|
|
Free text 2
|
Expense payment condition code |
|
|
Free text 5
|
Expense ID |
|
Note:
- To ensure the transactions can be synchronised, the export format must be available in Exact Expense Management. You can find the standard export format at Management > Connections > Export formats > Globe. You can further adjust these in Exact
Expense Management according to the required invoice format as long as the
end result is a valid XML file. However, you must set Free text 5
as Expense ID for synchronisation purposes and you must disable the
Mark exported reports as 'Processed' option. You can use the other
fields in the table above as a guideline.
- In
the event where Exact Expense Management records multiple expense claims
with different expense claim types in one report, Exact Globe+ will create
separate purchase invoices per type.
- If
there is an error with the master data during synchronisation, the
unsuccessful expense claim entry will remain in the Approved
status. You must rectify the error before the status can change to Processed.
The error message will be captured in ELIS Integration Console.
- If
an expense claim was submitted using a currency other than EUR, during
synchronisation, Exact Globe+ will create a purchase invoice with the
equivalent value in EUR (according to the exchange rate as recorded in
Exact Expense Management).
- If
an expense is of VND (Non-deductible VAT) VAT type, during
synchronisation, Exact Globe+ will still create a purchase invoice with a
normal VAT line.
- If
an expense claim was submitted with a negative amount (such as to rectify
overcharging), during synchronisation, Exact Globe+ will create an entry
with the negative amount accordingly. If there is more than one expense
claim, the net effect of the total claims will determine the type of
purchase invoice type Exact Globe+ (purchase credit note or purchase
invoice).
- If
an expense claim was recorded with a VAT amount but the Exact Globe+
company doesn’t have VAT enabled, during synchronisation, no
VAT amount entry will be recorded in the purchase invoice of Exact
Globe+.
Note on reopening approved
expense claims that were already successfully synchronised with Exact Globe+:
- If
the purchase invoice in Exact Globe+ is not yet processed, Exact Expense
Management can revise and reject the expense claim and subsequently
resubmit and approve it. During synchronisation, this will cause Exact
Globe+ to recreate the purchase invoice using the same entry number.
- If
the purchase invoice in Exact Globe+ was voided, the expense claim can be
revised and rejected and subsequently resubmitted and approved. During
synchronisation, Exact Globe+ will create a purchase invoice using the
same entry number. The voided purchase invoice will stay in Exact Globe+
separately.
- Reopening
and resubmitting expense claims don’t update the existing purchase invoice
in Exact Globe+ and you will see an error message in ELIS during
synchronisation if the payment for the invoice is processed, a final VAT
return is performed, or the invoice is processed in Exact Globe+.
- The
item field is optional and must only be filled if an item code needs to be
included in the purchase entry.
Migrate
Exact Globe+ master data to Exact Expense Management
When you install the Exact
Expense Management solution, ensure the new and modified information is synchronised. You can use the synchronisation in the general settings in Exact Globe+ administration to synchronise the existing data. The existing data are only activated if the add-on is activated in ELIS.
In the Exact Expense
Management section of the general settings, you can define which master
data you want to synchronise. Use the filter to make your selection. Click the  icon to start the
synchronisation. icon to start the
synchronisation.
Using an SQL statement, you
can select which master data to synchronise from the table and column. This can be up to a maximum of 255
characters.
Example: Only cost centres
that start with “001” have to be synchronised: kstpl.kstplcode like '001%'
After you define the
filter, you must click Save to enable the icon.
If you do not define filter
criteria, the master data is synchronised based on the default criteria. For
more information, see Which information is synchronised?.
Click the
icon to start the
synchronisation. If you close the settings during the synchronisation, the
synchronisation will stop. The synchronisation won't resume when you open the
settings again, so you'll have to restart the synchronisation by clicking
again. The
icon is disabled during the
synchronisation. Once the synchronisation is done, the icon will be enabled again.
Portal usage
Submitting receipt
expenses through the portal
- Log
in to the portal.
- The
inbox is displayed.
- Click
New expense.
- Click
Receipt.
- Select
the picture of the receipt.
- Select
a category.
- Enter
the amount.
- Select
the payment method
- Click
Save.
- The
expense is now added to the inbox.
- (Optional)
Add more expenses.
- Select
one or more expenses and click Add to report and New report
to add the expenses to a report.
- Select
the expenses in the form and click Submit.
- Select
the approver and click Submit.
Submit milage expenses
through the portal
- Log
in to the portal.
- The
inbox is displayed.
- Click
New expense.
- Click
Milage.
- Select
a start and end location to adjust the route.
- Indicate
if it was a return route. You will now see the distance and the amount
that will be reimbursed.
- Click
Save. The expense is now added to the inbox.
- (Optional)
Add more expenses.
- Select
the expenses and click Add to report and New report to add
the expenses to a report.
- Select
the expenses in the form and click Submit.
- Select
the approver and click Submit.
Approving expenses
through the portal
- Log
in to the portal.
- Go
to the form overview.
- Check
if all expenses are complete and correct.
- Click
Approve to Approve the form or click Reject to reject the
form. When you reject a form, you must provide a motivation.
Note: You always reject the entire form
and not just one expense.
| Main Category: |
Attachments & notes |
Document Type: |
Online help main |
| Category: |
|
Security level: |
All - 0 |
| Sub category: |
|
Document ID: |
31.091.911 |
| Assortment: |
Exact Globe+
|
Date: |
18-06-2025 |
| Release: |
419 |
Attachment: |
|
| Disclaimer |
|
|
|